Configuring connections for SSO
To allow administrators to use single-sign on (SSO) to access PingOne Advanced Services and the appropriate admin consoles, configure the connections.
| PingOne Advanced Services version 1.19.1 is required to configure a connection to PingOne. |
Before you begin
Ensure that:
-
Your PingOne environment is provisioned.
-
You have administrator credentials to sign on to the environment.
-
You have the region domain and environment ID for the PingOne Advanced Services environment, which you can get from your Ping Identity team members.
Regardless of which method you choose, you’ll need to complete these steps:
Steps
-
Create custom attributes to authenticate users when they sign on.
-
Create an OIDC application and configure it to connect the PingOne environment to the PingOne Advanced Services environment.
-
Configure the identity provider. There are a variety of ways the identity provider (IdP) can be configured.
Users can be managed:
-
In the same PingOne environment that contains the OIDC application connection to PingOne Advanced Services, which is the default.
-
In a PingOne environment that does not contain the OIDC application connection.
-
By another identity provider who uses OIDC.
-
-
If you have the Postman application, you can validate the configuration by running a Postman collection.
-
Submit a service request to the Support and Professional Services teams to provide them with details regarding the OIDC application and the name that should display when users sign on.
| If users report that they can’t access the admin consoles, see Troubleshooting, which provides step-by-step instructions for troubleshooting the connections. |
Creating custom user attributes
Create custom user attributes that you will use to authenticate users. You can use the P1AS Customer Tenant Configuration Postman collection, or add the attributes manually.
If you’re using Postman
Steps
-
Navigate to the first step in the collection: P1AS Customer Tenant Configuration → Tenant Configuration → Step 1. Create User Custom Attributes.
-
Drag and drop the step into the Run order window.
-
Click Run and determine if issues exist.
If you’re creating the application manually
Steps
-
Go to Applications → Applications.
-
Click the icon.
-
Complete the following fields:
-
Application Name: Enter the name of the application.
-
Description: Enter a meaningful description for the application.
-
Application Type: Select OIDC Web App.
-
-
Click Save.
-
On the Configuration tab, enter the appropriate URL in the Redirect URIs field using the following format:
https://auth.pingone.com/<REGION_ID>/rp/callback/openid_connect
Use the REGION_ID provided by your Ping Identity team members.
-
Click Save.
-
Add an MFA (multi-factor authentication) policy to the application. Learn more in Adding an MFA policy in the PingOne documentation.
Adding this additional layer of security is highly recommended if your users are created and stored in your PingOne environment. If your users are created and stored in an external IdP, we recommend configuring an MFA policy in the third-party OIDC application that is connected to the external IdP. -
On the Attribute Mappings tab, enter the following mappings:
“sub” = “User ID”
“email” = “Email Address”
“familyName” = “Family Name”
“givenName” = “Given Name”
“username” = “Username”
“p1asArgoCDRoles” = “P1AS ArgoCD Roles”
"p1asGrafanaRoles” = “P1AS Grafana Roles”
“p1asOpensearchRoles” = “P1AS Opensearch Roles”
“p1asPingAccessRoles” = “P1AS PingAccess Roles”
“p1asPingFederateRoles” = “P1AS PingFederate Roles”
“p1asPrometheusRoles” = “P1AS Prometheus Roles”
"p1asSelfServiceRoles" = "P1AS Self-Service Roles"
-
Click Save and click the toggle switch to enable the application.
Creating an OIDC application
Now, create an OpenID Connect (OIDC) application and configure it to connect the PingOne environment to the PingOne Advanced Services environment.
You can use the P1AS Customer Tenant Configuration Postman collection, or create the application manually.
If you’re using Postman
Steps
-
Navigate to the second step in the collection: P1AS Customer Tenant Configuration → Tenant Configuration → Step 2. Create OIDC Application.
-
Drag and drop the step into the Run order window.
-
Click Run and determine if issues exist.
-
Add an MFA (multi-factor authentication) policy to the application. For instructions, see Adding an MFA policy in the PingOne documentation.
Adding this additional layer of security is highly recommended if your users are created and stored in your PingOne environment. If your users are created and stored in an external IdP, we recommend configuring an MFA policy in the third-party OIDC application that is connected to the external IdP.
If you’re creating the application manually
Steps
-
Go to Applications → Applications.
-
Click the icon.
-
Complete the following fields:
-
Application Name: Enter the name of the application.
-
Description: Enter a meaningful description for the application.
-
Application Type: Select OIDC Web App.
-
-
Click Save.
-
On the Configuration tab, enter the appropriate URL in the Redirect URIs field using the following format:
https://auth.pingone.com/<REGION_ID>/rp/callback/openid_connect
Use the REGION_ID provided by your Ping Identity team members.
-
Click Save.
-
Add an MFA (multi-factor authentication) policy to the application. Learn more in Adding an MFA policy in the PingOne documentation.
Adding this additional layer of security is highly recommended if your users are created and stored in your PingOne environment. If your users are created and stored in an external IdP, we recommend configuring an MFA policy in the third-party OIDC application that is connected to the external IdP. -
On the Attribute Mappings tab, enter the following mappings:
“sub” = “User ID”
“email” = “Email Address”
“familyName” = “Family Name”
“givenName” = “Given Name”
“username” = “Username”
“p1asArgoCDRoles” = “P1AS ArgoCD Roles”
"p1asGrafanaRoles” = “P1AS Grafana Roles”
“p1asOpensearchRoles” = “P1AS Opensearch Roles”
“p1asPingAccessRoles” = “P1AS PingAccess Roles”
“p1asPingFederateRoles” = “P1AS PingFederate Roles”
“p1asPrometheusRoles” = “P1AS Prometheus Roles”
"p1asSelfServiceRoles" = "P1AS Self-Service Roles"
-
Click Save and click the toggle switch to enable the application.
Configuring the identity provider
There are a variety of ways the identity provider can be configured:
Users are managed in the same environment that contains the OIDC application
In this configuration, which is the default, users are managed in the same environment as the OIDC application, which connects to PingOne Advanced Services, as shown in the diagram.
Network diagram
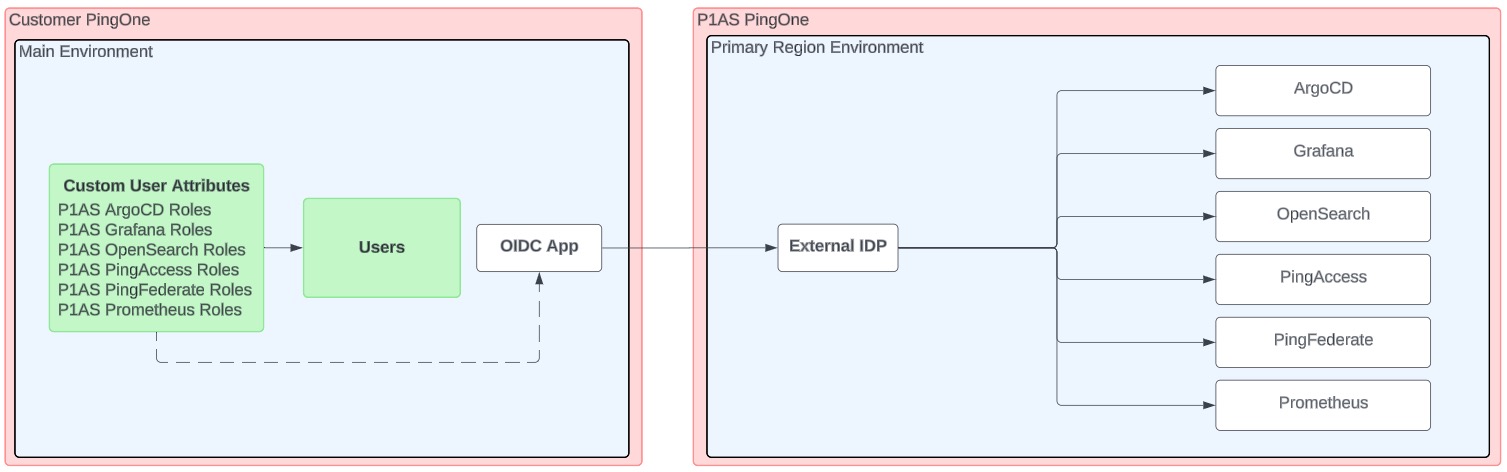
If you have this type of configuration, most of your work is done.
-
First, submit a service request to the Support and Professional Services teams to provide them with details regarding the OIDC application and the name that should display when users sign on.
-
Then, you can begin adding users to this environment and assigning roles. You can find a complete list of PingOne Advanced Services attribute mappings for each administrator role and the permissions each role is assigned in the administrative role mappings.
Users are managed in an environment that does not contain the OIDC application
In this configuration, users are managed in a PingOne environment that does not contain the OIDC application that connects to PingOne Advanced Services, as shown in the diagram.
Network diagram
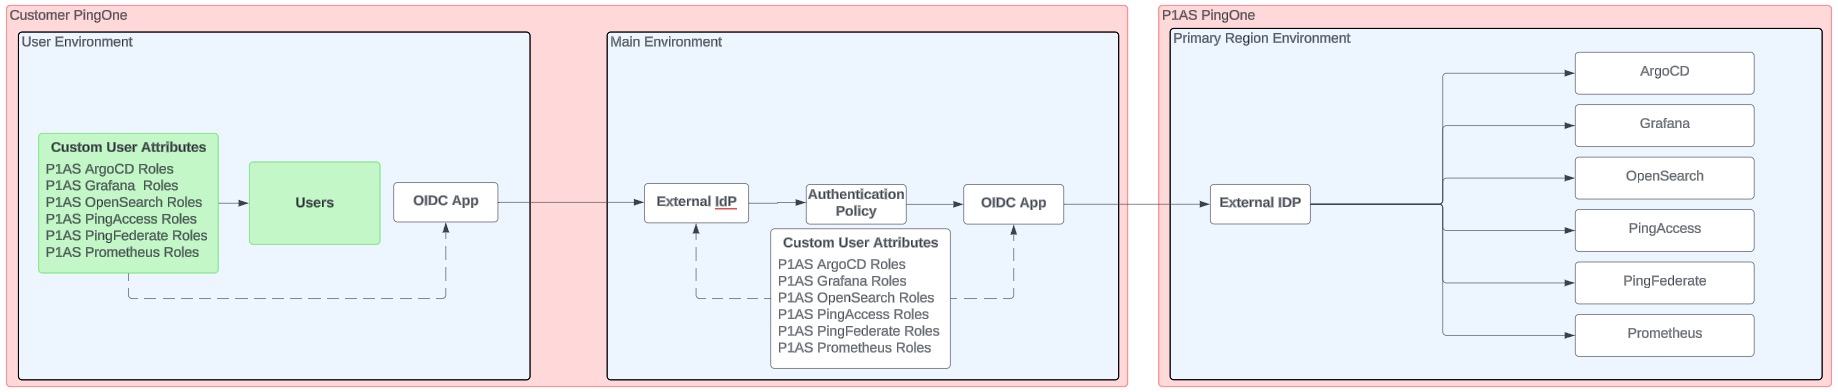
If you have this type of configuration, you need to configure a connection from the environment containing your users to the environment containing the OIDC application that connects to PingOne Advanced Services:
-
Access the PingOne environment that contains your users and complete the steps listed here.
-
Access the PingOne environment that contains the OIDC application, which connects to PingOne Advanced Services, and complete the steps listed here.
-
Access the PingOne environment that contains your users and complete the process.
1. Access the PingOne environment that contains your users
-
Ensure that the custom user attributes are defined, as described in Creating custom user attributes.
-
Create a new OIDC application to connect these environments. Learn how to create this application in Creating an OIDC application.
-
Copy and save the application client ID, client secret, and OIDC Discovery Endpoint URL, which you’ll need to provide in the next task.
2. Access the PingOne environment that contains the OIDC application, which connects to PingOne Advanced Services
-
Access the appropriate PingOne environment.
-
Create an external IdP to configure a connection to the user environment:
-
Go to Integrations → External IdPs.
-
Click Add Provider.
-
Click OpenID Connect.
-
On the Create Profile page, enter the following:
-
Name: A unique identifier for the IdP.
-
Description (optional): A brief description of the IdP.
-
Icon (optional): An image to represent the identity provider. Use a file up to 1 MB in JPG, JPEG, GIF, or PNG format. Use a 90 X 90 pixel image.
-
Login button (optional): An image to use for the login button displayed to the end user. Use a 300 X 42 pixel image.
-
-
Click Continue.
-
Enter the connection and discovery details you copied and saved in step 3 of the previous task:
-
Client ID: Enter the client ID for the OIDC application you just created.
-
Client secret: Enter the client secret generated for the OIDC application.
-
Discovery document URI: Enter the OIDC Discovery Endpoint URL from the OIDC application, and then click Use Discovery document to populate the remaining settings. Learn more in Discovery document URI in the PingOne documentation.
-
-
Click Save and Continue.
-
On the Map Attributes page enter the following mappings:
“Username” = “providerAttributes.username”
“External ID” = “providerAttributes.sub”
“Email” = “providerAttributes.email”
“Family Name” = “providerAttributes.familyName”
“Given Name” = “providerAttributes.givenName”
“P1AS ArgoCD Roles” = “providerAttributes.p1asArgoCDRoles
“P1AS Grafana Roles” = “providerAttributes.p1asGrafanaRoles”
“P1AS Opensearch Roles” = “providerAttributes.p1asOpensearchRoles”
“P1AS PingAccess Roles” = “providerAttributes.p1asPingAccessRoles”
“P1AS PingFederate Roles” = “providerAttributes.p1asPingFederateRoles”
“P1AS Prometheus Roles” = “providerAttributes.p1asPrometheusRoles”
"P1AS Self-Service Roles" = "providerAttributes.p1asSelfServiceRoles"
-
Click Save and Finish.
-
Locate the new external IdP in the list, expand it, and click the Connections tab.
-
Copy and save the Callback URL to use in a later step.
-
Click the toggle switch to enable the application.
-
-
Create an authentication policy for the external IdP:
-
Go to Authentication → Authentication.
-
Click Add Policy.
-
Enter a policy name.
-
From theStep Type list, select External identity provider.
-
From the External identity provider list, select the external provider you just configured and click Save.
-
-
Add the authentication policy to the OIDC application:
-
Go to Applications → Applications, and select the OIDC application you created in the previous step.
-
Select the Policies tab and click Add Policies.
-
Select the authentication policy you created in the previous step and click Save.
-
3. Access the PingOne environment that contains your users
-
Go to Applications → Applications, and select the new OIDC application.
-
Click the Configuration tab and then click the Pencil icon.
-
In the Redirect URIs field, enter the Callback URL you copied and saved in the previous task and click Save.
-
Submit a service request to the Support and Professional Services teams to provide them with details regarding the OIDC application and the name that should display when users sign on.
-
Now, you can begin adding users to this environment and assigning roles. You can find a complete list of PingOne Advanced Services attribute mappings for each administrator role and the permissions each role is assigned in Administrative role mappings.
Users are managed by another identity provider
In this configuration, users are managed in your PingOne environment that does not contain the OIDC application connection, as shown in the diagram.
Network diagram
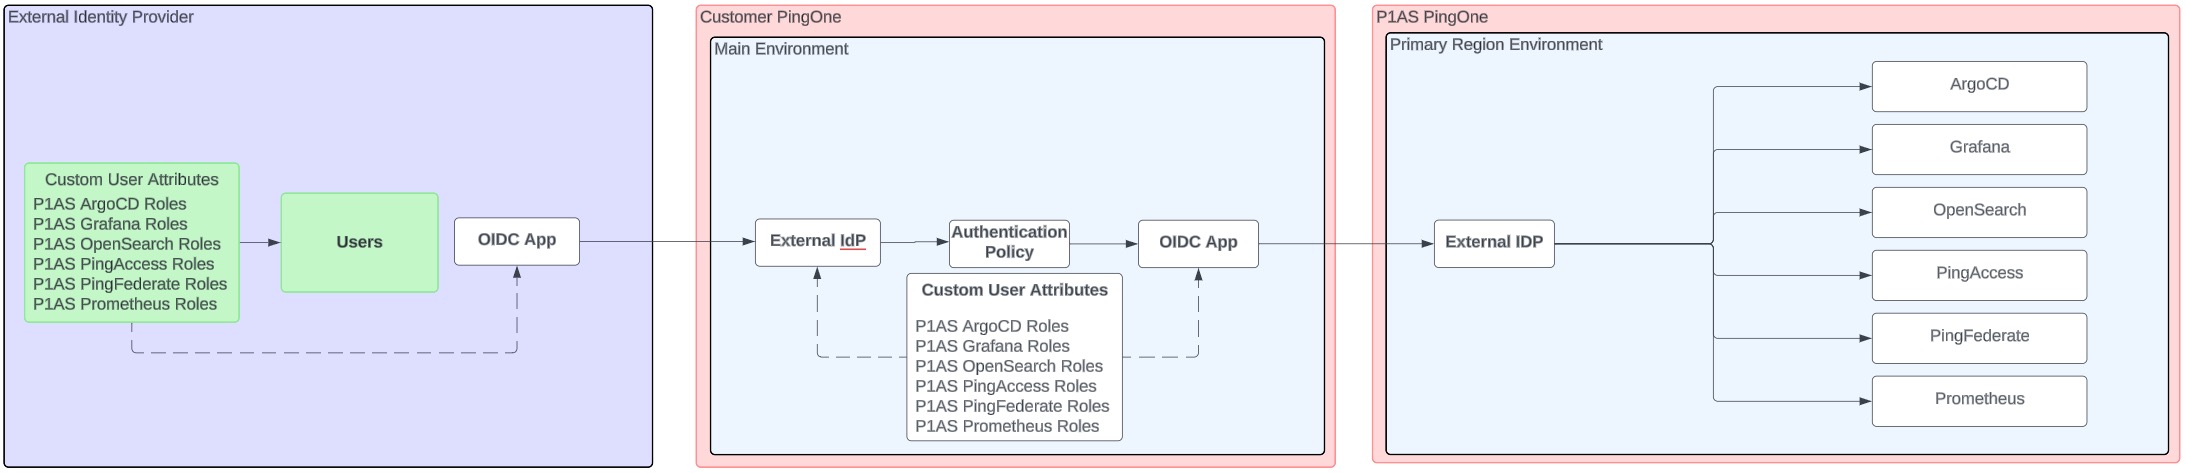
If you have this type of configuration, you need to configure a connection from the external identity provider that manages your users to the PingOne environment that contains the OIDC application that connects PingOne to PingOne Advanced Services.
-
Access the external identity provider environment that contains your users and complete the steps listed here.
-
Access the PingOne environment that contains the OIDC application and complete the steps listed here.
-
Access the external identity provider environment that contains your users and complete the process.
1. Access the external identity provider environment that contains your users
-
Ensure that the custom user attributes are defined as described in Creating custom attributes.
-
Create a new OIDC application to connect these environments.
-
Go to Applications → Applications.
-
Complete the following fields:
-
Application Name: Enter the name of the application.
-
Description: Enter a meaningful description for the application.
-
Application Type: Select OIDC Web App.
-
-
On the Configuration tab, click the Pencil icon, select the following options, and click Save.
-
In the Response Type field, select Code.
-
In the Grant Type field, select Authorization Code.
-
In the Token Auth Method field, select Client Secret Basic.
-
-
Add a multi-factor authentication (MFA) policy to the application. Refer to your external identity provider documentation for instructions on adding an MFA policy.
-
Click the Attribute Mappings tab and enter the following mappings:
“sub” = “User ID”
“email” = “Email Address”
“familyName” = “Family Name”
“givenName” = “Given Name”
“username” = “Username”
“p1asArgoCDRoles” = “P1AS ArgoCD Roles”
“p1asGrafanaRoles” = “P1AS Grafana Roles”
“p1asOpensearchRoles” = “P1AS Opensearch Roles”
“p1asPingAccessRoles” = “P1AS PingAccess Roles”
“p1asPingFederateRoles” = “P1AS PingFederate Roles”
“p1asPrometheusRoles” = “P1AS Prometheus Roles”
"p1asSelfServiceRoles" = "P1AS SelfService Roles"
-
Click the toggle switch to enable the application.
-
Copy and save the application client ID, client secret, and OIDC Discovery Endpoint URL, which you’ll need to provide in the next step.
-
2. Access the PingOne environment that contains the OIDC application
-
Access the appropriate PingOne environment.
-
Create an external IdP to configure a connection to the user environment:
-
Go to Integrations → External IDPs.
-
Click Add Provider.
-
Click OpenID Connect.
-
On the Create Profile page, enter the following:
-
Name: A unique identifier for the IdP.
-
Description (optional): A brief description of the IdP.
-
Icon (optional): An image to represent the identity provider. Use a file up to 1 MB in JPG, JPEG, GIF, or PNG format. Use a 90 X 90 pixel image.
-
Login button (optional): An image to use for the login button displayed to the end user. Use a 300 X 42 pixel image.
-
-
Click Continue.
-
Enter the connection and discovery details you copied and saved in step 2 of the previous task:
-
Client ID: Enter the client ID for the OIDC application you just created.
-
Client secret: Enter the client secret generated for the OIDC application.
-
Discovery document URI: Enter the OIDC Discovery Endpoint URL from the OIDC application, and then click Use Discovery document to populate the remaining settings. Learn more in Discovery document URI in the PingOne documentation.
-
-
Click Save and Continue.
-
On the Map Attributes page enter the following mappings:
“Username” = “providerAttributes.username”
“External ID” = “providerAttributes.sub”
“Email” = “providerAttributes.email”
“Family Name” = “providerAttributes.familyName”
“Given Name” = “providerAttributes.givenName”
“P1AS ArgoCD Roles” = “providerAttributes.p1asArgoCDRoles
“P1AS Grafana Roles” = “providerAttributes.p1asGrafanaRoles”
“P1AS Opensearch Roles” = “providerAttributes.p1asOpensearchRoles”
“P1AS PingAccess Roles” = “providerAttributes.p1asPingAccessRoles”
“P1AS PingFederate Roles” = “providerAttributes.p1asPingFederateRoles”
“P1AS Prometheus Roles” = “providerAttributes.p1asPrometheusRoles”
"P1AS SelfService Roles" = "providerAttributes.p1asSelfServiceRoles"
-
Click Save and Finish.
-
Locate the new external IdP in the list, expand it, and click on the Connections tab.
-
Copy and save the Callback URL to use in a later step
-
Click the toggle switch to enable the application.
-
-
Create an authentication policy for the external IdP:
-
Go to Authentication → Authentication.
-
Click Add Policy.
-
Enter a policy name.
-
From the Step Type list, select External identity provider.
-
From the External identity provider list, select the external provider you just configured and click Save.
-
-
Add an authentication policy to the OIDC application:
-
Go to Applications → Applications, and select the OIDC application you created in the previous step.
-
Select the Policies tab and click Add Policies.
-
Select the authentication policy you created in the previous step and click Save.
-
3. In the external identity provider environment that contains your users
-
Go to Applications → Applications and select the new OIDC application.
-
Click the Configuration tab and then click the Pencil icon.
-
In the Redirect URIs field, enter the Callback URL you copied and saved in the previous task and click Save.
-
Submit a service request to the Support and Professional Services teams to provide them with details regarding the OIDC application and the name that should display when users sign on.
-
Now, you can begin adding users to this environment and assigning roles. You can find a complete list of PingOne Advanced Services attribute mappings for each administrator role and the permissions each role is assigned in Administrative role mappings.
Validating the configuration
If you have Postman, you can validate the configuration by running Postman collections.
To validate the custom user attributes that you created:
-
Navigate to the following folder:
P1AS Customer Tenant Configuration → Tenant Validation → Validate User Attributes
-
Drag and drop the step into the Run order window.
-
Click Run and determine if issues exist.
To validate the OIDC application that you created:
-
Navigate to the following folder:
P1AS Customer Tenant Configuration → Tenant Validation → Validate OIDC application
-
Drag and drop the step into the Run order window.
-
Click Run and determine if issues exist.
Submitting a service request
To complete the connection, submit a service request through the Support Portal.
Steps
-
Complete the following fields:
-
Subject: Enter a description of your request, including the action to be taken.
-
Environment Type: Specify the type of environment affected by this request.
-
Proposed Change Window: Specify the dates or times in which you want the work complete.
-
-
In the Capability list, select Advanced/Other.
-
In the Business Priority list, select the appropriate description:
-
Change needed by deadline to avoid business impact
-
Change modifies existing functionality
-
Change adds new functionality
-
-
In the Description field, provide the following information regarding the OIDC application you created:
-
The Client ID, which displays on the OIDC application Overview page.
-
The Client Secret, which also displays on the OIDC application Overview page.
-
The Issuer URL, which displays on the OIDC application Configuration page, in the URLs section.
-
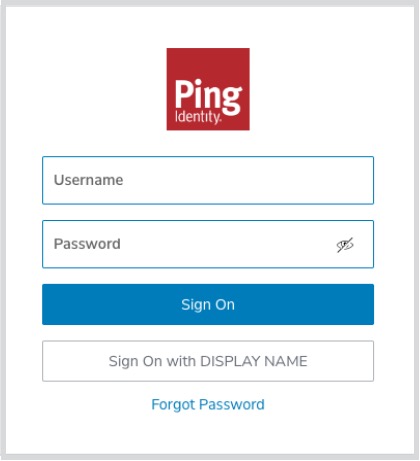
The Display Name, which is the name that you want displayed to your users when they sign on, as shown here.
-
-
If you are tracking your request within your organization, enter the tracking ID or ticket number associated with it in the Customer Tracking ID field.
-
To submit your request, click Save.
Configuring Postman
If you plan to use Postman to configure your connections, you’ll need to ensure that several collection variables are set and that Postman is correctly configured. You’ll also need to download the collection. Learn more in Download the Postman collection.
Steps
-
Add the API domain for your PingOne region to the collection variable apiPath, and then add the auth domain for the region to the collection variable authPath. Learn more in API requests in the PingOne Developers documentation.
-
Get an access token from a worker application. You can use an existing worker application or create a new one.
Either way, ensure that the Environment Admin and Client Application Developer roles are assigned. Learn more in Create an admin Worker app connection in the PingOne Developers documentation.
Then, get the token. Learn more in Get a PingOne admin access token in the PingOne Developers documentation.
To get a token from a different worker application in a different sandbox environment, run the token request endpoint using the client ID and client secret of the worker application to authenticate the request. Learn more in Worker applications in the PingOne Developers documentation.
Add the access token to the collection variable accessToken.
-
Choose the PingOne environment that will act as the OIDC identity provider, which will connect to the PingOne Advanced Services environment.
-
Add the environment ID to the collection variable envID.
-
Request the region domain and environment ID for your primary region from PingOne Advanced Services.
-
Add the auth domain for the PingOne Advanced Services environment to the collection variable p1asAuthPath.
-
Add the environment ID for the PingOne Advanced Services tenant to the collection variable p1asEnvID.
Download the Postman collection
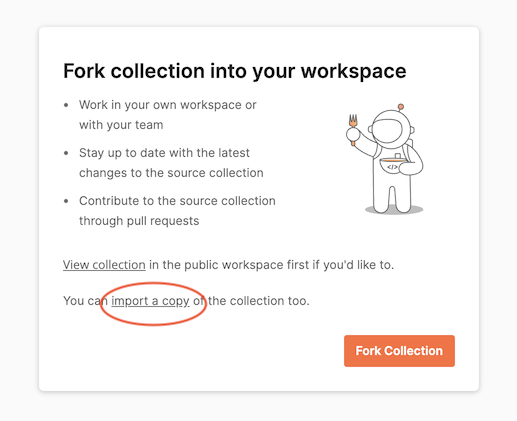
There are two different methods you can use to retrieve a Postman collection into your workspace:
-
Fork the collection into your workspace. The Postman application retains an association between the source and your fork. If Ping Identity changes the source collection, you can pull those changes into the fork in your workspace.
-
Import the collection into your workspace. This is a one-time transfer and retains no association to the source collection.
Steps
To retrieve the collection:
-
Click Run in Postman.
-
At the prompt, click Fork Collection at the bottom of the dialog or click import a copy near the bottom of the dialog.
You must be signed on to your Postman account to retrieve the collection.
-
Follow the on-screen instructions to fork or import the collection. You might be prompted to open your Postman app and to select a Postman workspace for the retrieved collection.
When you fork a Postman collection, you create a copy of it in a different workspace. Forking a collection creates a linked version that synchronizes with its source collection.
You’ll see this synchronization when you click the ellipsis icon on the forked collection. If changes are available, the context menu displays a Pull changes button, which you can click to compare the fork to the source collection and pull changes into your fork. You can also watch the collection so that you are notified when the source changes.
If you import a collection, a copy is created with no link back to the source. The collection is static, which might be useful in some situations. For example, if you intend to keep and consume only portions of the collection, a link back to the source is not needed.
But you don’t have to choose between these two methods. You can fork a copy to track the source and import a copy for experimentation.
The environment downloaded with the collection of requests contains every variable used in the collection. Each request that creates a new object with an ID has a script that:
-
If not available, create an environment variable unique to that service.
-
Assigns the id of the newly created object to that environment variable.
Troubleshooting
If your users are having trouble accessing their admin consoles, determine where the users are managed and complete the appropriate set of steps:
Users are managed in a PingOne environment
If your users are managed in a PingOne environment, test the connection between that environment and the environment containing the OIDC application that connects to PingOne Advanced Services.
About this task
To test this connection, create a test user in the environment and use the new user credentials to sign on to the appropriate console.
Steps
Use Postman to create the test user, or create the user manually.
If you’re using Postman:
-
Navigate to the following step in the collection:
P1AS Customer Tenant Configuration → Troubleshooting → Create Test User to Validate P1AS Connection.
-
Drag and drop the step into the Run order window.
-
Click Run and determine if issues exist.
If you’re creating a test user manually:
-
Ensure that the user is added to the appropriate population and that the appropriate IdP is selected. For instructions, see Adding a user in the PingOne documentation.
-
Assign the user the appropriate roles and user attributes. You can find a complete list of PingOne Advanced Services attribute mappings for each administrator role, and the permissions each role is assigned, in Administrative role mappings.
-
Use the appropriate console URL and the new test user’s credentials to sign on.
If you’re able to sign on, that means that the connection works and the issue likely involves users’ roles, permissions, or the user attributes assigned.
-
If you’re not able to sign on, access the user’s profile and determine if they have the appropriate roles and user attributes assigned.
Users are managed by an external identity provider
If your users are managed by an external identity provider, test the connections between the environments.
About this task
There are two different connections to test:
-
The connection between the environment containing the users and the environment containing the OIDC application. To test this connection, complete the troubleshooting steps outlined in Users are managed in a PingOne environment.
-
The connection between the external IdP and the environment that contains the OIDC application.
To test this connection, attempt to access the admin consoles from the external identity provider:
Steps
-
Get the username and password for the user.
-
Open a browser window and enter the admin console URL.
-
Enter the username and password and click Sign On.
-
If you’re able to sign on, that means that the connection works.
-
If you’re not redirected to the external identity provider, ensure that the authentication policy that the OIDC application is using includes the external identity provider:
-
If you’re using login authentication, ensure that the external identity provider is added as a Presented identity provider. To learn more, see Adding a login authentication step in the [pingone] documentation.
-
If you’re using identifier-first authentication, ensure that the external IdP is added as a rule or as a Presented identity provider. To learn more, see Adding an identifier-first authentication step.
-
If you’re using external identity provider authentication policies, ensure that the external IdP is added as an External identity provider. To learn more, see Adding an external identity provider sign-on step.
-
-
If you receive an error message regarding missing roles:
-
Ensure that the user has the appropriate roles and attributes assigned.
-
Ensure that the custom user attributes are correctly defined and mapped.
-
-
Administrative role mappings
Refer to the following:
Argo CD roles
Argo CD attribute mappings and permissions
| Attribute mapping | Permissions |
|---|---|
argo-configteam |
Argo CD restart statefulset access for the Dev and Test environments. |
Grafana roles
Grafana attribute mappings and permissions
| Attribute mapping | Permissions |
|---|---|
dev-graf-editor |
Grafana editor access for the Dev environment. |
test-graf-editor |
Grafana editor access for the Test environment. |
stage-graf-editor |
Grafana editor access for the Stage environment. |
prod-graf-editor |
Grafana editor access for the Prod environment. |
OpenSearch roles
OpenSearch attribute mappings and permissions
| Attribute mapping | Permissions |
|---|---|
os-configteam |
OpenSearch admin access for all environments. |
PingAccess roles
PingAccess attribute mapping and permissions
| Attribute mapping | Permissions |
|---|---|
dev-pa-admin |
PingAccess admin access for the Dev environment. |
dev-pa-audit |
PingAccess audit access for the Dev environment. |
dev-pa-platform |
PingAccess platform access for the Dev environment. |
test-pa-admin |
PingAccess admin access for the Test environment. |
test-pa-audit |
PingAccess audit access for the Test environment. |
test-pa-platform |
PingAccess platform access for the Test environment. |
stage-pa-admin |
PingAccess admin access for the Stage environment. |
stage-pa-audit |
PingAccess audit access for the Stage environment. |
stage-pa-platform |
PingAccess platform access for the Stage environment. |
prod-pa-admin |
PingAccess admin access for the Prod environment. |
prod-pa-audit |
PingAccess audit access for the Prod environment. |
prod-pa-platform |
PingAccess platform access for the Prod environment. |
PingFederate roles
PingFederate attribute mapping and permissions
| Attribute mapping | Permissions |
|---|---|
dev-pf-audit |
PingFederate audit access for the Dev environment. |
dev-pf-crypto |
PingFederate crypto access for the Dev environment. |
dev-pf-expression |
PingFederate expression access for the Dev environment. |
dev-pf-roleadmin |
PingFederate role admin access for the Dev environment. |
dev-pf-useradmin |
PingFederate user admin access for the Dev environment. |
test-pf-audit |
PingFederate audit access for the Test environment. |
test-pf-crypto |
PingFederate crypto access for the Test environment. |
test-pf-expression |
PingFederate expression access for the Test environment. |
test-pf-roleadmin |
PingFederate role admin access for the Test environment. |
test-pf-useradmin |
PingFederate user admin access for the Test environment. |
stage-pf-audit |
PingFederate audit access for the Stage environment. |
stage-pf-crypto |
PingFederate crypto access for the Stage environment. |
stage-pf-expression |
PingFederate expression access for the Stage environment. |
stage-pf-roleadmin |
PingFederate role admin access for the Stage environment. |
stage-pf-useradmin |
PingFederate user admin access for the Stage environment. |
prod-pf-audit |
PingFederate audit access for the Prod environment. |
prod-pf-crypto |
PingFederate crypto access for the Prod environment. |
prod-pf-expression |
PingFederate expression access for the Prod environment. |
prod-pf-roleadmin |
PingFederate role admin access for the Prod environment. |
prod-pf-useradmin |
PingFederate user admin access for the Prod environment. |
Prometheus roles
Prometheus attribute mapping and permissions
| Attribute mapping | Permissions |
|---|---|
prom |
Prometheus admin access for all environments. |
Self-Service roles
Self-Service attribute mappings and permissions
| Attribute mapping | Permissions |
|---|---|
dev-tls-audit |
TLS read-only access for the Dev environments. |
dev-tls-admin |
TLS admin access for the Dev environment. |
test-tls-audit |
TLS read-only access for the Test environment. |
test-tls-admin |
TLS admin access for the Test environment. |
stage-tls-audit |
TLS read-only access for the Stage environment. |
stage-tls-admin |
TLS admin access in the Stage environment. |
prod-tls-audit |
TLS read-only access for the Prod environment. |
prod-tls-admin |
TLS admin access for the Prod environment. |
all-tls-audit |
TLS read-only audit access for all environments. |
all-tls-admin |
TLS admin access for all environments. |