Enabling third-party identity providers
Self-registration is a streamlined self-service registration process aimed at consumers. It enables users to create their own accounts, then access resources protected by multiple service providers. It provides a more convenient way for users to register.
Users can create a login with a unique username and password during self-registration. You can find detailed information on how to set up this configuration in Setting up self-service registration.
You can also enable users to leverage their existing identities from third-party identity providers during self-registration. Any identity provider (IdP) connection or IdP adapter, such as the LinkedIn IdP Adapter in the LinkedIn Login Integration Kit, can be used as an authentication source for a third-party identity provider.
With this configuration, they can create a login or use their identities from third-party providers during self-registration.
About this task
Use the Administrative console to configure self-registration both with and without enabling third-party IdPs. The tasks are the same for both but some of the steps and values vary. Enabling third-party IdPs includes entering information for the IdP connections or IdP adapter instances to connect with the third-party identity providers.
You set up PingDirectory to connect with PingFederate during PingDirectory installation, create an authentication policy, and configure an HTML Form Adapter instance identically. To enable third-party IdPs, you enter information for the IdP connections or IdP adapter instances to connect with the third-party identity providers when you create a local identity profile and IdP authentication policy.
During self-registration, a user provides an email address, first and last name, password, and, optionally, a mobile phone number. The email address is the user identifier. As specified in the partner agreements, all attributes are sent to the service providers. You have already created a specific object class in the directory to store the user information. The object class name is aPerson and the LDAP attributes are mail, givenName, sn, and mobile.
ACME is a major social network for registration and authentication. It stores user identity information for third-party identity providers. This procedure takes advantage of pre-existing user accounts at ACME. You have already established an IdP connection to this social network from which you receive a set of attributes for each user: SAML_SUBJECT (email address), ssoFirstName, ssoLastName, and ssoMobile.
Configuration tasks
You enable this functionality by mapping the attributes returned by the identity provider to the registration page fields.
You enter this information when you create a local identity profile and IdP authentication policy.
|
If you have set up PingDirectory to connect with PingFederate and created an authentication policy contract, you can skip to step 3 to create a local identity profile that specifies ACME as an authentication source. |
Steps
-
Install PingDirectory. Refer to Installing the PingDirectory Suite of Products in the PingDirectory documentation.
-
Create an authentication policy contract.
-
Go to Authentication > Policies > Policy Contracts.
-
On the Policy Contracts page, click Create New Contract.
-
On the Contract Info tab, enter a name for the authentication policy. Click Next.
-
On the Contract Attributes tab, extend the authentication policy contract by entering the
firstName,lastName,mobileNumber, andSAML_SUBJECT(email address) attributes in the Extend the Contract field.(Optional) You can add other attributes.
-
After each entry, click Add. When you are finished, click Next.
-
On the Summary tab, review your changes.
-
Click Save.
Learn more in Managing policy contracts.
-
-
Create a local identity profile.
-
Go to Authentication > Policies > Local Identity Profiles.
-
Click Create New Profile to access the Local Identity Profile page and configuration wizard.
-
On the Profile Info tab:
-
Enter a name in the Local Identity Profile Name field.
-
Select the authentication policy that you created in step 2.
-
Select the Enable Registration checkbox.
-
Click Next.
-
-
On the Authentication Sources tab:
-
Enter
ACMEin the Authentication Source field.(Optional) You can add additional third-party identity providers in the Authentication Source field.
-
After each entry, click Add.
-
When you are finished, click Next.
Self-registration can support more than one third-party identity providers. support additional third-party identity providers. At runtime, the sign-on page displays them in the order defined on this page.
-
-
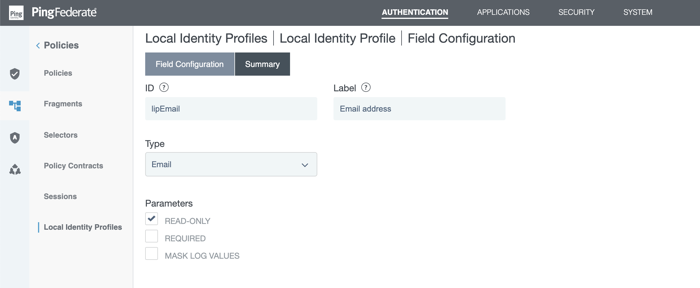
On the Fields tab, define the fields for local identity profiles. Each row in the following table has information for a field.
ID Label Type Parameters lipEmail
Email address
Email
Select the Required checkbox. After you have created this local identity field, click the Unique ID radio button for it.
The Unique ID radio button is located on the Fields tab.
lipFirstName
First name
Text
Select the Required checkbox.
lipLastName
Last name
Text
Select the Required checkbox.
lipMobile
Phone
Phone
None required.

-
Click Create New Field.
-
On the Field Contiguration tab, enter the ID and Label.
-
Select the Type in the list.
-
Select the parameter checkboxes, if required.
-
As needed, select the Mask Log Values checkbox for the local identity field.
-
Select the Mask all OGNL-expression generated log values checkbox.
-
Click Next.
-
Click Done. Repeat the procedure for the next field.
-
After you have entered information for all local identity fields, select the Unique ID radio button for the email field.
-
Click Next.
-
-
On the Email Verification tab, click Next.
-
On the Registration tab, click Next.
-
On the Data Store Configuration tab, click Configure Data Store.
-
Select the LDAP datastore that has been set up to connect to your PingDirectory in the Data Store list. Click Next.
-
On the LDAP Configuration tab, specify the branch of your directory hierarchy where you want PingFederate to store customer identities in the Base DN field and the LDAP attributes to be associated with fields defined in this local identity profile under Attribute.
-
On the Identity Creation tab, define the RDN pattern in the Relative DN Pattern field and select your object, such as class
aPerson, from the Object Class list.The pattern is as follows.
attribute1=value1[, …, attributeN=valueN]To use the
${entryUUID}variable variable to guarantee the uniqueness of the relative DNs for all users, use it with the{entryUUID}LDAP attribute.entryUUID=${entryUUID} -
On the Data Store Mapping tab of the Data Store Configuration page, configure the mapping between the local identity profile fields and datastore attributes for each entry. Refer to the following table for the specific fields and attributes.
Mapping entries for local identity profile fields and datastore attributes Field Data Store Attribute lipEmail
mail
lipFirstName
givenName
lipLastName
sn
lipMobile
mobile
-
On the Summary tab, click Done.
-
On the Summary tab of the local identity profile, click Save.
Learn more in Configuring local identity profiles.
-
-
Configure an HTML Form Adapter instance for customer identities.
If you have set up an HTML Form Adapter instance for customer identities, you can skip to step 5 to create an IdP authentication policy.
-
Go to Authentication > Integration > IdP Adapters.
-
Create a new HTML Form Adapter instance or reuse an existing one by clicking its name.
-
In the Password Credential Validator Instance section on the IdP Adapter tab, add the LDAP Username Password Credential Validator instance that has been set up to validate credentials stored on your PingDirectory.
-
Select the newly created local identity profile in the Local Identity Profile list.
-
Complete the rest of the configuration and save all changes.
Learn more in Configuring the HTML Form Adapter for customer identities.
-
-
Create an IdP authentication policy.
-
Go to Authentication > Policies > Policies.
-
Under Policy, select the HTML Form Adapter instance configured in step 4.
-
Under the Value section, click the drop-down arrow to show the Fail and Success fields.
-
For the Fail path, select Done.
-
For the Success path, select the local identity profile created in step 3. Click Done.
-
-
Click Local Identity Mapping underneath the selected local identity profile, which opens the Inbound Mapping & Contract Fulfillment configuration wizard.
In the next few steps, configure the fulfillment of the authentication policy contract for the scenario where users choose to register directly without going through ACME.
If you know how to set up the inbound mapping and contract fulfillment of an authentication policy contract through a local identity profile shown in Setting up self-service registration, you can skip to step 1 to create a rule for the scenario where users choose to register and subsequently authenticate via ACME.
-
On the Inbound Mapping & Contract Fulfillment Inbound Mapping page, configure the
pf.local.identity.unique.idbuilt-in local identity field for the registration process.At runtime, PingFederate fulfills the value of the
pf.local.identity.unique.idbuilt-in local identity field based on this configuration and passes the value to PingDirectory.PingDirectory uses this value to determine whether such identity has already been created. The
pf.local.identity.unique.idfield value should therefore be mapped from the subject identifier of the preceding authentication source, namely theusernameattribute from the HTML Form Adapter.Configure the Inbound Mapping page as shown in the following table.
Inbound Mapping Fulfillment Source Value pf.local.identity.unique.id
Adapter
username
-
On the Attribute Sources & User Lookup tab, click Next.
-
On the Issuance Criteria tab, click Next.
-
On the Inbound Mapping & Contract Fulfillment > Summary page, click Done.
The Inbound Mapping & Contract Fulfillment configuration wizard returns to the Manage Authentication Policies page.
The remaining steps are specific to configuring the IdP authentication policy to enable users to register and authenticate through the identification information that ACME has for their pre-existing accounts with third-party providers.
-
Click Rules underneath the Success path of the HTML Form Adapter instance.
-
In the Rules dialog box, create a policy path for users who choose to register and authenticate through ACME.
The following table has the attribute name, condition, and value that you will enter.
Authentication policy rules fields and entries Attribute Name Condition Value Result policy.action
equal to
ACME
This value must match the one defined on the Authentication Sources page. See step 3d.
ACME users
The Result field controls the label shown for the policy path of this rule. The value does not need to match the value defined on the Authentication Sources page.
If you have defined multiple third-party identity providers on the Authentication Sources page, you must repeat these steps to add a
policy.actionrule to create a policy path for each.In addition, select the Default to Success checkbox, the default behavior. When selected, the Success path remains, which is important because it enables users to be free to choose whether to register and subsequently authenticate via ACME.
When finished, click Done, which returns you to the Authentication Policies page.
-
For the ACME users path, select the IdP connection to ACME under Action.
You can use any IdP adapter instance or connection that connects to the third-party identity provider.
-
For its Fail path, select Done.
If you have defined multiple third-party identity providers and added rules to create a policy path for each, you can select Restart. The Restart policy action enables users to start over. When triggered, the policy engine routes the requests back to the first checkpoint of the invoked authentication policy.
By selecting Restart for the Fail path, you give users the opportunity to choose another third-party identity provider when they fail to authenticate through ACME.
Undesirable looping behaviors can occur if you select Restart for the Fail path at the root of an authentication policy tree. PingFederate mitigates this risk by automatically limiting the number of policy restarts per transaction.
-
For its Success path, select the local identity profile created in step 3.
-
-
Click Local Identity Mapping underneath the selected IdP connection, which opens the Inbound Mapping & Contract Fulfillment configuration wizard.
-
On the Inbound Mapping & Contract Fulfillment Inbound Mapping page, configure the
pf.local.identity.unique.idbuilt-in local identity field for the registration process and, optionally, other fields so PingFederate can pre-populate values for the additional fields on the registration page.At runtime, PingFederate fulfills the value of the
pf.local.identity.unique.idbuilt-in local identity field based on this configuration and passes the value to PingDirectory. PingDirectory uses this value to determine whether such identity has already been created.Therefore, the
pf.local.identity.unique.idfield value should be mapped from the subject identifier of the preceding authentication source, which is the subject identifier from the IdP connection.Configure the Inbound Mapping page with the information that is in the following table.
Inbound Mapping fields and entries Inbound Mapping Fulfillment Source Value pf.local.identity.unique.id
IdP Connection
SAML_SUBJECT
lipEmail
IdP Connection
SAML_SUBJECT
lipFirstName
IdP Connection
ssoFirstName
lipLastName
IdP Connection
ssoLastName
lipMobile
IdP Connection
ssoMobile
-
On the Attribute Sources & User Lookup tab, click Next.
-
On the Issuance Criteria tab, click Next.
-
On the Inbound Mapping & Contract Fulfillment Summary tab, click Done.
Through the Inbound Mapping & Contract Fulfillment configuration wizard, the Manage Authentication Policies page appears.
If you have defined multiple rules, each forming a policy path for a third-party identity provider, complete the Inbound Mapping & Contract Fulfillment configuration for each.
-
On the Policies tab of the Policies page, select the IdP Authentication Policies checkbox.
Other IdP authentication policies, if any, are enabled as well.
-
Click Save to retain your changes.
-
Result
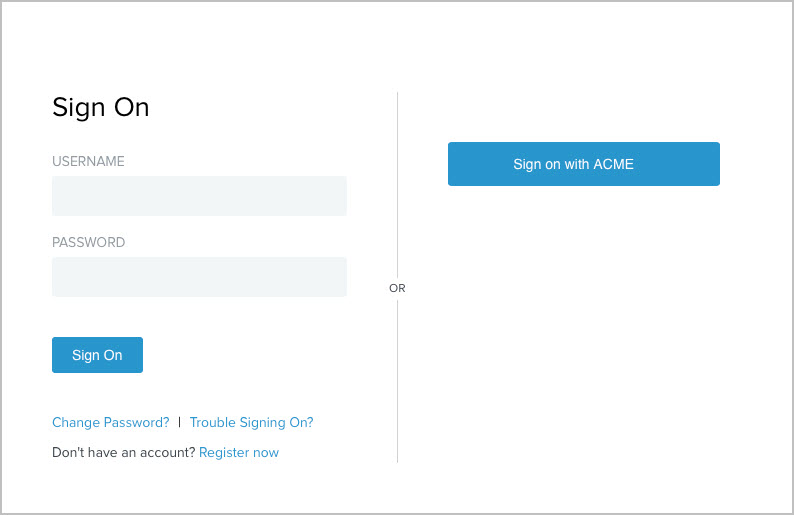
You have successfully set up self-service registration with an option for users to register and subsequently authenticate via ACME. When users sign on through this HTML Form Adapter instance, they have two registration options:
-
Click the Register now link, fill in the registration page, and register.
-
Click the social sign-on link, authenticate through ACME, review the registration page, and register.
Based on the configuration, the following screen capture of a sign-on page appears.

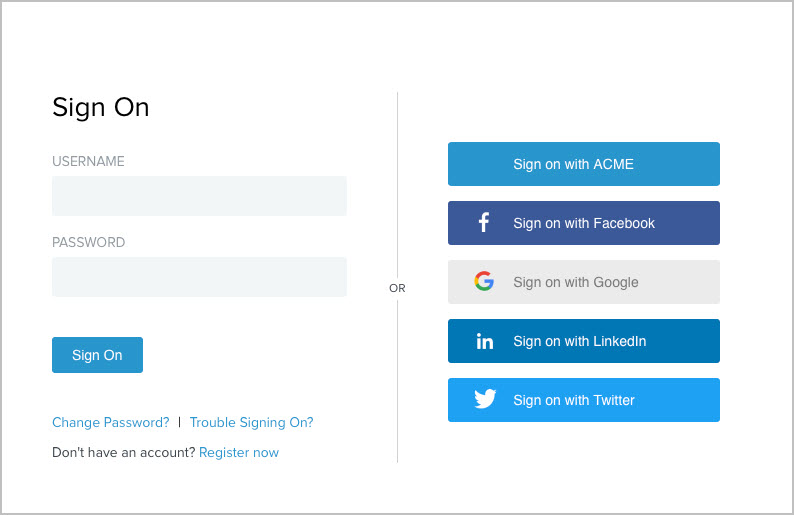
If you have added Facebook, Google, LinkedIn, and Twitter as the authentication sources, the following sign-on page is presented.

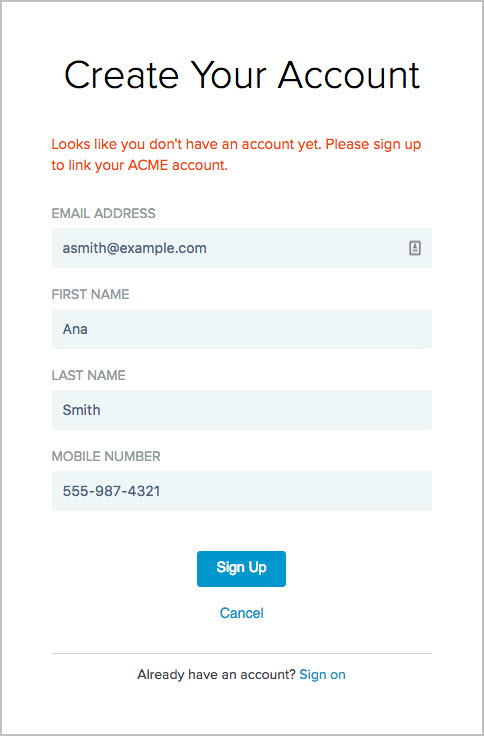
If a user chooses to register through ACME. Once authenticated and redirected back to PingFederate, PingFederate pre-populates the registration page with values it receives from ACME, as illustrated in this screen capture.

This registration option streamlines the self-service registration process.