Configuring federation with SharePoint server
Create a WS-Federation connection, export the signing certificate, add a trusted identity provider to the SharePoint server, and assign the identity provider to the web application.
This document describes how to configure a WS-Federation connection on the PingFederate server to integrate with SharePoint Server 2013 or SharePoint Server 2016.
Creating WS-Federation connection on the PingFederate server
Set up a WS-Federation connection with PingFederate to establish federation with the SharePoint server.
Before you begin
-
Have a fully created and functional Web Application with federated authentication.
Steps
-
Open the PingFederate Admin console.
-
Go to System → Server → Protocol Settings.
-
On the Roles & Protocols tab, select the Enable Service Provider (SP) Role and Support the Followingcheckbox, and then select the WS-Federation checkbox below. Click Save.
-
Go to Identity Provider → SP Connections. Click Create New.
-
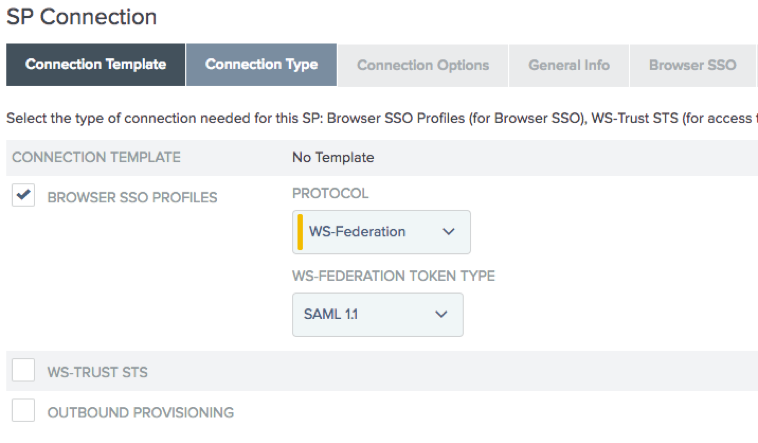
On the Connection Template tab, click Do Not Use a Template for This Connection. Click Next.
-
On the Connection Type tab, select the Browser SSO Profiles checkbox.
-
From the Protocol list, select WS-Federation.
-
From the WS-Federation Token Type list, select SAML 1.1. Click Next.
-
-
On the Connection Options tab, keep the default settings. Click Next.
-
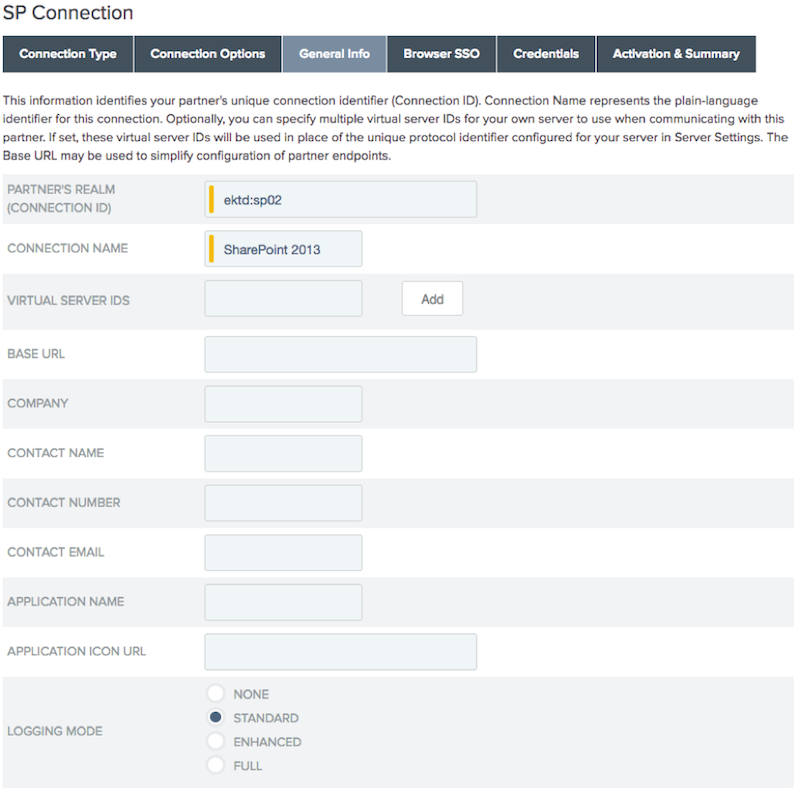
Complete the General Info tab.
-
In the Partner’s Realm (Connection ID) field, enter the partner’s unique connection identifier.
-
In the Connection Name field, enter a name for the connection. Click Next.
The Partner’s Realm can be an arbitrary value.
-
-
On the Browser SSO tab, click Configure Browser SSO.
-
Complete the Assertion Lifetime tab.
-
In the Minutes Before field, enter
15. -
In the Minutes After field, enter
15. Click Next.
-
-
On the Assertion Creation tab, click Configure Assertion Creation.
-
On the Identity Mapping tab, click User Principal Name. Click Next.
Configure the identity claim type on the SharePoint server for different attributes like email address, UPN or common name.
-
Complete the Attribute Contract tab.
-
In the Extend the Contract field, enter
upn. -
From the Attribute Name Format list, select http://schemas.xmlsoap.org/ws/2005/05/identity/claims.
-
Click Add, and then click Next.
The attribute names are case-sensitive. They should match the claim type names configured for the Trusted Identity Provider on the SharePoint server.
-
-
On the Authentication Source Mapping tab, add a mapping of your choice. Choose one of the following options.
Choose from:
-
Map New Adapter Instance
-
Map New Authentication Policy
-
-
Depending on your choice, from the Authentication Policy Contract list select an authentication policy contract, or from the Adapter Instance list select the adapter instance. Click Next.
If you do not have an Authentication Policy Contract or an Adapter Instance created, click Manage Authentication Policy Contracts or Manage Adapter Instance and configure the authentication source mapping as needed.
For more information, see Policy contracts and Manage IdP Adapters in the PingFederate documentation.
-
On the Mapping Method tab, select Retrieve Additional Attributes From Multiple Data Stores Using One Mapping.
Result:
This selection retrieves the UPN value from an LDAP Data Store.
-
On the Attribute Sources & User Lookup tab, click Add Attribute Store and select an existing data store under Active Data Store or create a new one.
For more information, see Data Stores in the PingFederate documentation.
-
On the LDAP Directory Search tab, enter the base DN details in the Base DN field.
-
In the attribute list, add userPrincipalName to the list of attributes returned from search. Click Next.
-
In the Filterfield, enter a name for the filter. Click Next.
-
Click Done.
-
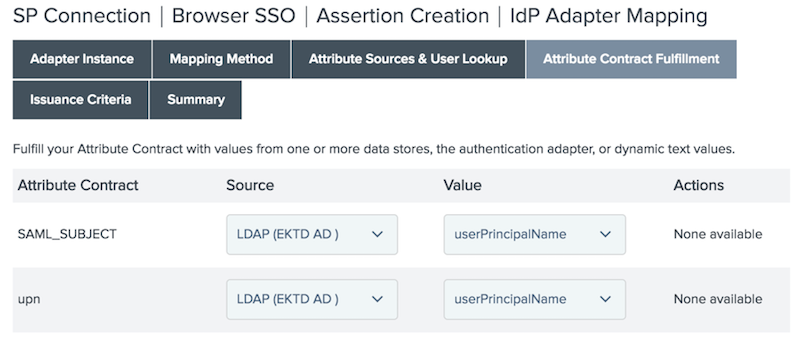
On the Attribute Contract Fulfillment tab, select the attribute contract source from the Source list, and the value from the Value list for each attribute contract. Click Next.
-
If necessary, complete the Issuance Criteria tab. Click Next.
The Issuance Criteria tab is not required to continue.
-
On the Summary tab, review the information and click Done.
-
On the Authentication Source Mapping tab, click Next.
-
On the Summary tab, click Done.
-
On the Assertion Creation tab, click Next.
-
On the Protocol Settings tab, click Configure Protocol Settings.
-
On the Service URL tab, in the Endpoint URL field enter the Endpoint URL. Click Next.
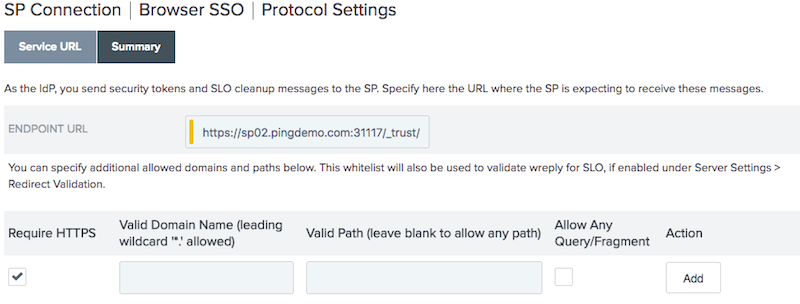
Construct the Endpoint URL by adding
/_trust/at the end of the SharePoint Web Application URL. In order to support multiple web applications on the same connection, see Additional configuration options. -
On the Summary tab, click Done.
-
On the Protocol Settings tab, click Next.
-
On the Summary tab, click Done.
-
On the Browser SSO tab, click Next.
-
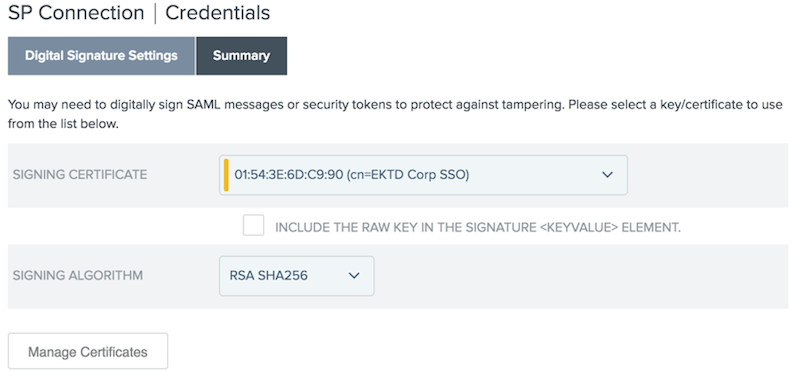
On the Credentials tab, click Configure Credentials.
-
On the Digital Signature Settings tab, from the Signing Certificatelist, select your signing certificate.
-
From the Signing Algorithm list, select the Signing Algorithm. Click Next.
-
On the Summary tab, click Done.
-
On the Credentials tab, click Next.
-
On the Activation & Summary tab, review the connection settings and set the Connection Status to Active. Click Save.
Exporting the signing certificate
Find and export the signing certificate created for the WS-Federation connection on the PingFederate server.
Steps
-
In the PingFederate Admin Console, go to Security → Certificate & Key Management → Signing & Decryption Keys & Certificates.
-
In the row with the previously-created signing certificate for the WS-Federation connection, click Select Action.
-
Click Export.
-
On the Export Certificate tab, click Certificate Only. Click Next.
-
Verify the certificate is correct, and then click Export.
A
.crtfile will be saved in the Downloads folder configured for your browser.
Adding a trusted identity provider to the SharePoint server
Run the following commands in the SharePoint Management Shell to add an identity provider.
Steps
-
Open SharePoint Management Shell.
-
Update the following commands according to your environment and run them one by one. To run the commands as a PowerShell script, add them to a
.pslfile.#Path to the Signing Certificate exported from the PingFederate server. $certpath = "c:\<pf-cert-name>.crt" #Name the PingFederate will be represented within SharePoint as a Trusted Identity Provider (PingFederateSTS was used in this example). $stsname = "<PingFederate_Trusted_Identity_Provider_name>" #Description for PingFederate STS within SharePoint. $stsdesc = "PingFederate Claims Provider" #Entity ID of the SharePoint realm (in our example it is ektd:sp02). $stsrealm = "<SharePoint_Realm_Name>" #PingFederate WS-Federation Endpoint. $signinurl = "https://<PingFederate_host_name_or_FQDN>:<port_number>/idp/prp.wsf" #Importing PingFederate Certificate into SharePoint. $cert = New-Object System.Security.Cryptography.X509Certificates.X509Certificate2("$certpath") New-SPTrustedRootAuthority -Name "PingFederate Token Signing Cert" -Certificate $cert # Defining incoming Claim Types. # Note: It could be more than one incoming claim type specified here. $m1 = New-SPClaimTypeMapping -IncomingClaimType "http://schemas.xmlsoap.org/ws/2005/05/identity/claims/upn" -IncomingClaimTypeDisplayName "UPN" -SameAsIncoming # Creating Trusted Identity Provider New-SPTrustedIdentityTokenIssuer -Name $stsname -Description $stsdesc -Realm $stsrealm -ImportTrustCertificate $cert -ClaimsMappings $m1 -SignInUrl $signinurl -IdentifierClaim $m1.InputClaimType
Assigning the created PingFederate trusted identity provider to the web application
Assign the web application’s authentication providers using the zone name, claims authentication types, and the sign in page redirect URL.
Steps
-
Open SharePoint Central Administration console and go to Application Management → Manage Web Applications.
-
Select the Web Application, and then click Authentication Providers.
-
Click the desired Zone name.
-
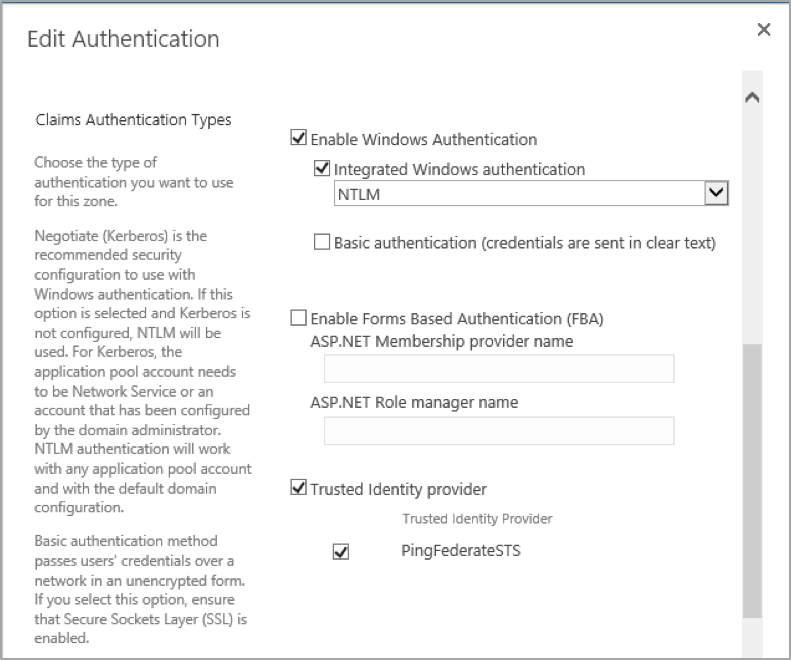
To enable the PingFederateSTS trusted identity provider, go to Claims Authentication Types, and then select PingFederateSTS.
-
Go to Sign In Page URL, and then click Custom Sign In Page.
-
In the Custom Sign In Page field, enter
/_trust/?trust=<PingFederate_Trusted_Identity_Provider_name>.
To automatically redirect users to PingFederate for authentication when other authentication providers are configured, you must enter a destination for Sign In page redirection.
-
Save changes.
Enabling additional configuration options
Use the same service endpoint connection to service all of the web applications hosted on SharePoint Server.
Steps
-
Open the SharePoint Management Shell.
-
To enable the
wreplyparameter for the Trusted Identity Provider, run the following commands.$tit = Get-SPTrustedIdentityTokenIssuer <PingFederate_Trusted_Identity_Provider_Name> $tit.UseWReplyParameter = $true $tit.Update() -
Configure Valid Domain Names.
-
In the PingFederate Admin console, open the connection for your SharePoint server.
-
Go to Protocol Settings → Service URL.
-
In the Valid Domain Name field, enter the domain name.
If you have several web applications with a common domain name, such assales.pingdemo.com or support.pingdemo.com, and if you require extra security, add them to the list. Otherwise, to cover these and future URLs with a similar format, add the domain name with a leading wildcard (*.pingdemo.com).
-
Select the Require HTTPS and Allow Any Query/Fragment checkboxes. Click Add.
-
Click Save.
-