Protecting your VPN with PingID MFA
To improve network security posture and provide a true MFA experience to network resources, add PingID multi-factor authentication (MFA) to your VPN authentication ceremony.
Before you begin
Component
-
PingFederate 10.1
Do the following:
-
Install and configure PingFederate.
-
Install and configure PingID.
-
Enable RADIUS network connectivity between your VPN client and PingFederate.
-
Connect and configure an existing user datastore as a password credential validator (PCV), such as PingDirectory or Active Directory.
About this task
By using the RADIUS protocol, PingFederate works as an on-premise agent to enable MFA into your VPN use cases. The following steps are required to set up and configure a PingID MFA for your VPN.
Steps
-
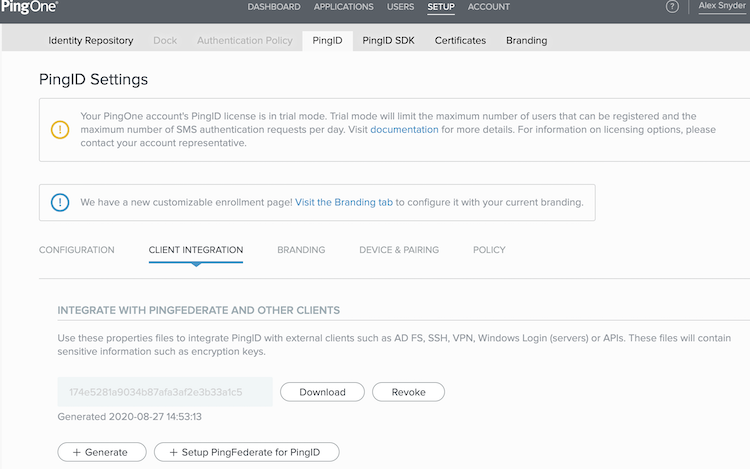
In the PingOne for Enterprise administrative console, go to Setup > PingID > Client Integration > Integration with PingFederate and Other Clients.

-
To receive your
pingid.propertiesfile, click Download.If there are no property files available and you need to generate one, click the Generate button and then click Download.
-
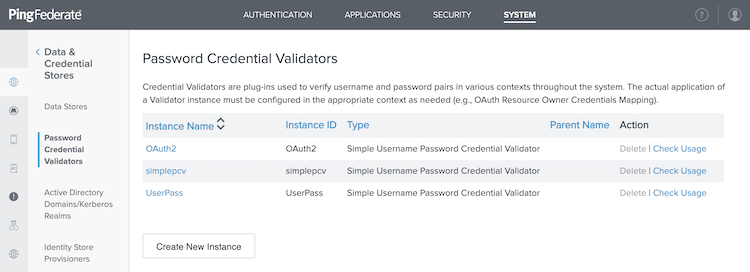
In the PingFederate administrative console, go to System > Data & Credential Stores > Password Credential Validators.

-
Click Create New Instance.
-
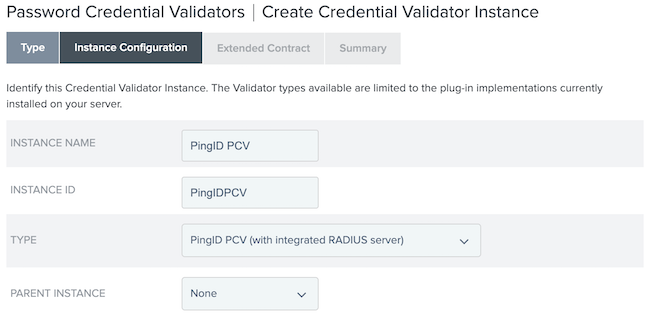
On the Type tab, configure the fields:
-
In the Instance Name field, enter an instance name.
-
In the Instance ID field, enter an instance ID.
-
From the Type list, select PingID PCV (with integrated RADIUS server).
-
Click Next.

-
-
On the Instance Configuration tab, click Add a new row to 'RADIUS Clients'.
-
In the Client IP field, enter a client IP address to match your RADIUS client.
-
In the Client Shared Secret field, enter a shared secret to match your RADIUS client.
-
To complete the client configuration, click Update.
Repeat step 6 for any additional RADIUS clients.
-
-
Click Add a new row to 'Delegate PCV’s'.
-
From the Delegate PCV list, select the primary user datastore you want RADIUS clients to authenticate against.
-
To complete the configuration, click Update.
Repeat step 7 for any additional PCVs.
-
-
In the PingID Properties File field, paste the
pingid.propertiesfile you downloaded from PingID in step 2.
-
In the Authentication During Errors field, select the appropriate authentication behavior when PingID services are unavailable.
Choose from:
-
Bypass User
-
Block User
-
Passive Offline Authentication
-
Enforce Offline Authentication
-
-
In the Users Without a Paired Device field, select whether to bypass or block the user when PingID services are unavailable.
-
Complete any remaining fields. Click Next.
-
Click Next and Done.
-
Click Save.
Next steps
Perform the RADIUS client test to verify and ensure the authentication ceremony works properly.