Part 3. Running a client sample app
In this section you configure one of the OIDC (centralized login) sample apps to test out your custom UI.
Running the JavaScript sample OIDC client app
-
In a JavaScript-capable IDE, open the
sdk-sample-appsfolder you downloaded earlier. -
Open the
/javascript/central-login-oidcsample. -
Edit the values in the
.env.samplefile to match your environment:-
In SCOPE, enter the list of scopes to request are present in the issued OAuth 2.0 token.
For example,
"openid profile email phone address" -
In WEB_OAUTH_CLIENT, enter the client ID of the OAuth 2.0 client you configured earlier.
For example,
sdkCustomUI -
In WELL_KNOWN, enter the
.well-knownURL of the realm in which you created the OAuth 2.0 client.How do I find my PingOne Advanced Identity Cloud
.well-knownURL?You can view the
.well-knownendpoint for an OAuth 2.0 client in the PingOne Advanced Identity Cloud admin console:-
Log in to your PingOne Advanced Identity Cloud administration console.
-
Click Applications, and then select the OAuth 2.0 client you created earlier. For example, sdkPublicClient.
-
On the Sign On tab, in the Client Credentials section, copy the Discovery URI value.
How do I find my PingAM
.well-knownURL?To form the
.well-knownURL for an PingAM server, concatenate the following information into a single URL:-
The base URL of the PingAM component of your deployment, including the port number and deployment path.
For example,
https://openam.example.com:8443/openam -
The string
/oauth2 -
The hierarchy of the realm that contains the OAuth 2.0 client.
You must specify the entire hierarchy of the realm, starting at the Top Level Realm. Prefix each realm in the hierarchy with the
realms/keyword.For example,
/realms/root/realms/customersIf you omit the realm hierarchy, the top level
ROOTrealm is used by default. -
The string
/.well-known/openid-configuration
-
The result will resemble the following:
Example.env.examplefileSCOPE="openid profile email phone address" TIMEOUT=1000 WEB_OAUTH_CLIENT=sdkCustomUI WELL_KNOWN=https://openam-docs-regular.forgeblocks.com/am/oauth2/alpha/.well-known/openid-configuration SERVER_TYPE=AIC -
-
Save the file as
.envin the same folder. -
Edit the
webpack.config.jsfile.-
In the
devServersection, add the DNS alias you created earlier, for examplesdkapp.example.comin a newallowedHostsproperty:devServer: { port: 8443, host: 'localhost', allowedHosts: 'sdkapp.example.com', … }
-
-
From the
/javascriptfolder, run the central login OIDC sample app as follows:cd javascript npm run start:central-login-oidcWebpack compiles the code and serves it on the local IP address of your computer.
Try it out
To test that your custom UI app is acting as the centralized login pages, perform the following steps.
-
In a browser, open the local IP address of your computer, with the port number you edited earlier.
For example,
https://sdkapp.example.com:8443 -
As the custom UI sample app is running on a self-signed SSL certificate on your local IP address, your browser might display a warning message.
You can ignore this warning for this tutorial:
-
In Chrome, click Advanced and then click Proceed to sdkapp.example.com (unsafe).
-
In Firefox, click Advanced and then click Accept the risk and continue.
-
In Safari, click Show Details and then click visit this website.
The sample OIDC login app displays Login and Force Renew buttons:
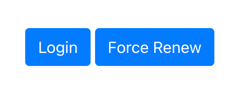 Figure 1. JavaScript OIDC sample app showing Login and Force Renew buttons.
 -
-
Click the Login button.
The client app connects to the OAuth 2.0 client you created earlier, and is redirected to the custom UI sample running on your local computer.
The URL contains a
gotoparameter that contains the URL that the UI sample app redirects to after successful authentication. That URL will be theauthorizeendpoint of your authorization server. -
Enter the credentials of a known user, and then click Sign In.
-
If authentication is successful, the custom UI app redirects the browser to the
gotoURL, which points to your authorization server. The authorization server redirects back to your client app with the necessarycodeparameter. -
The sample client app uses the
codeparameter to contact the authorization serveraccess_tokenendpoint to obtain the OAuth 2.0 access and ID tokens. -
Using the access token as a bearer token, the sample app calls the
userinfoendpoint and displays them on the page: Figure 2. Userinfo of the authenticated user.
-
Running the Android sample OIDC client app
-
In Android Studio, open the
/android/kotlin-central-login-oidcsample from the repo you downloaded earlier. -
Edit the app > kotlin+java >
Config.ktfile to match your environment:-
In discoveryEndpoint, enter the
.well-knownURI of the realm in which you created the OAuth 2.0 client.How do I find my PingOne Advanced Identity Cloud
.well-knownURL?You can view the
.well-knownendpoint for an OAuth 2.0 client in the PingOne Advanced Identity Cloud admin console:-
Log in to your PingAM administration console.
-
Click Applications, and then select the OAuth 2.0 client you created earlier. For example, sdkPublicClient.
-
On the Sign On tab, in the Client Credentials section, copy the Discovery URI value.
How do I find my PingAM
.well-knownURL?To form the
.well-knownURL for an PingAM server, concatenate the following information into a single URL:-
The base URL of the PingAM component of your deployment, including the port number and deployment path.
For example,
https://openam.example.com:8443/openam -
The string
/oauth2 -
The hierarchy of the realm that contains the OAuth 2.0 client.
You must specify the entire hierarchy of the realm, starting at the Top Level Realm. Prefix each realm in the hierarchy with the
realms/keyword.For example,
/realms/root/realms/customersIf you omit the realm hierarchy, the top level
ROOTrealm is used by default. -
The string
/.well-known/openid-configuration
-
-
In oauthClientId, enter the client ID of the OAuth 2.0 client you configured earlier.
For example,
sdkCustomUI -
In oauthRedirectUri, enter the redirect URI you configured in the OAuth 2.0 client.
For example,
org.forgerock.demo://oauth2redirect -
In cookieName, enter the name of the cookie your authorization server uses to store session tokens on the client.
For example, PingAM servers use
iPlanetDirectoryProHow do I find my PingOne Advanced Identity Cloud cookie name?
To locate the cookie name in an PingOne Advanced Identity Cloud tenant:
-
Navigate to Tenant settings > Global Settings
-
Copy the value of the Cookie property.
-
-
In oauthScope, enter the list of scopes to request are present in the issued OAuth 2.0 token.
For example,
openid profile email phone address
The result will resemble the following:
data class PingConfig( var discoveryEndpoint: String = "https://openam-forgerock-sdks.forgeblocks.com/am/oauth2/realms/alpha/.well-known/openid-configuration", var oauthClientId: String = "sdkCustomUI", var oauthRedirectUri: String = "org.forgerock.demo://oauth2redirect", var oauthSignOutRedirectUri: String = "", var cookieName: String = "ch15fefc5407912", var oauthScope: String = "openid profile email phone address" ) -
-
Save your changes.
Try it out
To test that your custom UI app is acting as the centralized login pages, perform the following steps.
-
In Android Studio, on the Run menu, select Run 'ping-oidc.app'.
Android Studio compiles and launches the app in either your connected device or a simulator, and displays the configuration you entered earlier:
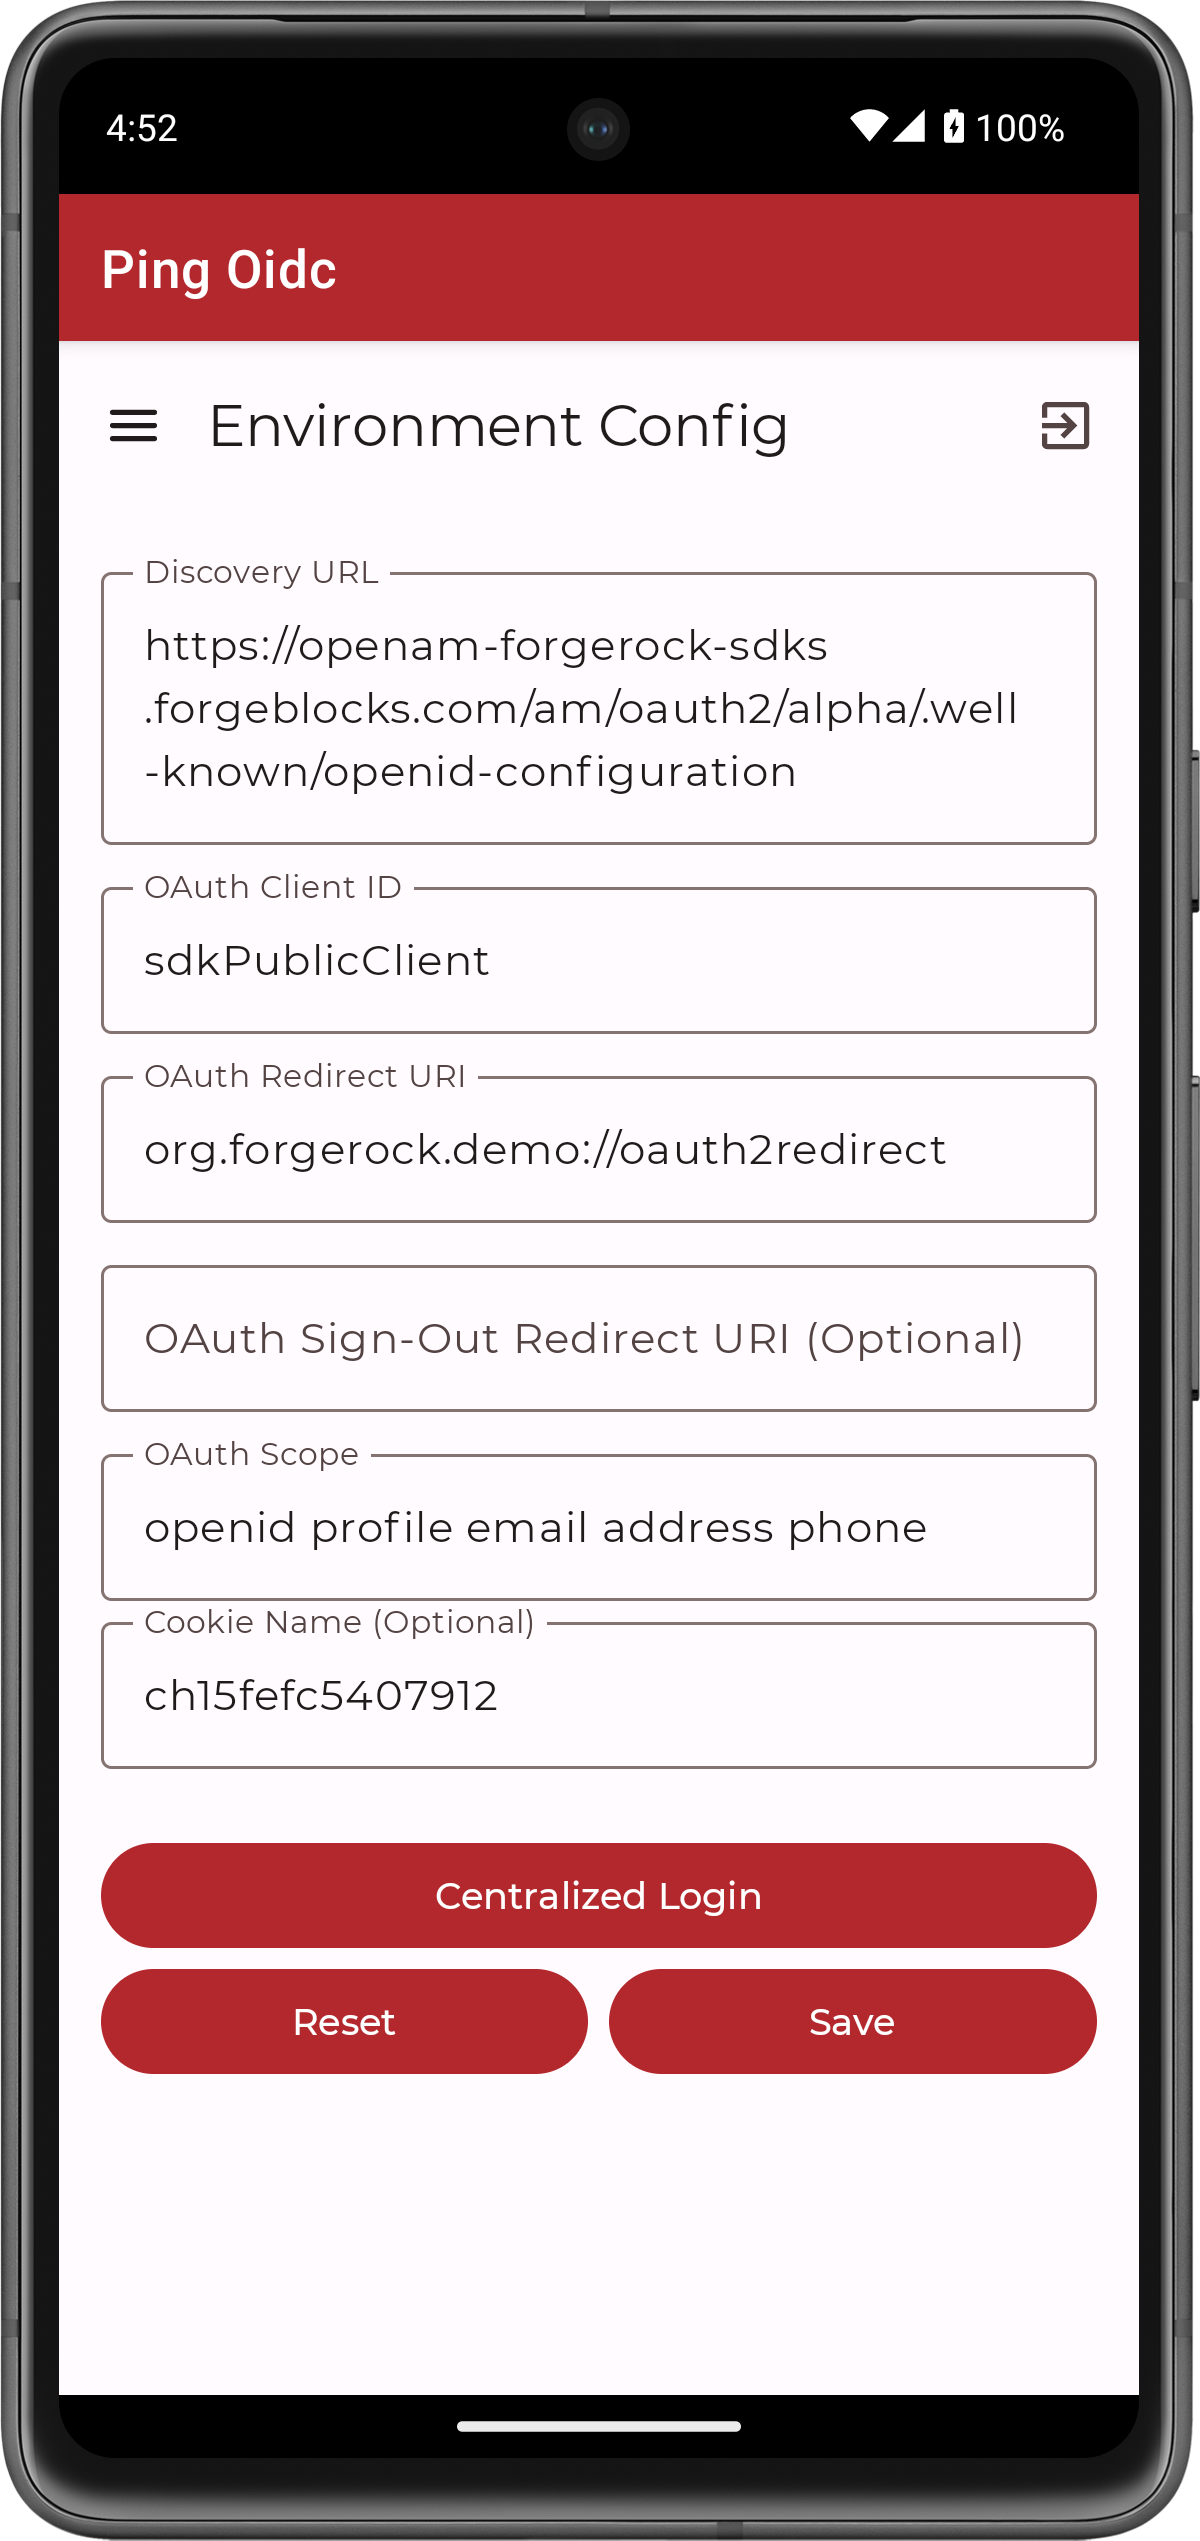 Figure 3. Android sample app showing the configuration.
You can alter the values in the app if required.
-
Click Centralized Login.
-
As the custom UI sample app is running on a self-signed SSL certificate on your local IP address, your browser might display a warning message.
You can ignore this warning for this tutorial:
-
In Chrome, click Advanced and then click Proceed to 192.168.0.35 (unsafe).
-
In Firefox, click Advanced and then click Accept the risk and continue.
The client app connects to the OAuth 2.0 client you created earlier, and is redirected to the custom UI sample running on your local computer.
The URL contains a
gotoparameter that contains the URL that the UI sample app redirects to after successful authentication. That URL will be theauthorizeendpoint of your authorization server. -
-
Enter the credentials of a known user, and then click Sign In.
-
If authentication is successful, the custom UI app redirects the browser to the
gotoURL, which points to your authorization server. The authorization server redirects back to your client app with the necessarycodeparameter. -
The sample client app uses the
codeparameter to contact the authorization serveraccess_tokenendpoint to obtain the OAuth 2.0 access and ID tokens: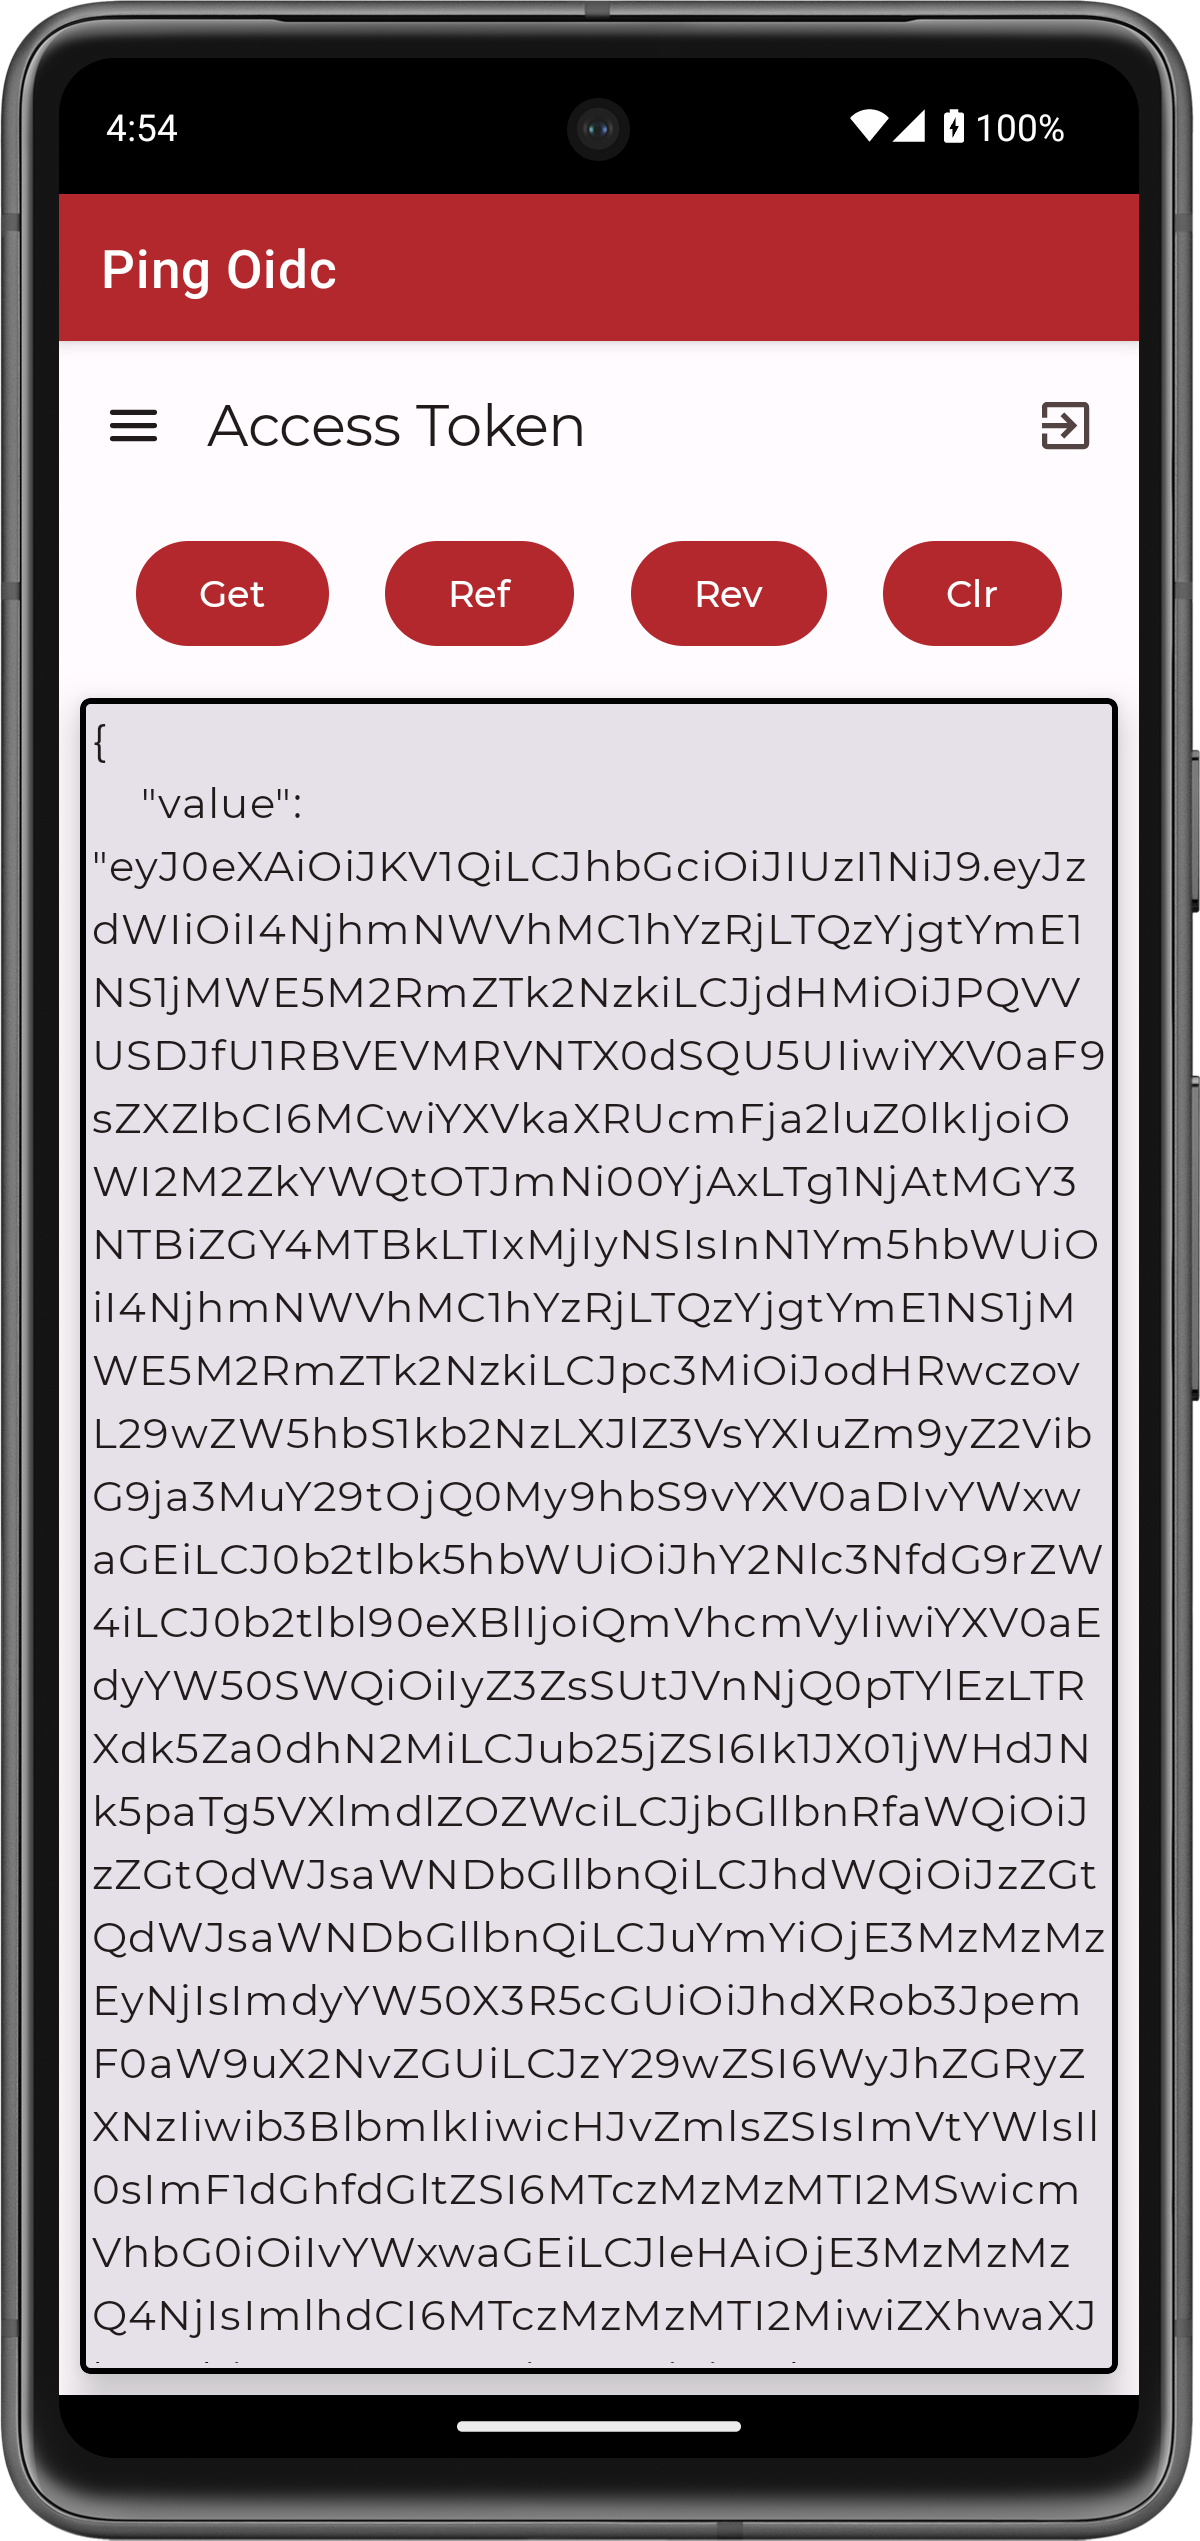 Figure 4. Android OIDC sample app showing the access and ID tokens.
 -
Tap the menu icon (), and then tap User Profile:
The OIDC sample app uses the access token as a bearer token and calls the
userinfoendpoint, displaying the result: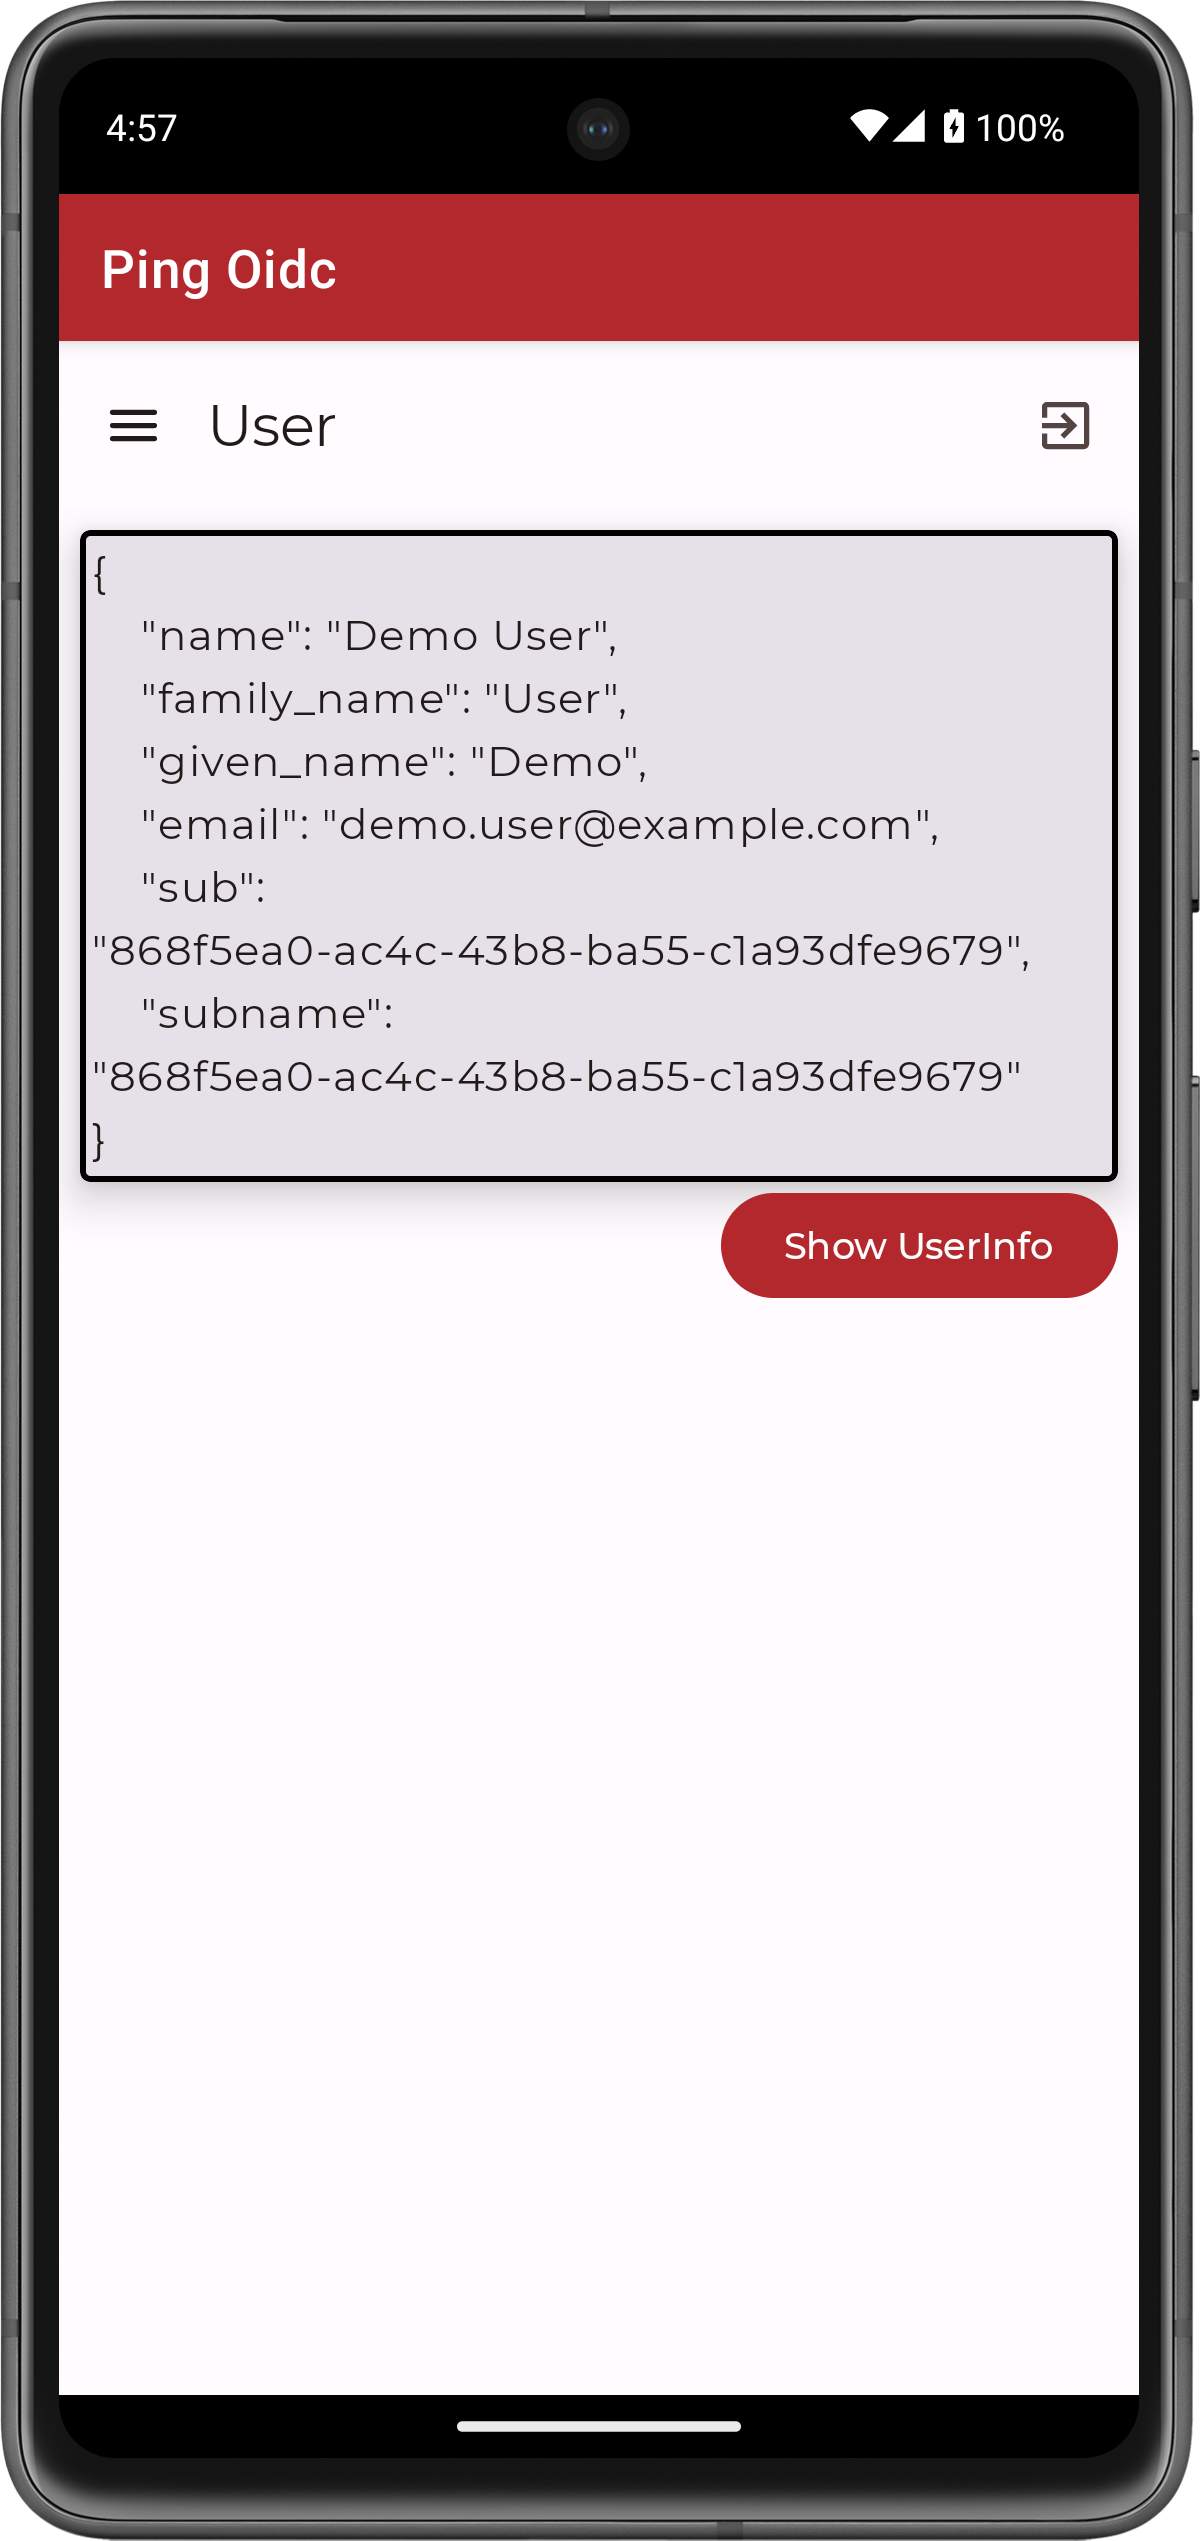 Figure 5. Userinfo of the authenticated user.
-
Running the iOS sample OIDC client app
-
In Xcode, in the
sdk-sample-appsfolder you cloned in the previous step, open theiOS>swiftui-oidc>PingExample>PingExample.xcodeprojfile. -
Locate the
ConfigurationViewModelfunction which contains placeholder configuration properties.The function is commented with //TODO:in the source to make it easier to locate.return ConfigurationViewModel( clientId: "[CLIENT ID]", scopes: ["openid", "email", "address", "phone", "profile"], redirectUri: "[REDIRECT URI]", signOutUri: "[SIGN OUT URI]", discoveryEndpoint: "[DISCOVERY ENDPOINT URL]", environment: "[ENVIRONMENT - EITHER AIC OR PingOne]", cookieName: "[COOKIE NAME - OPTIONAL (Applicable for AIC only)]", browserSeletorType: .authSession )-
In clientId, enter the client ID of the OAuth 2.0 client you configured earlier.
For example,
sdkCustomUI -
In scopes, enter an array of scopes to request are present in the issued OAuth 2.0 token.
For example,
["openid","profile","email","address","phone"] -
In redirectUri and signOutUri, enter the redirect URI you configured in the OAuth 2.0 client.
For example,
org.forgerock.demo://oauth2redirect -
In discoveryEndpoint, enter the
.well-knownURI of the realm in which you created the OAuth 2.0 client.How do I find my PingOne Advanced Identity Cloud
.well-knownURL?You can view the
.well-knownendpoint for an OAuth 2.0 client in the PingOne Advanced Identity Cloud admin console:-
Log in to your PingAM administration console.
-
Click Applications, and then select the OAuth 2.0 client you created earlier. For example, sdkPublicClient.
-
On the Sign On tab, in the Client Credentials section, copy the Discovery URI value.
How do I find my PingAM
.well-knownURL?To form the
.well-knownURL for an PingAM server, concatenate the following information into a single URL:-
The base URL of the PingAM component of your deployment, including the port number and deployment path.
For example,
https://openam.example.com:8443/openam -
The string
/oauth2 -
The hierarchy of the realm that contains the OAuth 2.0 client.
You must specify the entire hierarchy of the realm, starting at the Top Level Realm. Prefix each realm in the hierarchy with the
realms/keyword.For example,
/realms/root/realms/customersIf you omit the realm hierarchy, the top level
ROOTrealm is used by default. -
The string
/.well-known/openid-configuration
-
-
In environment, enter
AIC. -
In cookieName, enter the name of the cookie your authorization server uses to store session tokens on the client.
For example, PingAM servers use
iPlanetDirectoryProHow do I find my PingOne Advanced Identity Cloud cookie name?
To locate the cookie name in an PingOne Advanced Identity Cloud tenant:
-
Navigate to Tenant settings > Global Settings
-
Copy the value of the Cookie property.
-
-
In browserSeletorType, enter
.authSession.You can specify what type of browser the client iOS device opens to handle centralized login.
Each browser has slightly different characteristics, which make them suitable to different scenarios, as outlined in this table:
Browser type Characteristics .authSessionOpens a web authentication session browser.
Designed specifically for authentication sessions, however it prompts the user before opening the browser with a modal that asks them to confirm the domain is allowed to authenticate them.
This is the default option in the Ping SDK for iOS.
.ephemeralAuthSessionOpens a web authentication session browser, but enables the
prefersEphemeralWebBrowserSessionparameter.This browser type does not prompt the user before opening the browser with a modal.
The difference between this and
.authSessionis that the browser does not include any existing data such as cookies in the request, and also discards any data obtained during the browser session, including any session tokens.When is
ephemeralAuthSessionsuitable:-
ephemeralAuthSessionis not suitable when you require single sign-on (SSO) between your iOS apps, as the browser will not maintain session tokens. -
ephemeralAuthSessionis not suitable when you require a session token to log a user out of the server, for example for logging out of PingOne, as the browser will not maintain session tokens. -
Use
ephemeralAuthSessionwhen you do not want the user’s existing sessions to affect the authentication.
.nativeBrowserAppOpens the installed browser that is marked as the default by the user. Often Safari.
The browser opens without any interaction from the user. However, the browser does display a modal when returning to your application.
.sfViewControllerOpens a Safari view controller browser.
Your client app is not able to interact with the pages in the
sfViewControlleror access the data or browsing history.The view controller opens within your app without any interaction from the user. As the user does not leave your app, the view controller does not need to display a warning modal when authentication is complete and control returns to your application.
-
The result resembles the following:
return ConfigurationViewModel( clientId: "sdkCustomUI", scopes: ["openid", "email", "address", "phone", "profile"], redirectUri: "org.forgerock.demo://oauth2redirect", signOutUri: "org.forgerock.demo://oauth2redirect", discoveryEndpoint: "https://openam-forgerock-sdks.forgeblocks.com/am/oauth2/realms/alpha/.well-known/openid-configuration", environment: "AIC", cookieName: "ch15fefc5407912", browserSeletorType: .authSession ) -
-
Save your changes.
Try it out
To test that your custom UI app is acting as the centralized login pages, perform the following steps.
-
In Xcode, select Product > Run.
Xcode launches the sample app in the iPhone simulator.
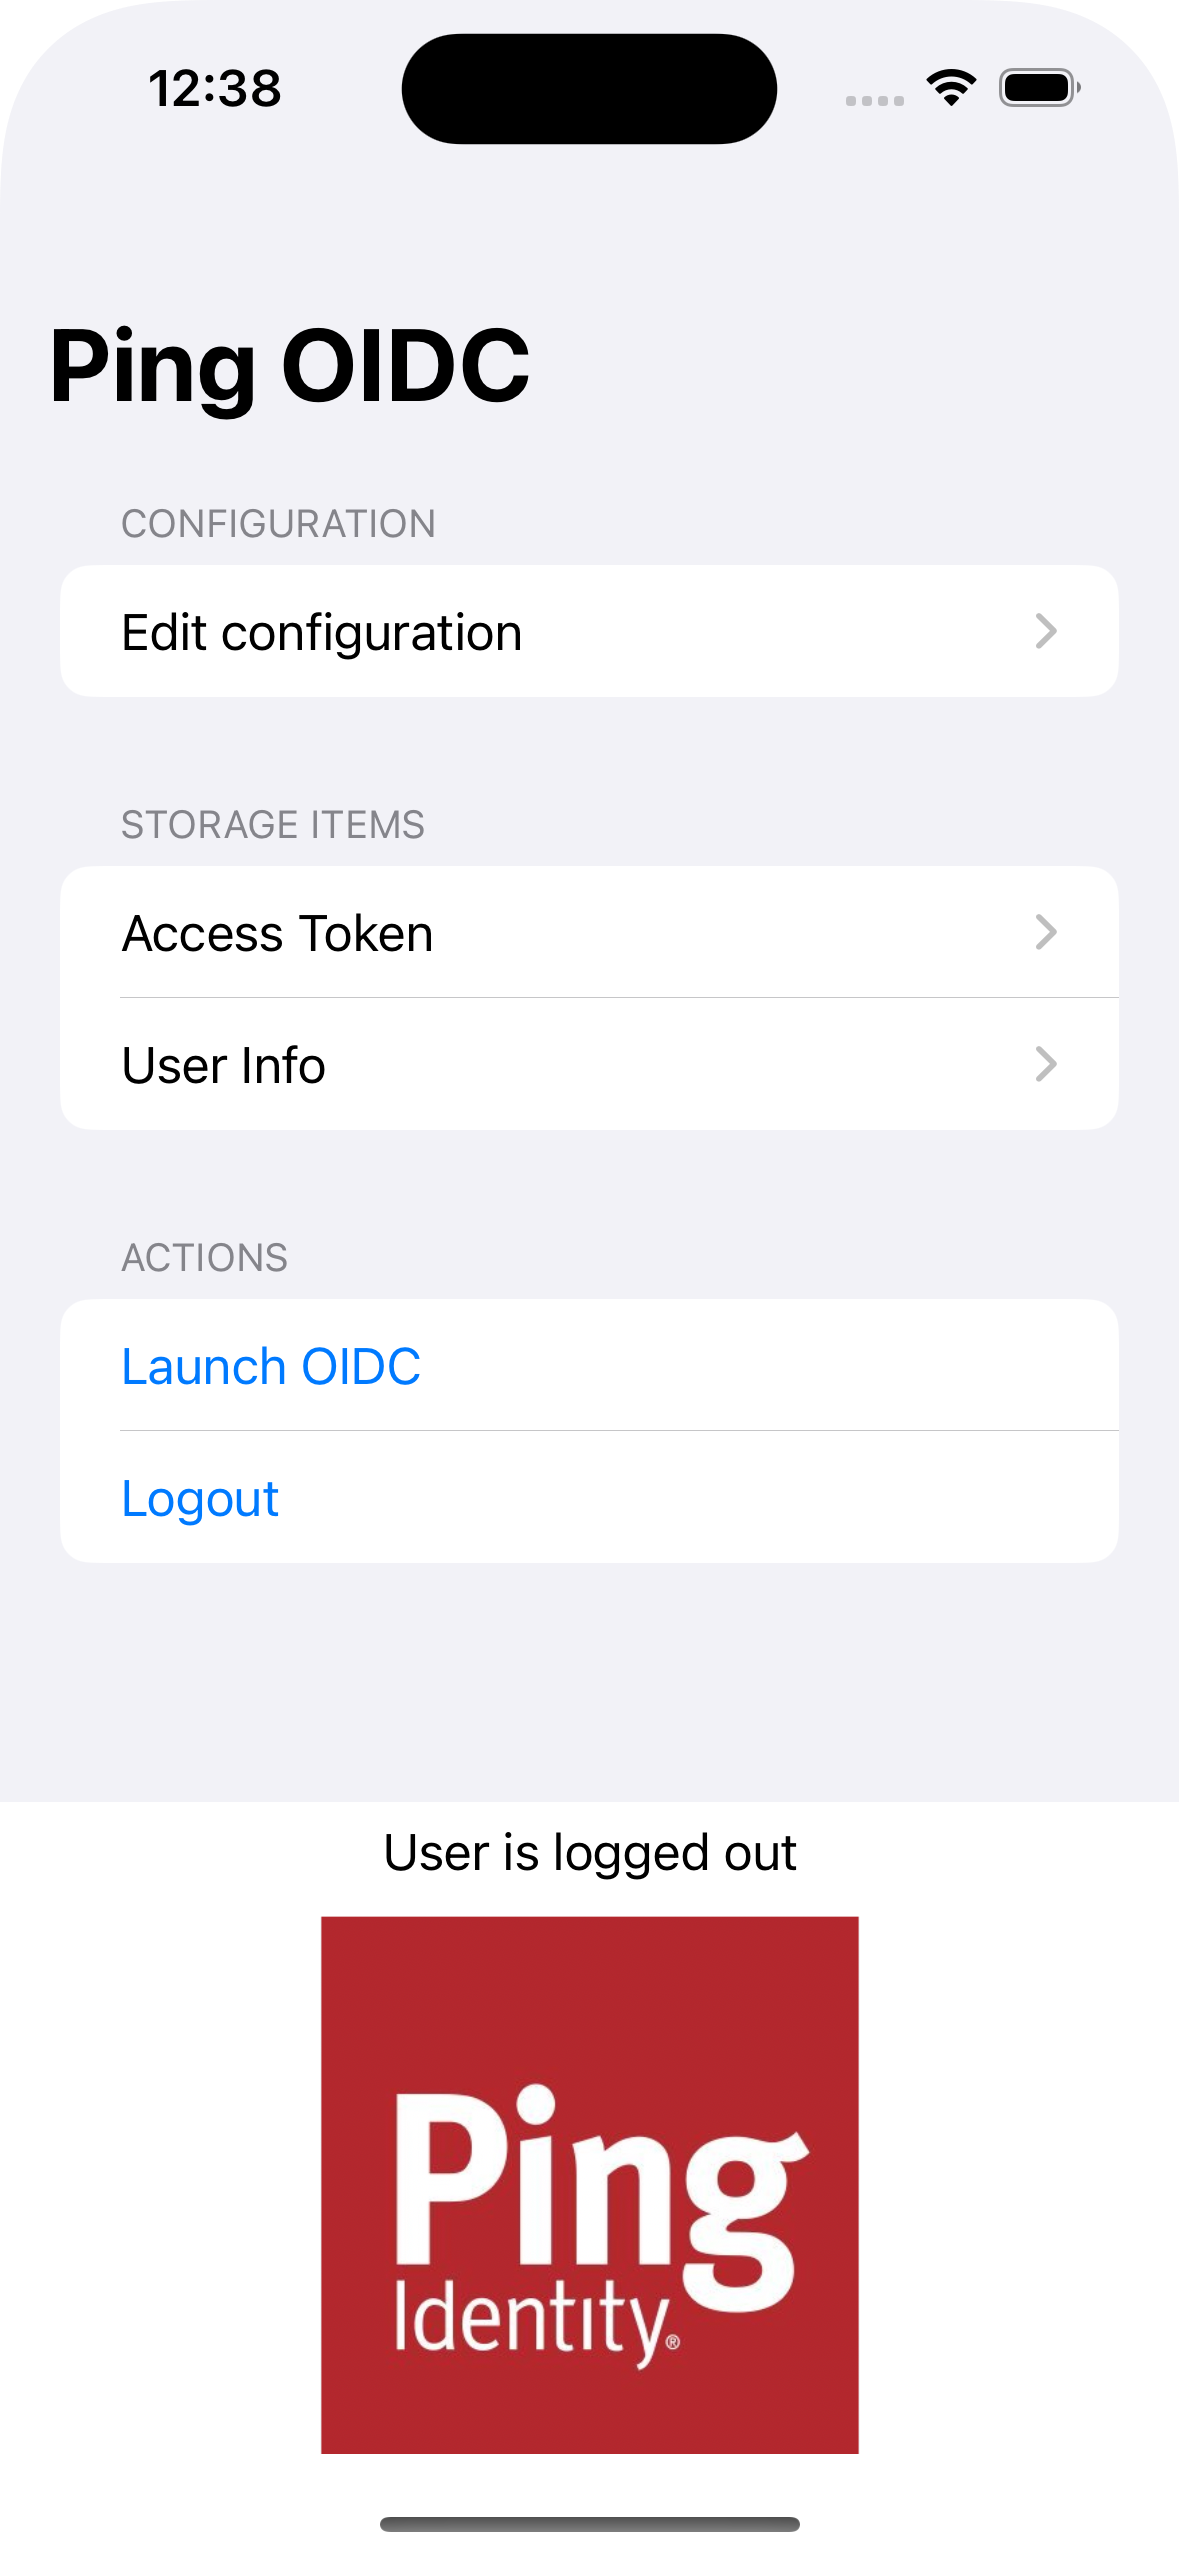 Figure 6. iOS OIDC login sample home screenThird-party cookies in the Safari browser
Safari blocks third-party cookies by default, so the custom UI app will not be able to authenticate calls to the
/authorizeendpoint if it is running on a different domain than the server.In production, ensure your custom UI app and server share the same domain.
For this tutorial disable third-party cookie checks in Safari as follows:
-
In the iPhone simulator, in the toolbar click Home. On the screen, use your mouse to swipe to the right, and then tap Settings.
-
Tap Safari, scroll to the Privacy & Security section, and disable Prevent Cross-Site Tracking.
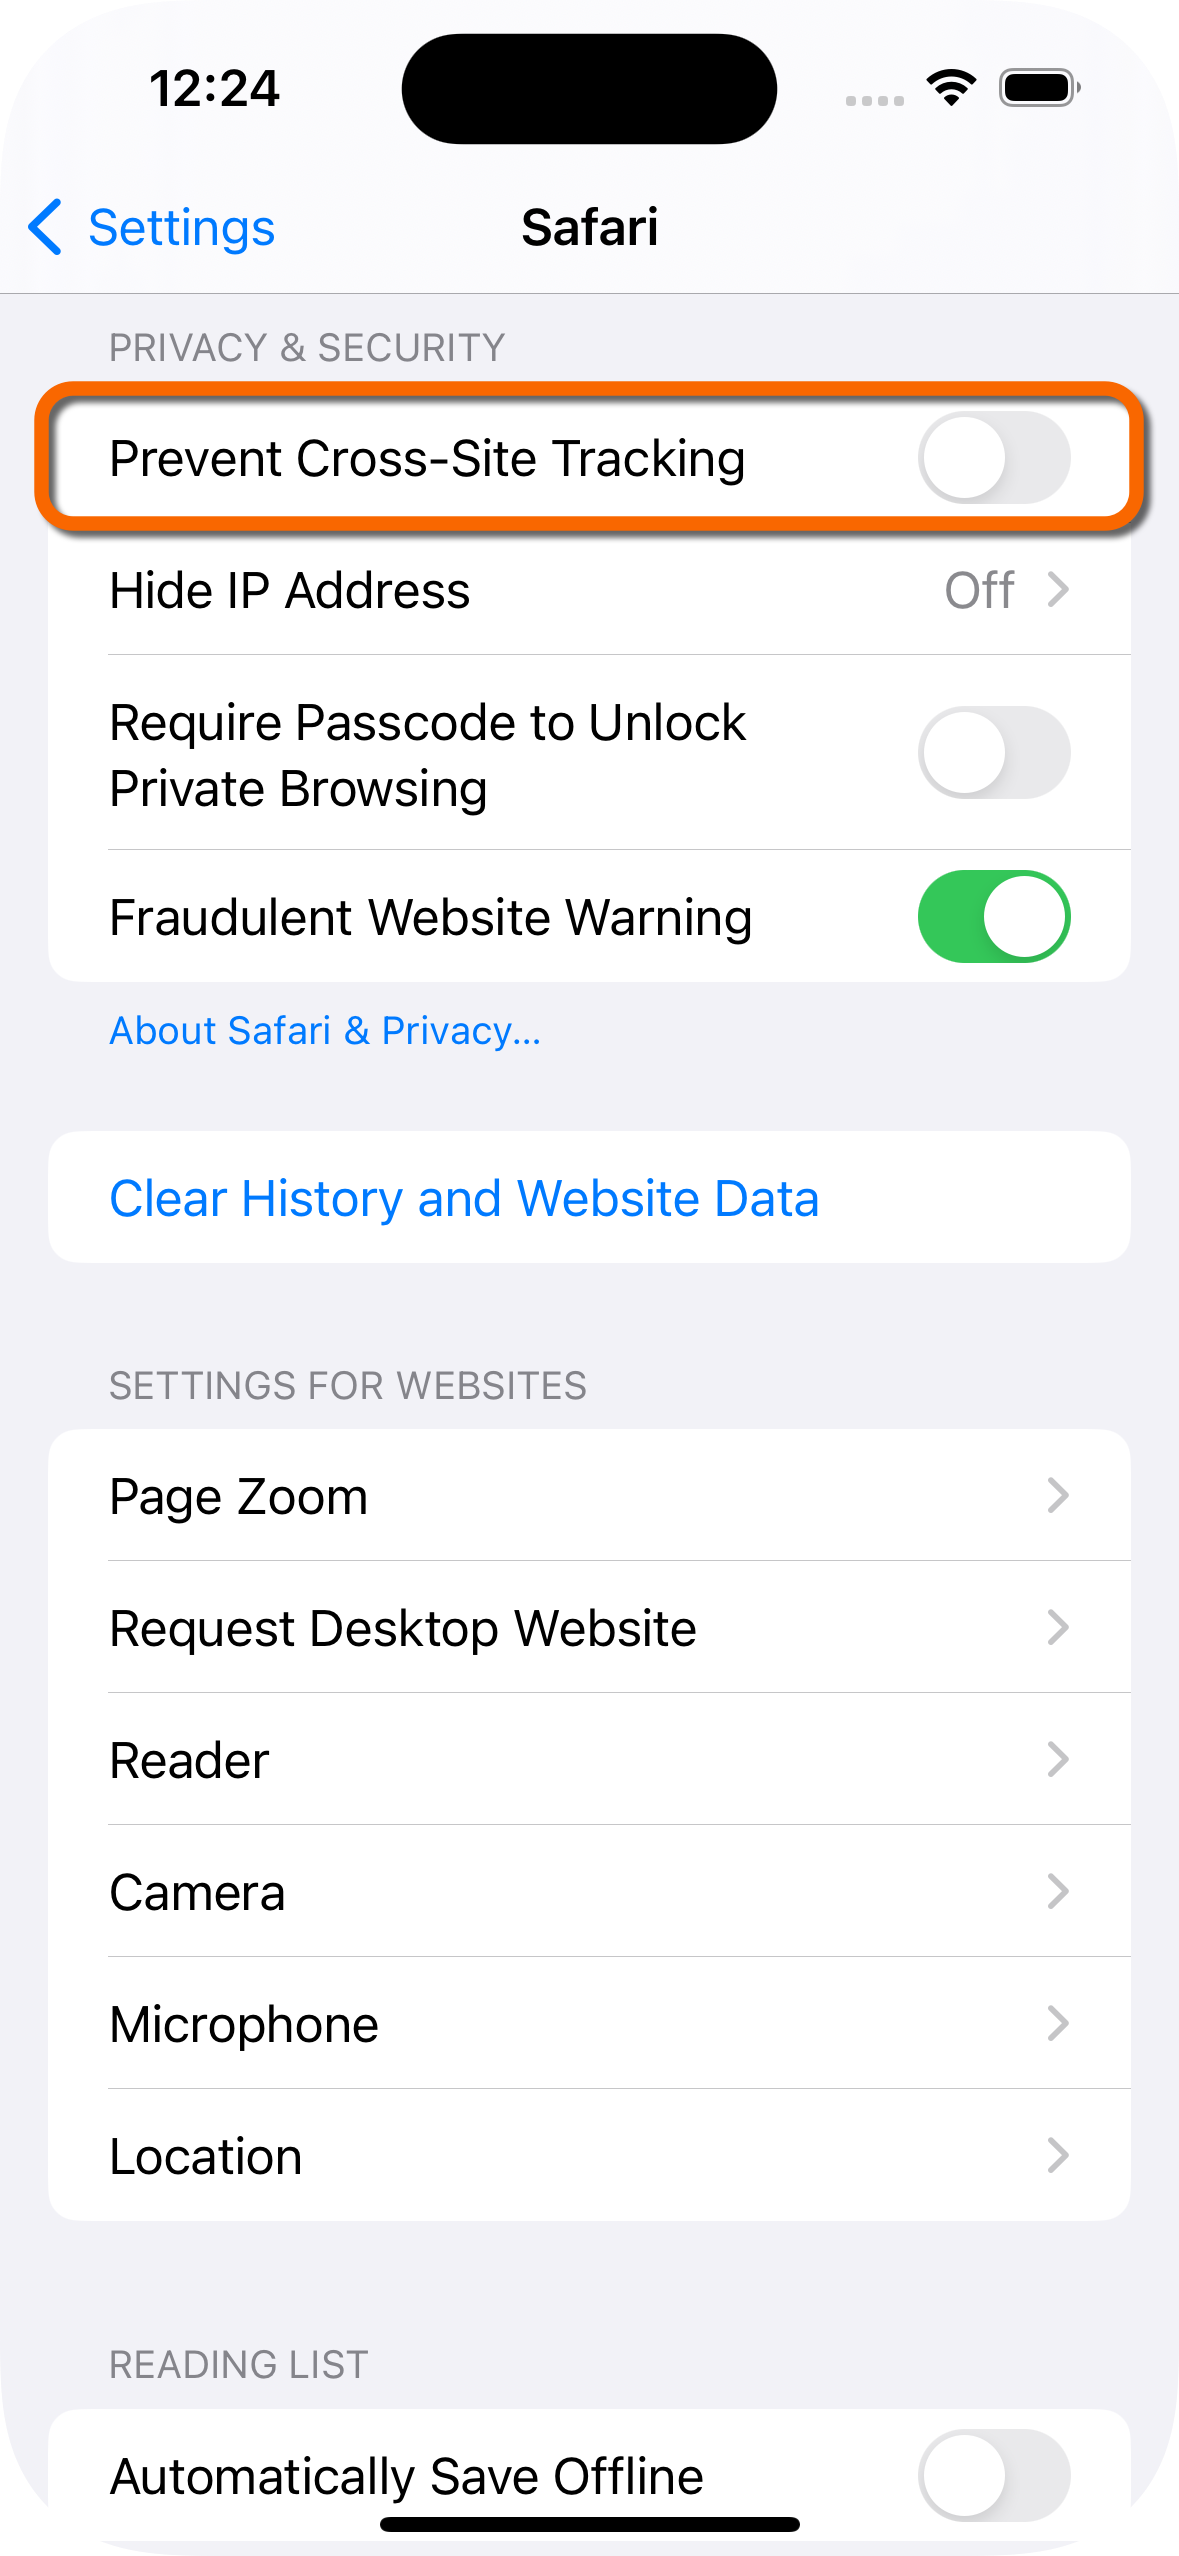 Figure 7. Allow third-party cookies in Safari
 -
To return to the sample app, in the toolbar double-click Home to show the open apps, and then tap the PingOIDC app.
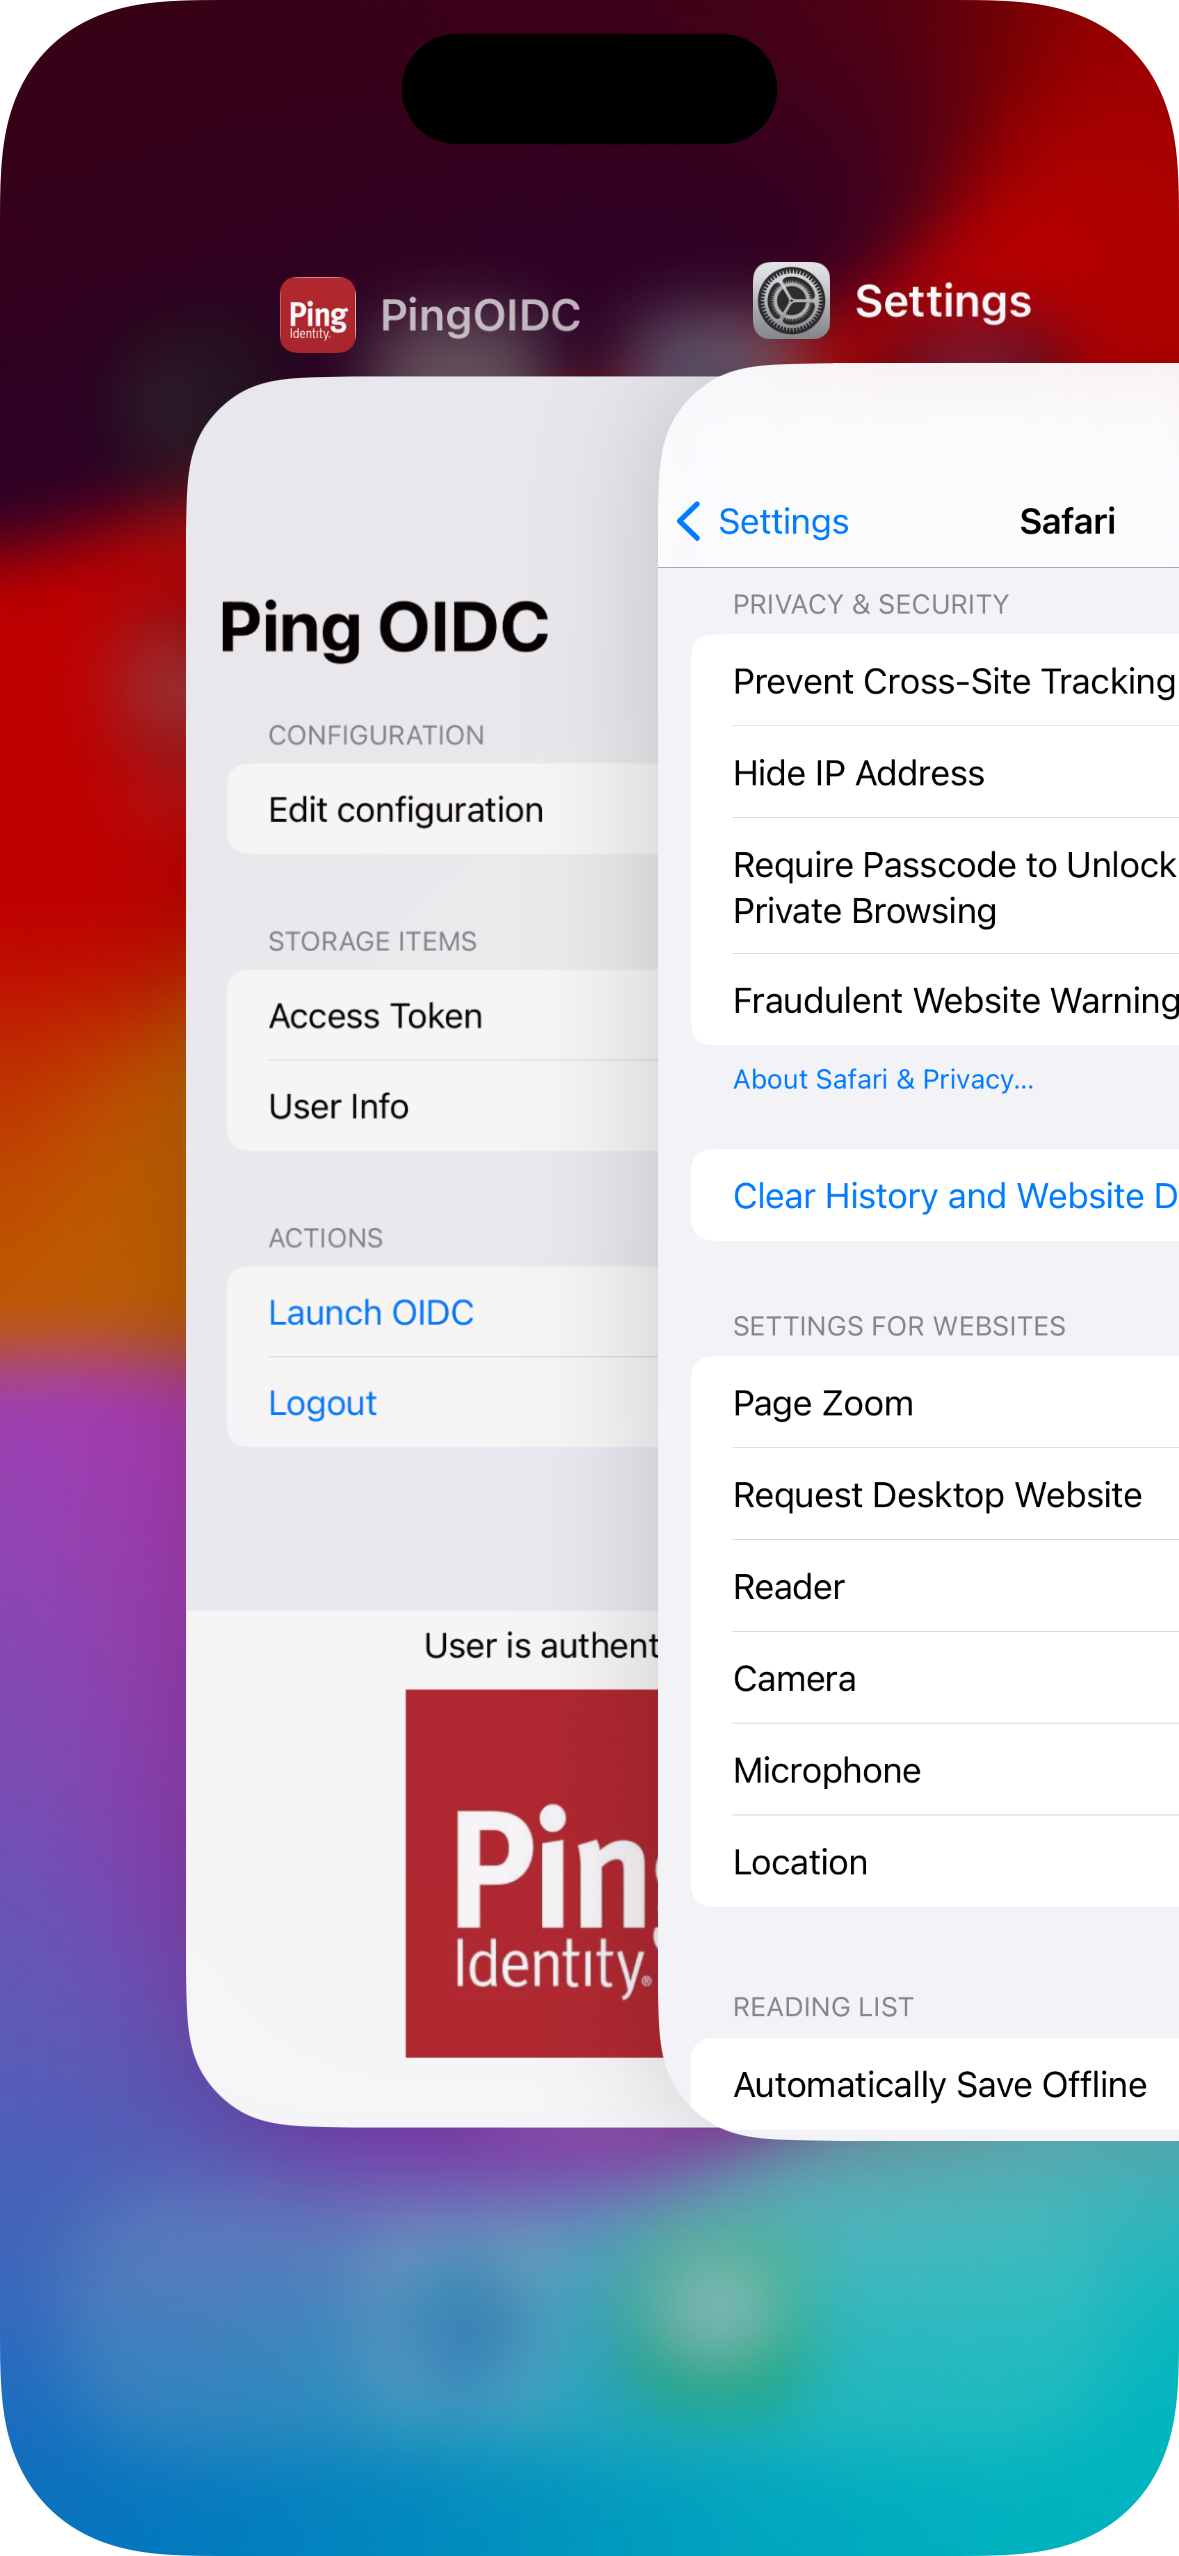 Figure 8. Return to the OIDC sample app by double-clicking the home icon.
-
-
In the sample app on the iPhone simulator, tap Edit configuration, and verify or edit the configuration you entered in the previous step.
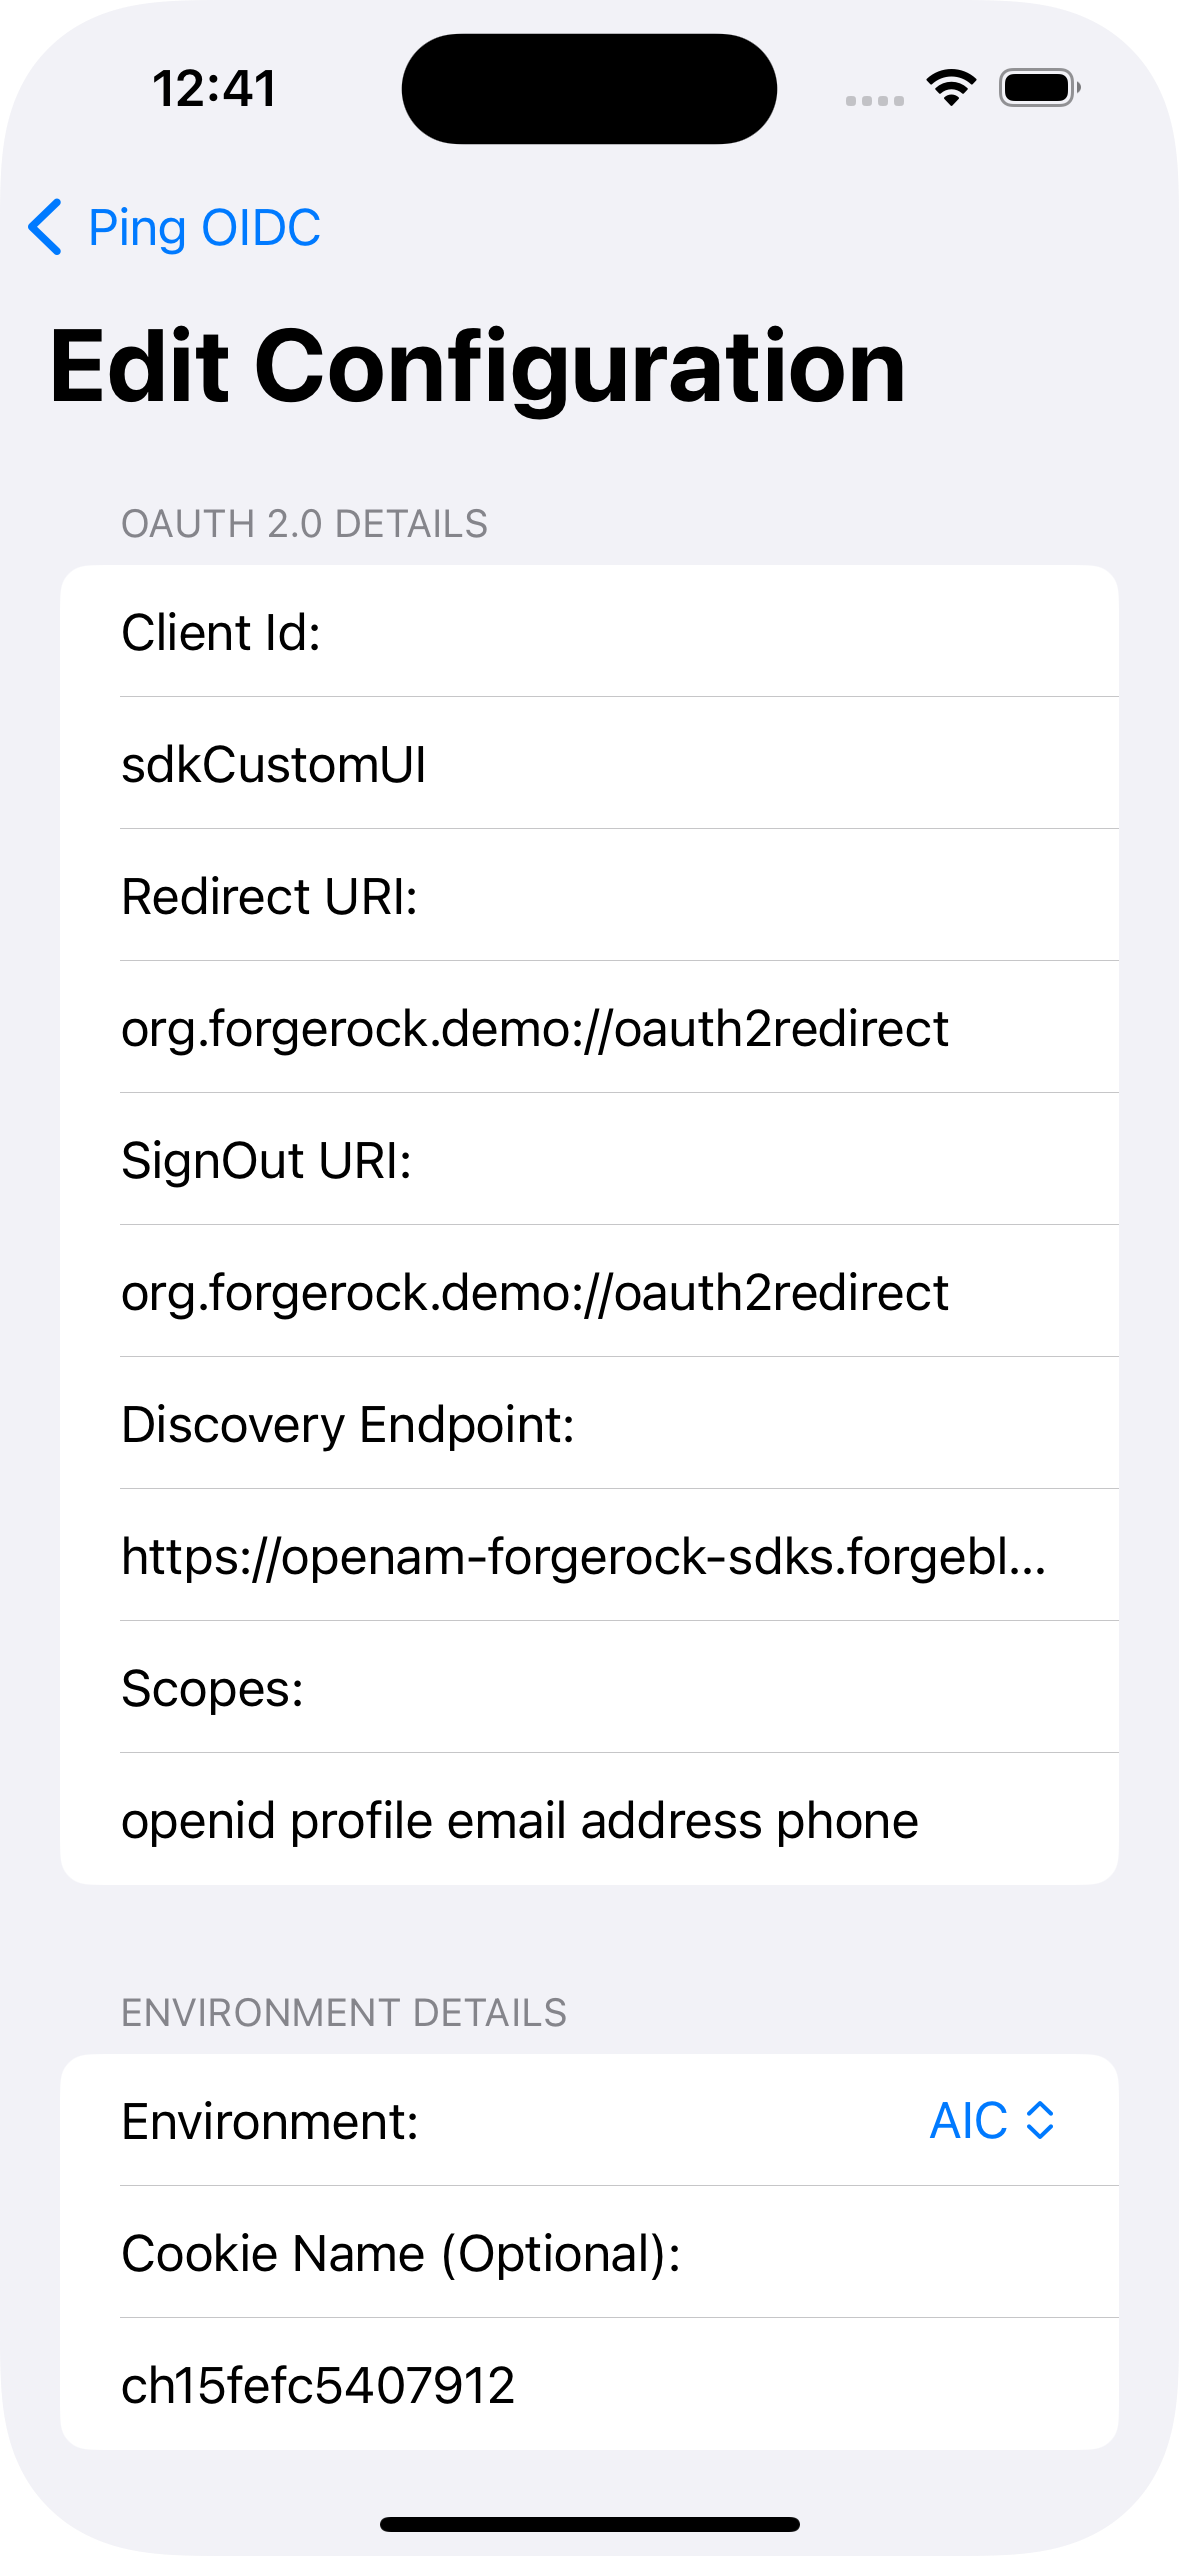 Figure 9. Verify the configuration settings
 -
Tap Ping OIDC to go back to the main menu, and then tap Launch OIDC.
You might see a dialog asking if you want to open a browser. If you do, tap Continue. The app launches a web browser and connects to your authorization server, which then redirects to the custom UI app running locally on your computer:
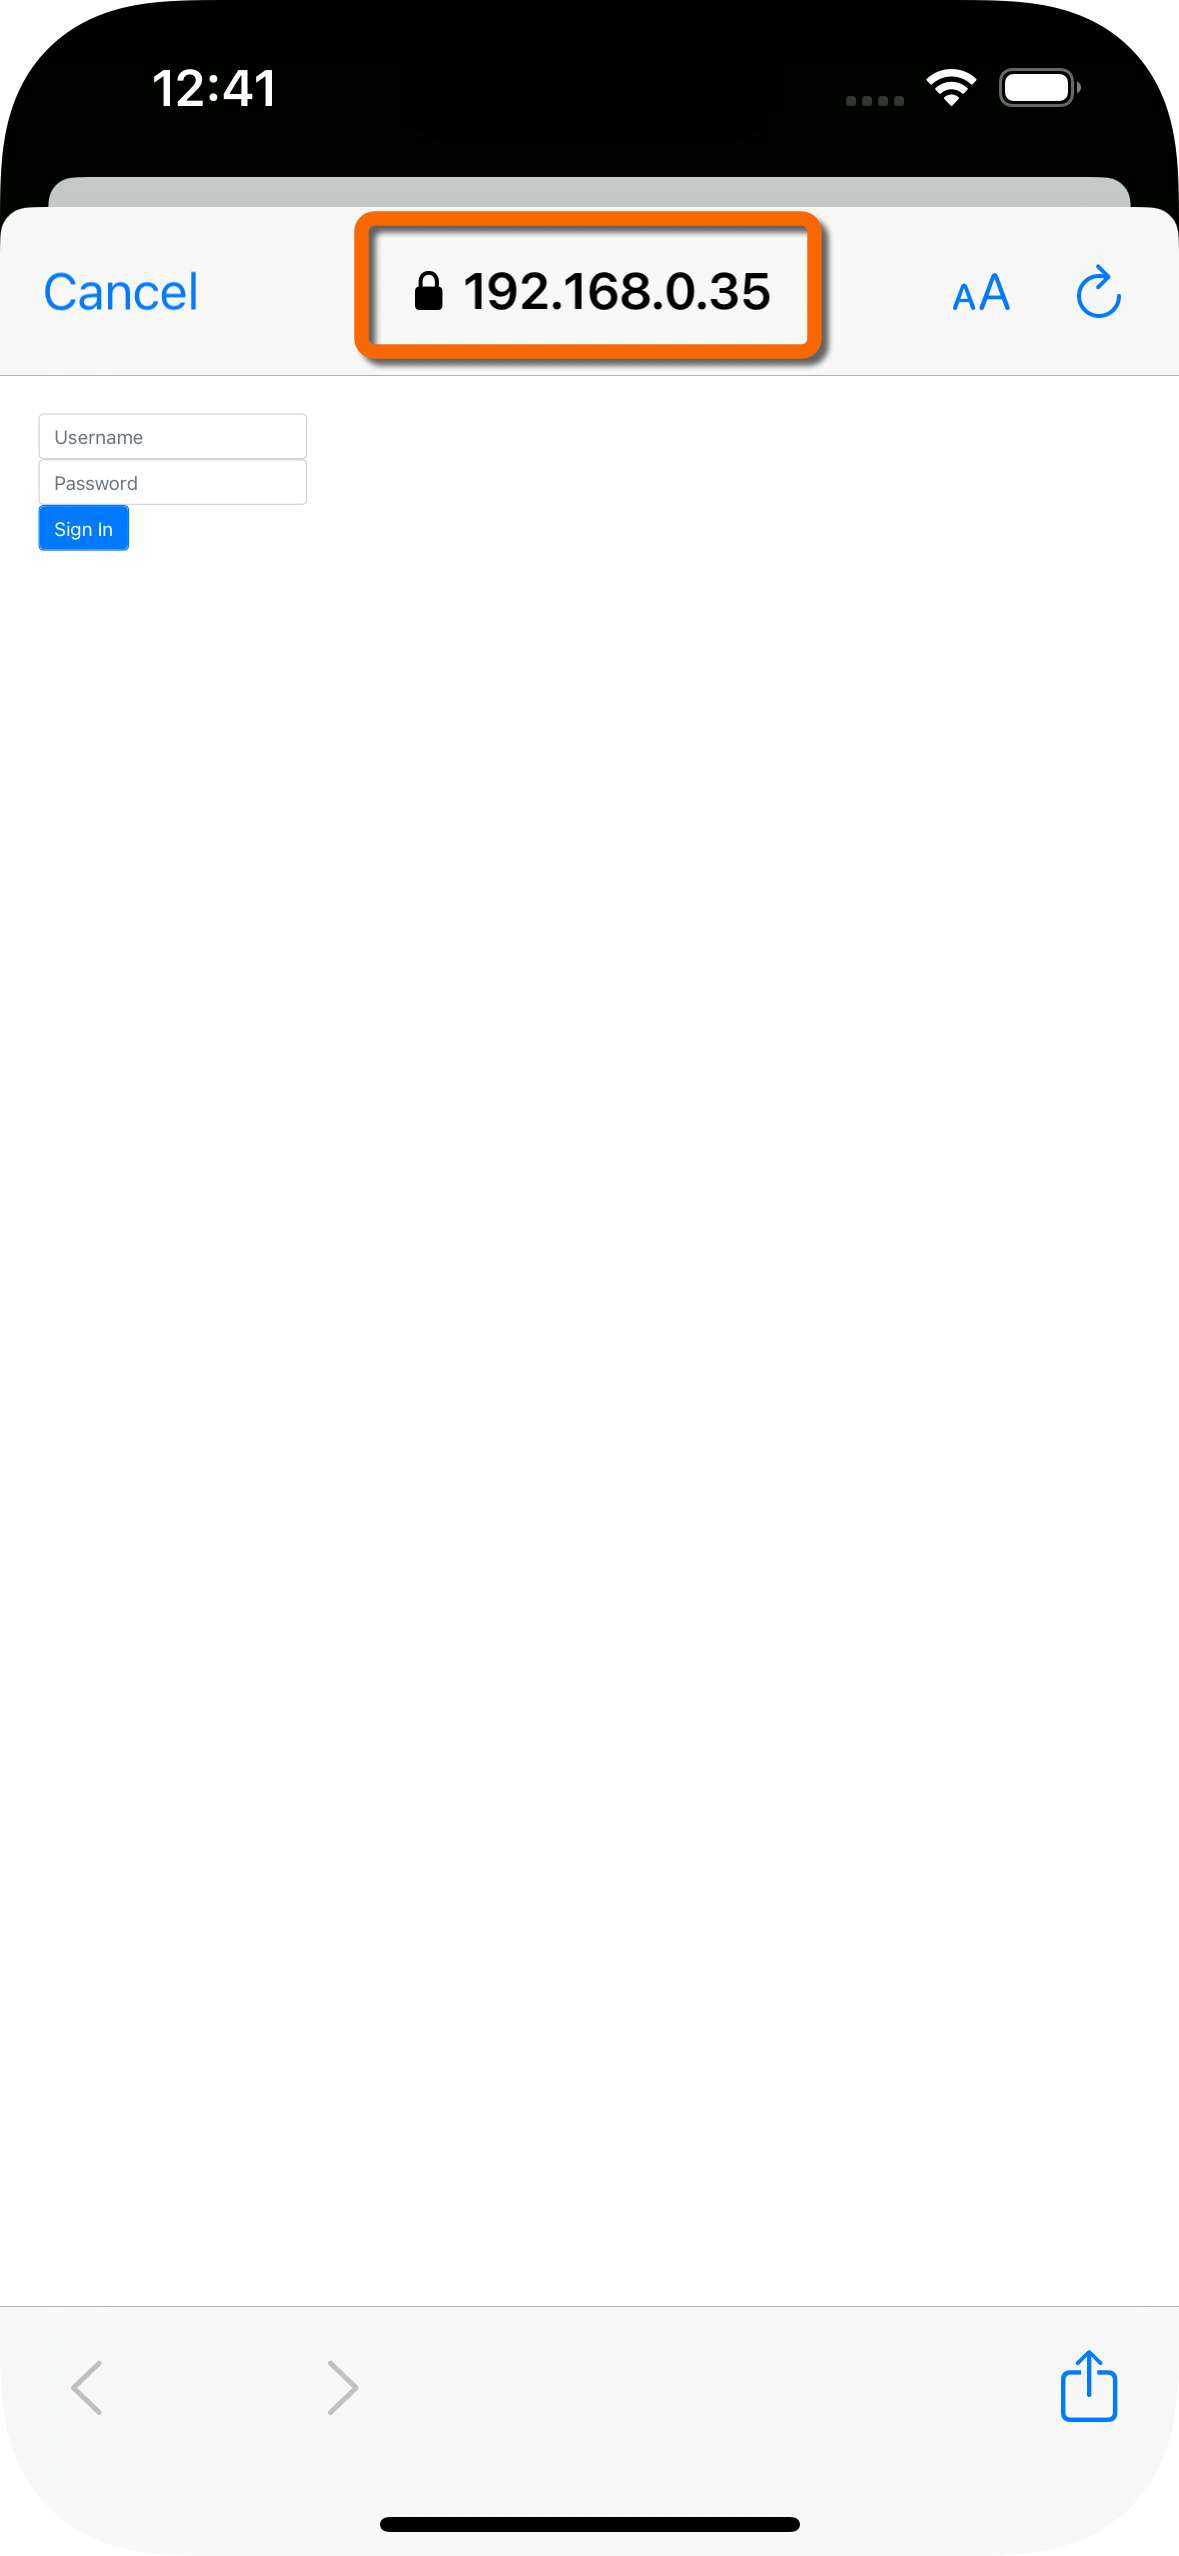 Figure 10. Browser launched and redirected to local custom UI app.
 -
Sign on as a demo user:
-
Name:
demo -
Password:
Ch4ng3it!
If authentication is successful, the application displays the access token issued by PingAM.
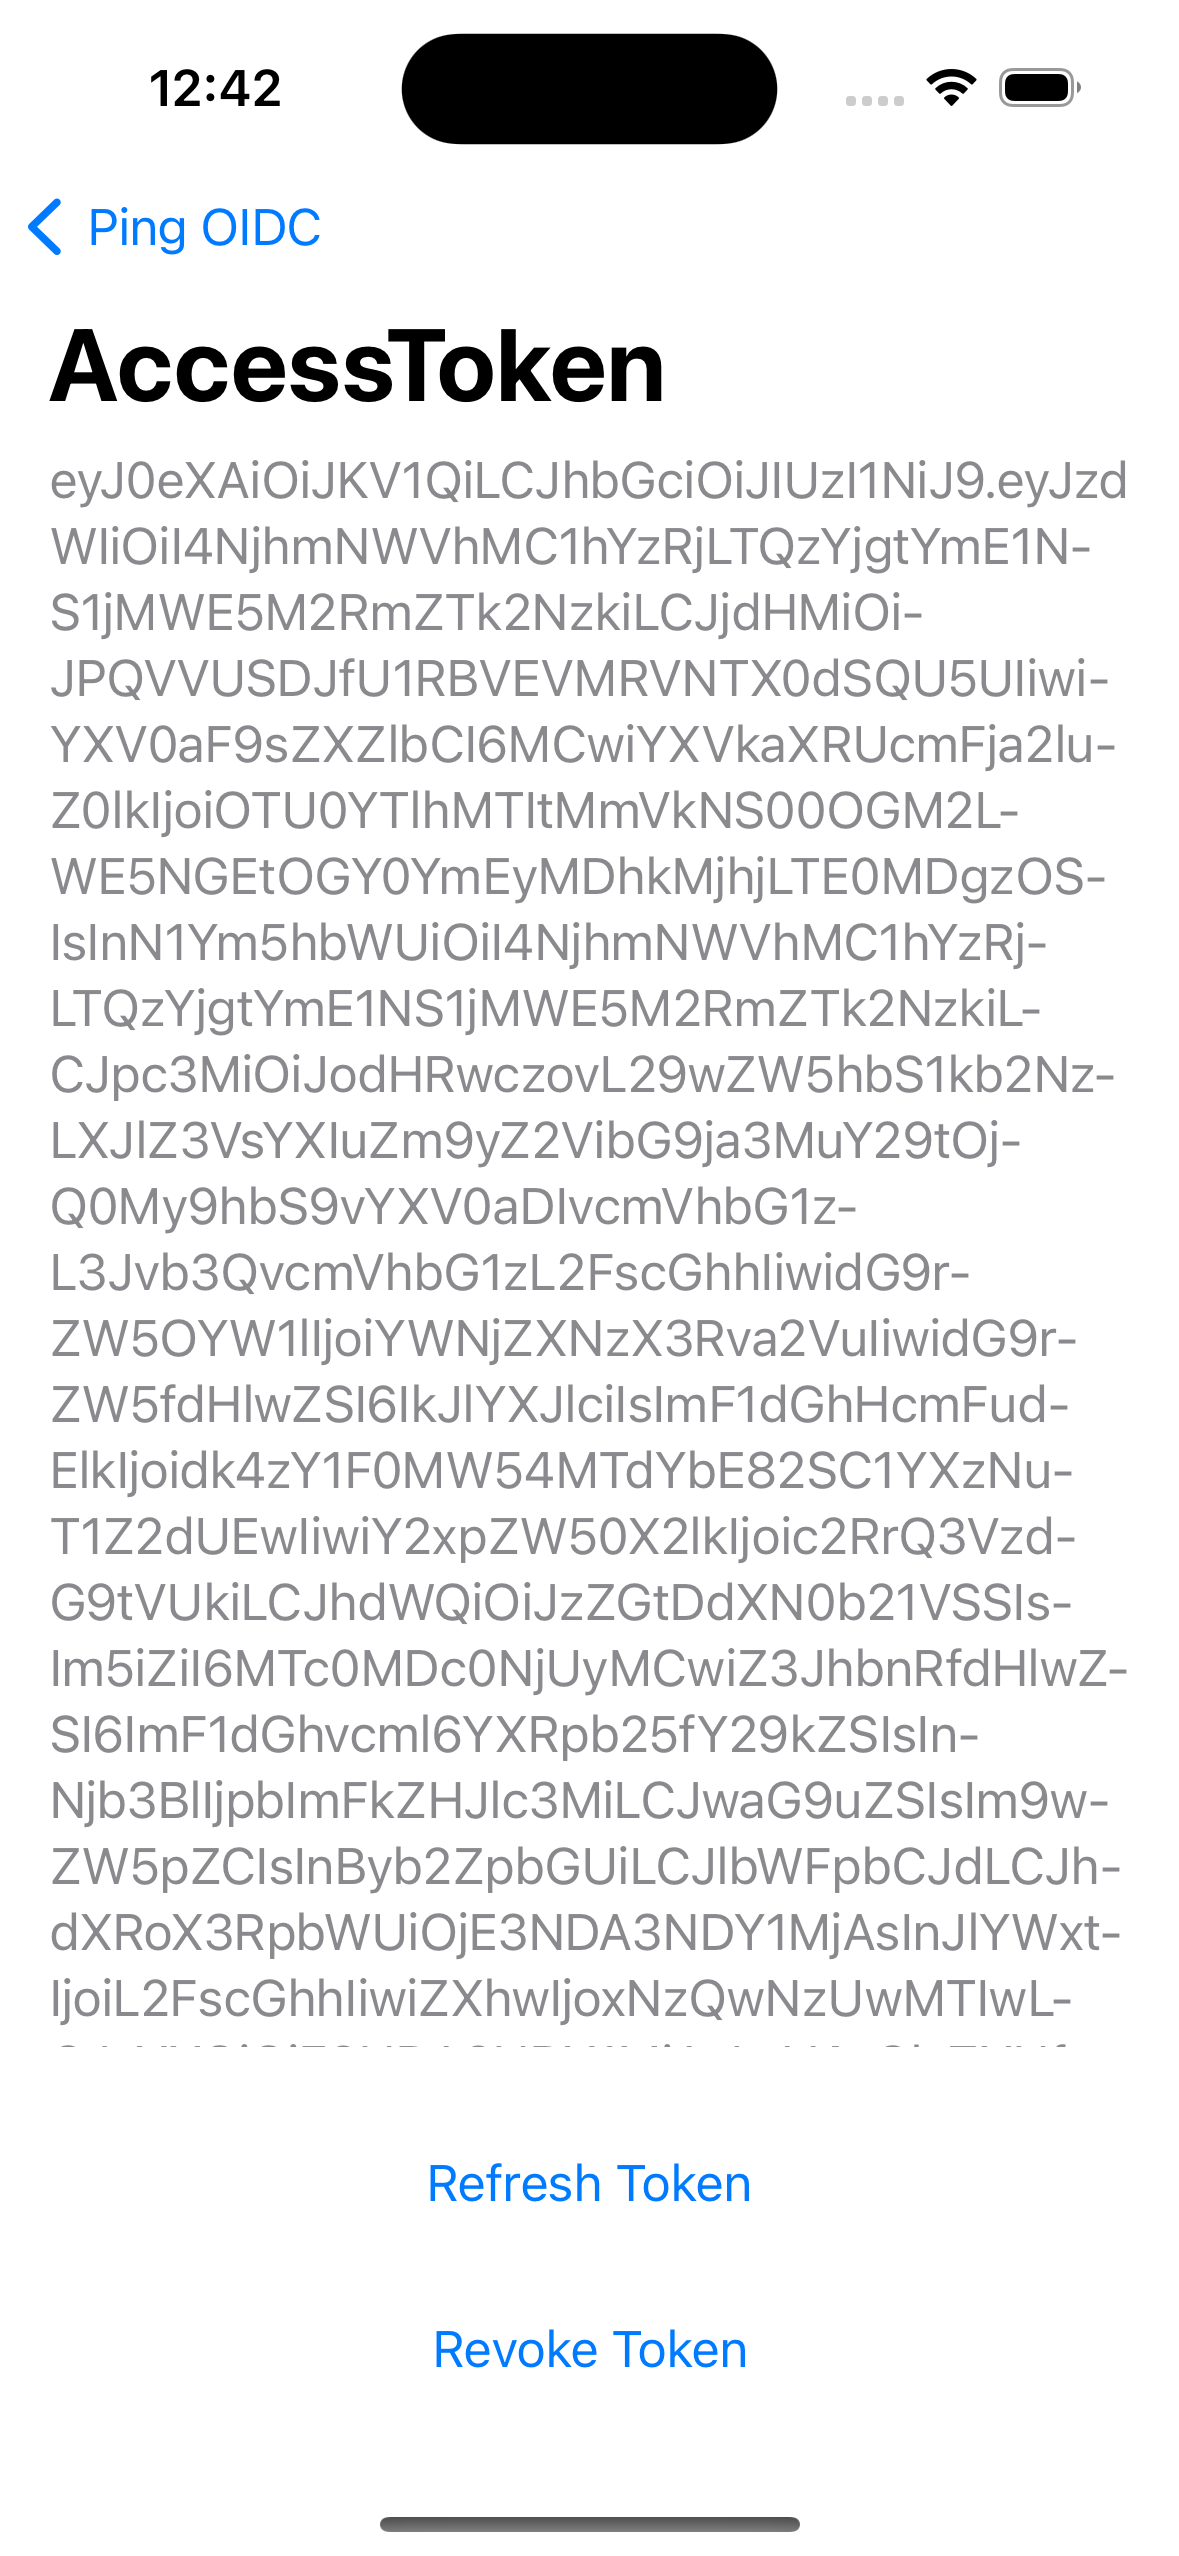 Figure 11. Access token after successful authentication
 -
-
Tap Ping OIDC to go back to the main menu, and then tap User Info.
The app displays the information relating to the access token:
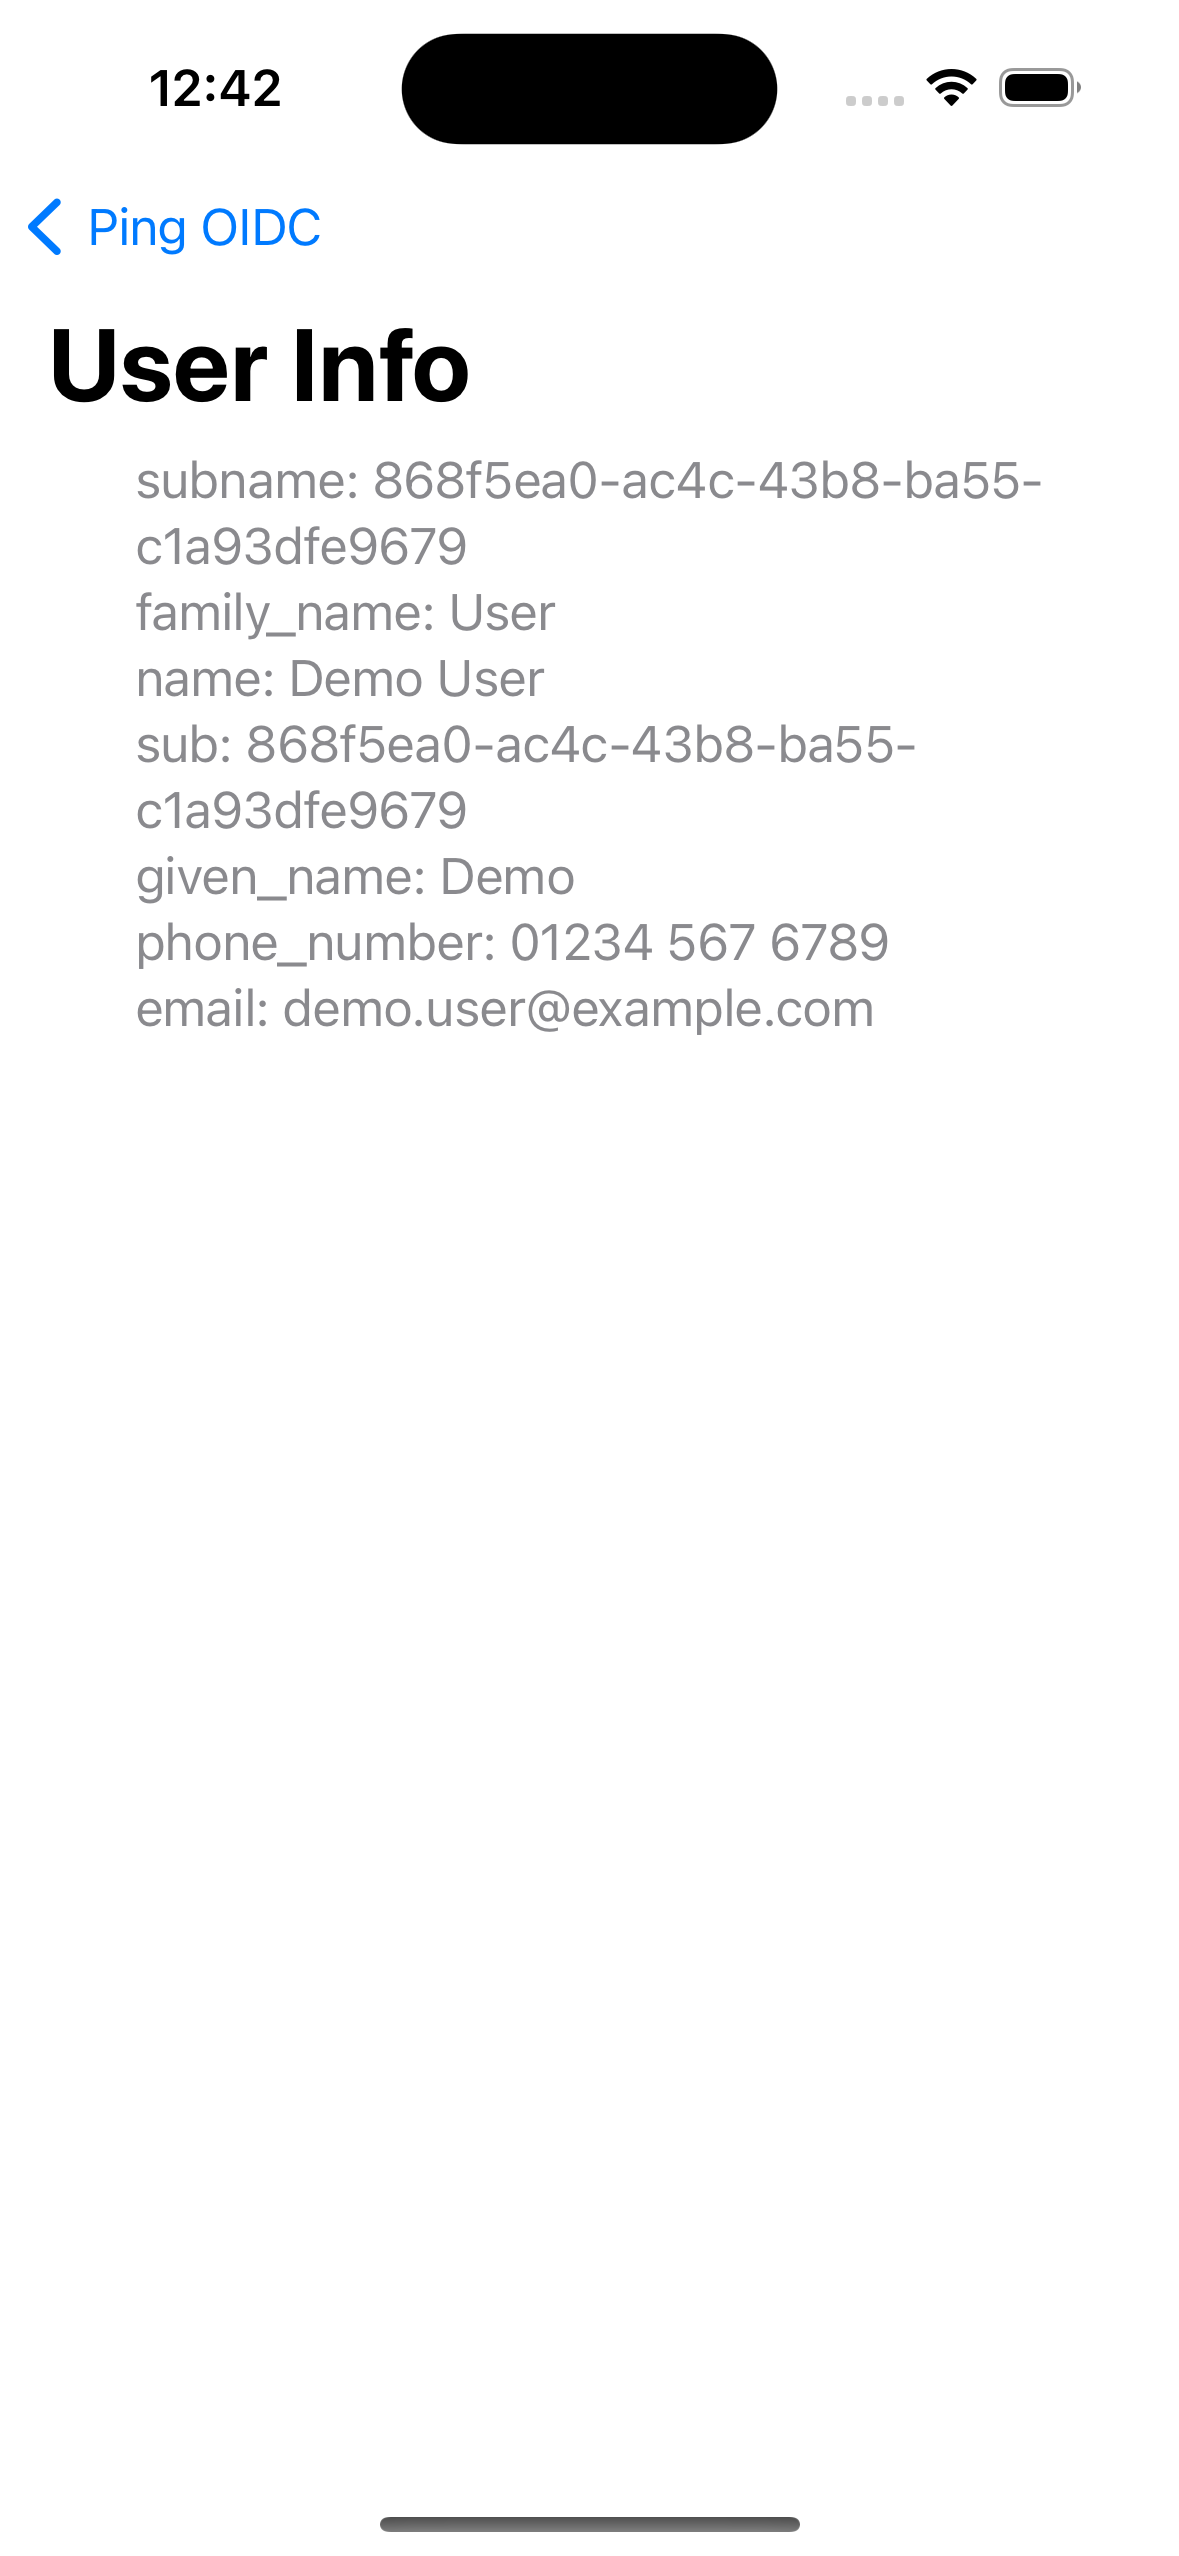 Figure 12. User info relating to the access token
 -
Tap Ping OIDC to go back to the main menu, and then tap Logout.
The app logs the user out of the authorization server and prints a message to the Xcode console:
[FRCore][4.8.0] [🌐 - Network] Response | [✅ 204] :
  https://openam.example.com:443/am/oauth2/connect/endSession?id_token_hint=eyJ0...sbrA&client_id=sdkPublicClient in 34 ms
[FRAuth][4.8.0] [FRUser.swift:211 : logout()] [Verbose]
  Invalidating OIDC Session successful