Functions Connector
The Functions connector lets you branch your PingOne DaVinci flow using logical conditions or based on the result of custom JavaScript code.
You can use the Functions connector to:
-
Compare the value of variables in your flow, such as A > B
-
Perform calculations
-
Run custom JavaScript
|
For best practices to use custom code in your flows, see Using custom code safely. |
Setup
Setting up the Functions connector
In DaVinci, add a Functions connection. For help, see Adding a connector.
This connector doesn’t have a configuration at the environment level. You configure it in your flow instead.
Using the connector in a flow
Comparing values
You can compare values using a variety of comparison capabilities, such as A == B, A != B, and A < B < C.
|
A node with the A == B capability cannot be branched from the top: 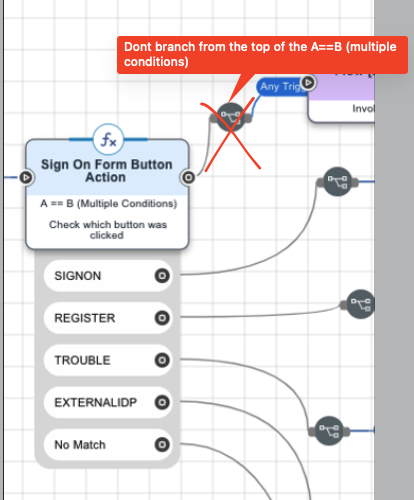
|
For example, we can check whether a user is eligible for a senior’s discount based on their age:
-
In your flow, add the Functions connector and select the A >= B capability. Select the node that appears in your flow.
-
In the Value A field, click {}, then select the attribute that holds the user’s current age.
-
In the Value B field, enter 65.
-
After applying your changes, you can add a True branch from your node for seniors, and a False branch for those who aren’t.
Adding a custom function to your flow
You can make your flows more powerful and flexible by adding your own custom code. This capability lets you take inputs from your flow, work with them in JavaScript, and make the results available in your flow.
The JavaScript in a custom function runs on the server, not the client. These functions stay with your flow if you export it to another DaVinci environment.
For example, we want to know how long until a user turns 65 and gets a senior’s discount. We already know their age from earlier in the flow and that they’re younger than 65. Our code will subtract their current age from 65 and make the result available in the flow.
|
The following libraries are available in custom functions:
|
|
All code for custom functions must comply with JavaScript’s strict mode. For more information, see Strict Mode. |
-
In your flow, add the Functions connector and select the Custom Function capability.
-
Select the node that appears in your flow.
-
Make the variable with their current age available in your function:
-
In the Variable Input List, click Add.
-
In the Variable Name field, enter
currentAge. Our code will call the variable by this name. -
In the Value field, click the input button and select the variable from your flow that you want as the value of
currentAgein your function. -
In the Data Type list, select the type that best suits the value your variable holds.
-
(Optional) To bring in more variables, click Add again.
To remove an extra variable, click Edit, then click the remove button.
-
-
In the Code field, enter your JavaScript custom code.
To give yourself more room to work, click the Expand () icon. This lets you use your browser zoom to enlarge the code.
Our code creates a variable called
ageDeltathat holds the difference between the user’s current age and 65:// How long until eligible for a senior’s discount? module.exports = a = async ({params}) => { Let ageDelta = 65 - params.currentAge return {'yearsUntilDiscount': ageDelta} }Our code returns a variable called
yearsUntilDiscount. -
In the Output Schema field, capture the return variables from your code and make them available elsewhere in your flow.
{
    "output": {
        "type": "object",
        "properties": {
            "yearsUntilDiscount": {
                "type": "integer"
            }
        }
    }
}
Now,
yearsUntilDiscountis available to use elsewhere in your flow.
Checking whether a variable has a value
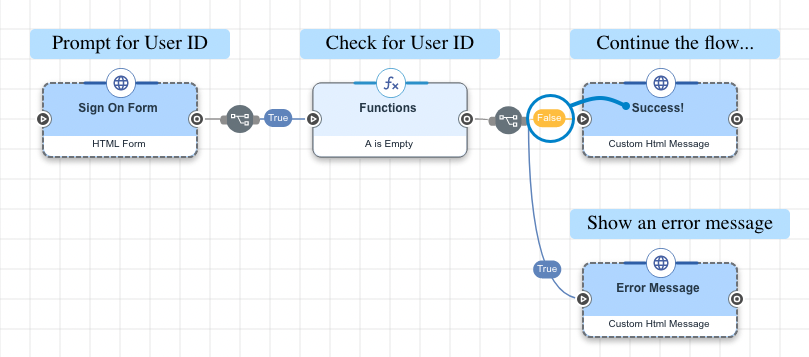
When building a flow, it can be useful to check whether a variable contains a value. For example, testing whether the expected user ID or token has actually been provided earlier in the flow.
-
Check whether the variable is empty:
-
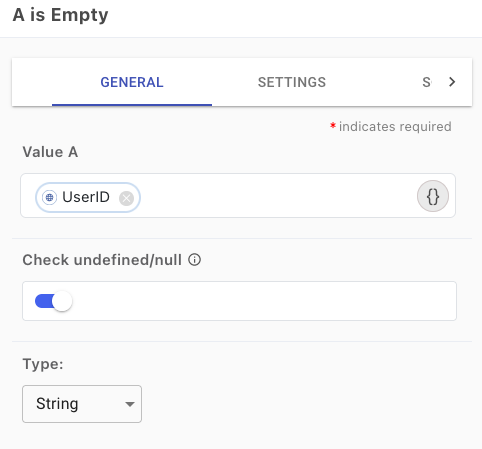
In your flow, add a Functions connector with the A is Empty capability.
-
In the Value A field, click {} and select the variable that you want to check.
-
Enable Check undefined/null.
-
In the Type list, select the type of data that the variable should contain.
-
Click Apply.
-
-
Add a success path by following the A is Empty node using the Any Trigger False condition.
The A is Empty capability returns "false" when the expected User ID, token, or other value is provided. As a result, the success path for your flow follows branches from the "false" result.
-
Add an error message or failure path by following the A is Empty node using the All Triggers True condition.
Hashing a value
You can use the Create a Hash capability to hash the value provided by another node in your flow. Hashing transforms an input value into a fixed-length string or number for secure verification.
To hash a value:
-
In your flow, add a Functions connector with the Create a Hash capability.
-
In the Input Value field, enter the value or select the variable containing the value to hash.
-
Select a Hash Algorithm to use.
-
Select a Salt Mode to determine whether to add a salt value to make the hash value more unique and difficult to guess.
To use a custom value, you can select Use Custom Salt Value and define your own in the Custom Salt Value field.
-
Select the Output Encoding Format for the resulting hash value.
Binary encoding produces raw binary, which does not render meaningfully when the hashed value outputs to the screen in plain text.
Capabilities
A == B
If A equals B
Show details
-
Properties
- leftValueA textField
- rightValueB textField
- type dropDown
- Case Sensitive toggleSwitch
-
When enabled, the values are considered a match only if the case is the same.
A != B
If A is not equal to B
Show details
-
Properties
- leftValueA textField
- rightValueB textField
- type dropDown
- Case Sensitive toggleSwitch
-
When enabled, the values are considered a match only if the case is the same.
A < B
If A is less than B
Show details
-
Properties
- leftValueA textField
- rightValueB textField
- type dropDown
A ⇐ B
If A is less than or equal to B
Show details
-
Properties
- leftValueA textField
- rightValueB textField
- type dropDown
A > B
If A is greater than B
Show details
-
Properties
- leftValueA textField
- rightValueB textField
- type dropDown
A >= B
If A is greater than or equal to B
Show details
-
Properties
- leftValueA textField
- rightValueB textField
- type dropDown
B < A < C
If A is between B and C
Show details
-
Properties
- leftValueA textField
- rightValueB textField
- rightValueC textField
- type dropDown
B ⇐ A ⇐ C
If A is between B and C or equal to B or C
Show details
-
Properties
- leftValueA textField
- rightValueB textField
- rightValueC textField
- type dropDown
B ⇐ A < C
If A is between B and C or equal to B
Show details
-
Properties
- leftValueA textField
- rightValueB textField
- rightValueC textField
- type dropDown
B < A ⇐ C
If A is between B and C or equal to C
Show details
-
Properties
- leftValueA textField
- rightValueB textField
- rightValueC textField
- type dropDown
A is Empty
If A is Empty
Show details
-
Properties
- leftValueA textField
- Check undefined/null toggleSwitch
-
Check undefined/null
- type dropDown
If Array A includes B
Show details
-
Properties
- leftValueA textField
- rightValueB textField
- type dropDown
- inputContains dropDown
- Case Sensitive toggleSwitch
-
When enabled, the values are considered a match only if the case is the same.
If String A includes B
Show details
-
Properties
- leftValueA textField
- rightValueB textField
- Case Sensitive toggleSwitch
-
When enabled, the values are considered a match only if the case is the same.
Custom Function
Show details
-
Properties
-
Output Schema
- variableInputList variableInputList
- code codeEditor
-
Follow example for code. Caution: Custom code is for advanced users only. Before using custom code, review the security risks in the DaVinci documentation by searching for "Using custom code safely".
Default:
// Write your code here // Supported language: Javascript module.exports = a = async ({params}) => { console.log('params: ', params) return {'testVariable': params.testVariable} } - outputSchema codeEditor
-
Follow example for JSON schema.
Default:
{
"output": {
"type": "object",
"properties": {
"testVariable": {
"type": "string"
}
}
}
}
-
output object::
Create a Hash
Hash a value using the selected algorithm
Show details
-
Properties
-
Input Schema
-
Output Schema
- Input Value textField
-
The value to hash, such as “myPa55woRd123#".
- Hash Algorithm dropDown
-
The hash algorithm to use.
-
SHA-1
-
SHA-256 (Default)
-
SHA-384
-
SHA-512
-
- Salt Mode dropDown required
-
Determines whether to add a salt value to make the hashed value unique and more difficult to guess. For a custom value, select Use Custom Salt Value and enter the value in Custom Salt Value.
-
Off (Default)
-
Generate random salt
-
Use Custom Salt Value
-
- Custom Salt Value textField required
-
Enter the salt value to use when hashing, such as “mySaltu7v8w9x0“.
- Output Encoding Format dropDown required
-
The encoding method for the resulting hashed value.
-
Base64
-
Binary
-
Hexadecimal (Default)
-
-
default object
-
properties object
-
message string required
The input value to hash, such as “myPa55woRd123#”.
-
digestAlgorithm string required
The hash algorithm to use.
-
saltMode string
Determines whether to add a salt value to make the hashed value unique. For useCustomSaltValue, provide the customSaltValue.
-
customSaltValue string
The salt value to use when hashing, such as “mySaltu7v8w9x0“.
-
outputEncodingFormat string
The encoding method for the resulting hashed value.
-
-
Input Example
 { "properties" :
  { "message" : "mysecretpassword",
   "digestAlgorithm" : "sha256",
   "saltMode" : "useCustomSaltValue",
   "customSaltValue" : "mySaltu7v8w9x0",
"outputEncodingFormat" : "base64" } }-
output object
-
hash string
The hashed value.
-
salt string
The salt value used in the hash.
-
length number
The length of the hashed value.
-
Output Example
 { "hash" : "NJM86MstFd2CZO4M5nMR4HvJdUafOwpeSL5aFgS+r9A=",
  "salt" : "mySaltu7v8w9x0",
  "length" : 44 }