Configuring Amazon CloudFront for PingOne Authorize integration
Deploy the Amazon Web Services (AWS) integration kit as a Lambda@Edge function and configure it to integrate with PingOne Authorize and Amazon CloudFront.
Request flow
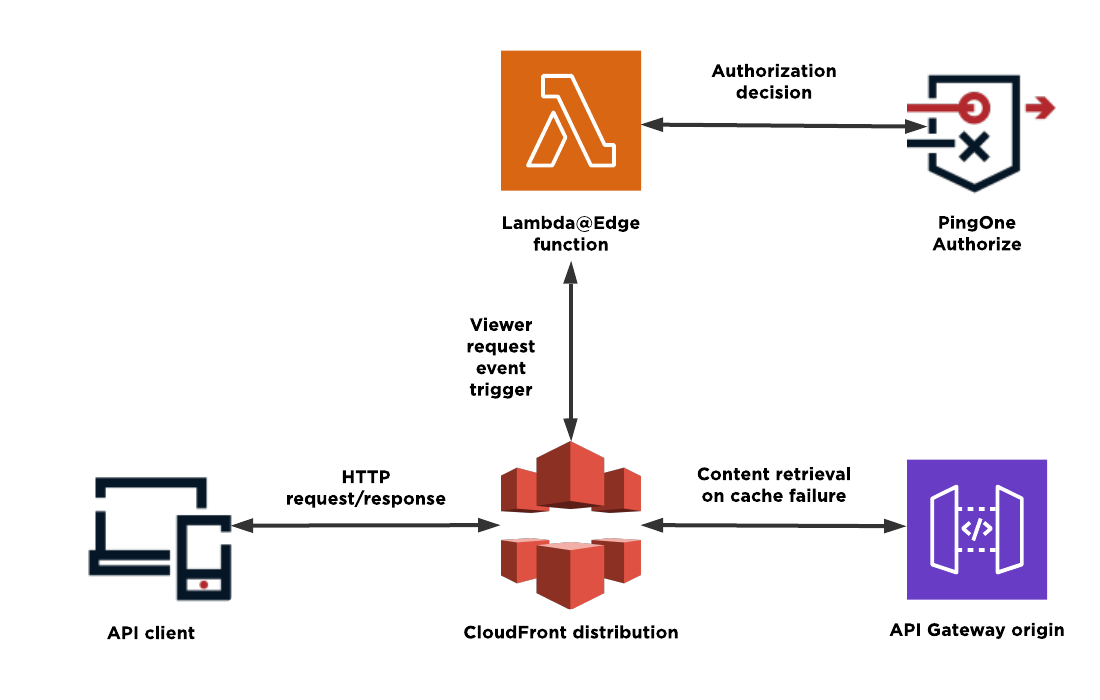
The following diagram and steps represent a typical request flow with CloudFront, a Lambda@Edge function, an API Gateway origin server, and PingOne Authorize:
-
The API client makes an HTTP request to the CloudFront distribution’s domain.
-
The request is routed to a CloudFront edge location.
-
The Lambda@Edge function is invoked at the viewer request stage and processes the API client request.
As part of this processing, the Lambda@Edge function calls PingOne Authorize for an authorization decision.
-
If authorized, the API client request proceeds to the next step.
-
If unauthorized, CloudFront sends a deny response to the API client, and the request terminates.
-
-
CloudFront forwards the request to the origin server.
-
The origin server processes the request and sends a response.
-
CloudFront decides whether to cache the response and sends the final response back to the API client.
Before you begin
To set up a CloudFront distribution and a Lambda@Edge function, you’ll need:
-
A comfortable level of knowledge of the following interfaces and technologies (or access to developers as necessary):
-
Sufficient permission to create, edit, and publish Lambda functions and CloudFront distributions.
-
Version 1.4.0 or later of the AWS integration kit downloadable
.ziparchive. Download the latest integration kit from the Ping Identity Integration Directory. -
An understanding of policy limitations.
Configuring an API Gateway origin
Create and configure an Amazon API Gateway to serve as the origin for CloudFront.
Steps
-
Create a backend REST API:
-
Open the AWS API Gateway console.
-
Click Create API.
-
In the REST API section, click Build.
-
In the API name field, enter a unique name for your API.

-
In the API endpoint type list, select an endpoint type for your API.
Learn more about the available endpoint types in API endpoint types for REST APIs in the Amazon API Gateway documentation.
-
Click Create API.
Result:
A page opens for your new API.
-
-
Create an API method:
-
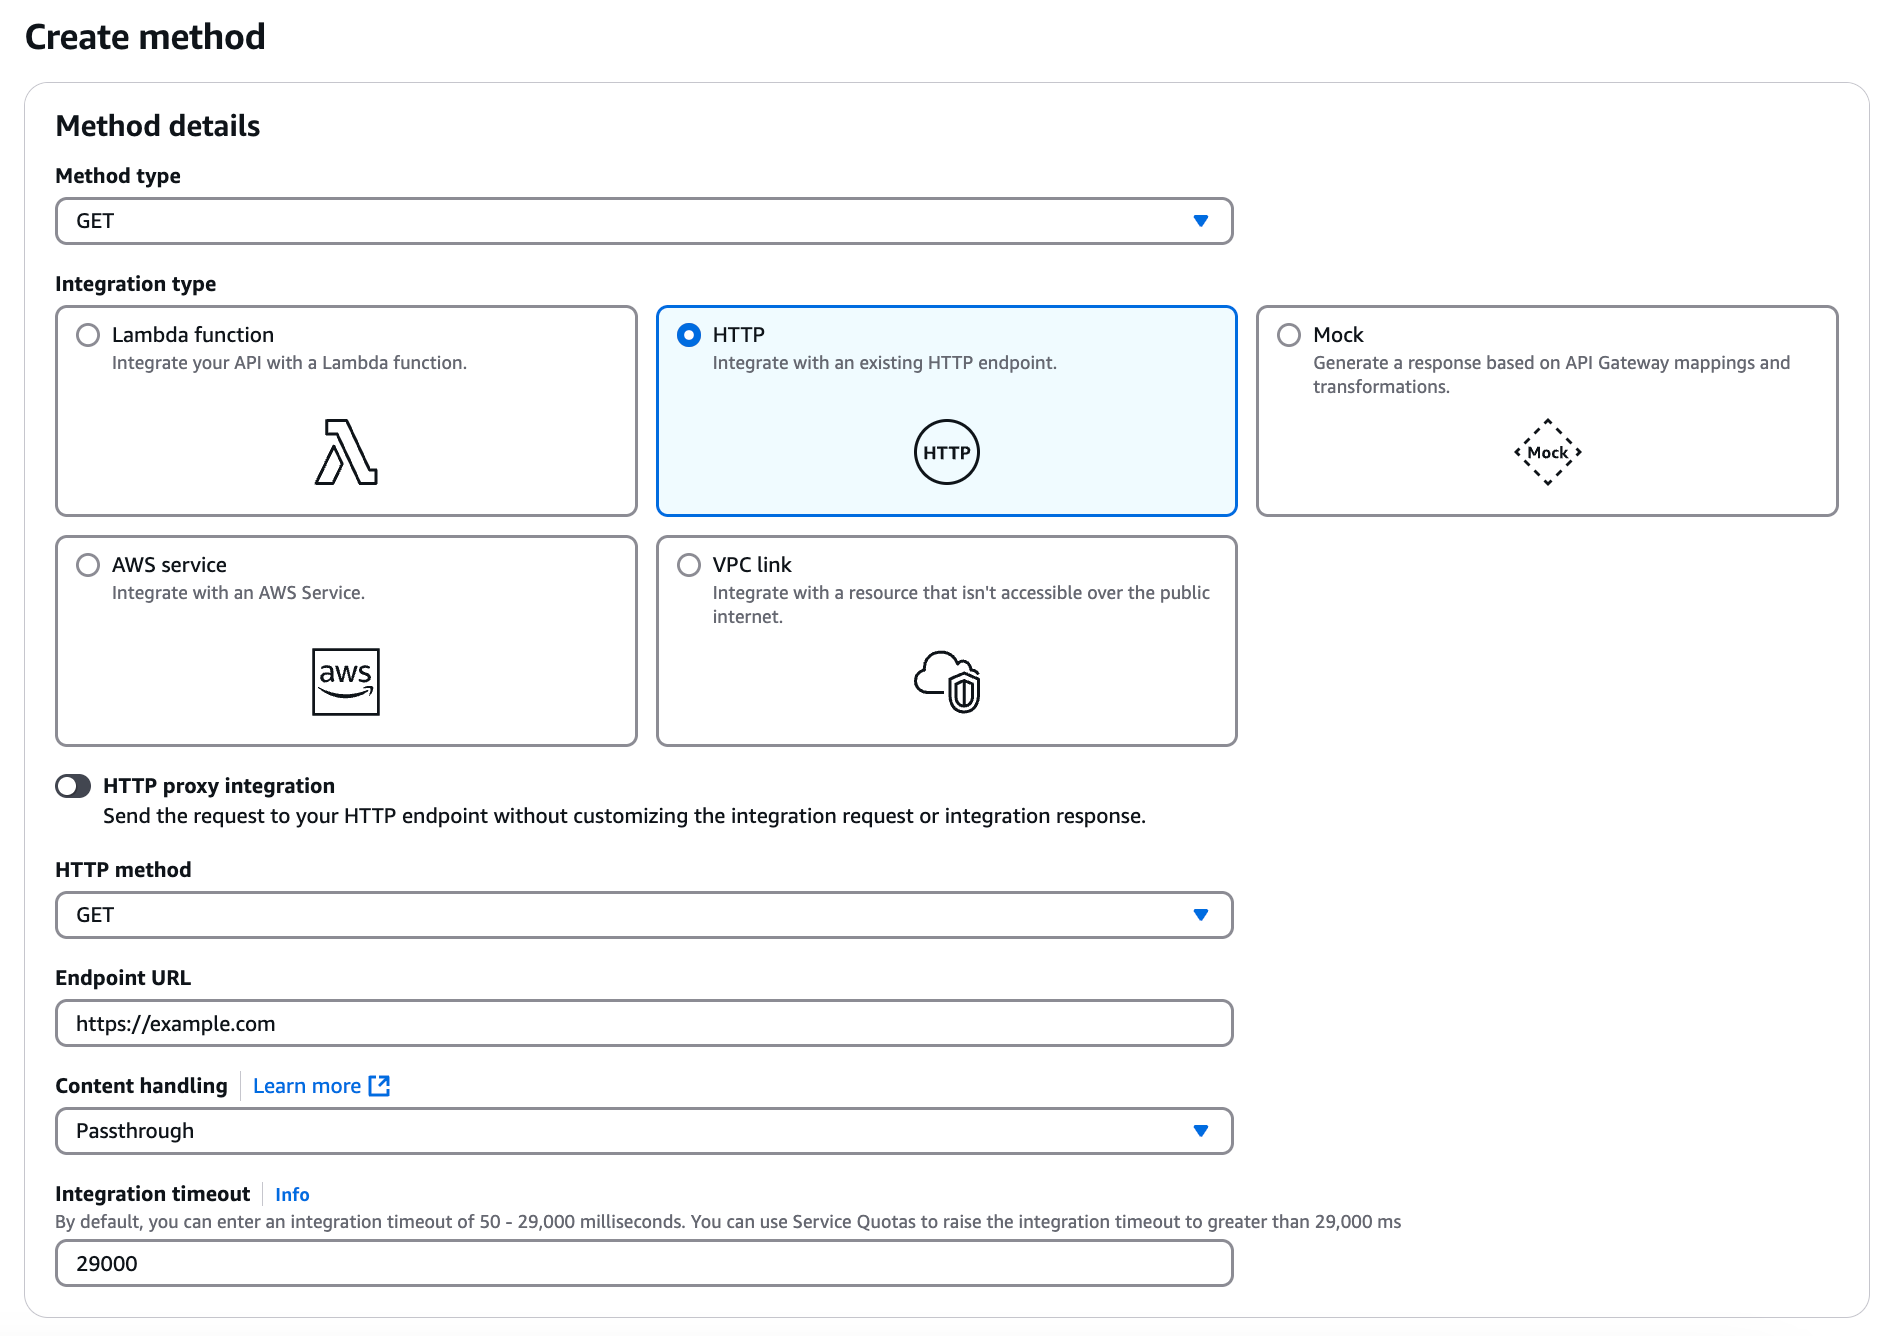
In the Methods section, click Create method.
-
In the Method type list, select an API method.
-
Under Integration type, click HTTP.
-
Configure the rest of the method to meet your business needs.
-
Click Create method.
Result:
The page for your API opens with the new method defined.
-
-
Deploy your REST API:
-
Click Deploy API.
-
In the Stage list, select a deployment stage.
-
(Optional) In the Deployment description field, enter a description.
-
Click Deploy.
-
-
Go to Stages and select the deployed stage.
-
In the Stage details section, copy the Invoke URL for later use.
Configuring a CloudFront distribution
Create and configure a CloudFront distribution to define the origin servers from which CloudFront retrieves your API resources.
Steps
-
Open the AWS CloudFront console.
-
Click Create distribution.
-
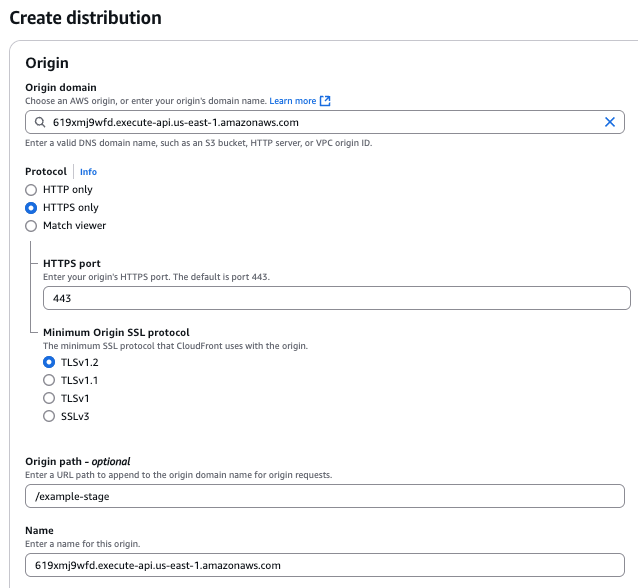
Configure the origin settings:
-
In the Origin domain field, paste the API invoke URL you copied earlier.
The Name field is automatically populated with the origin domain name, and the Origin path field is automatically populated with the stage path.
-
Under Protocol, click HTTPS only, and leave the default settings.
-
-
In the Default cache behavior section, configure caching to meet your business needs.
-
In the Web Application Firewall (WAF) section, click either Enable security protections or Do not enable security protections.
-
(Optional) To make it easier to find your CloudFront distribution later, add a Description.
-
(Optional) To enable CloudWatch logging for your CloudFront distribution, in the Standard logging section, click On, and then configure the settings to meet your business needs.
-
Click Create distribution.
It might take a few minutes to deploy the CloudFront distribution. You can check the deployment status in the Details section of the distribution, under Last modified.
Configuring a Lambda@Edge function
Create a Lambda@Edge function and associate it with a CloudFront distribution.
Learn more about Lambda@Edge functions in Customize at the edge with Lambda@Edge in the CloudFront documentation.
Steps
-
Create a Lambda function:
-
Open the AWS Lambda console.
Make sure you’re in the US East (N. Virginia) AWS region. You must be in this region to create Lambda@Edge functions.
-
Click Create function.
-
Click Author from scratch.
-
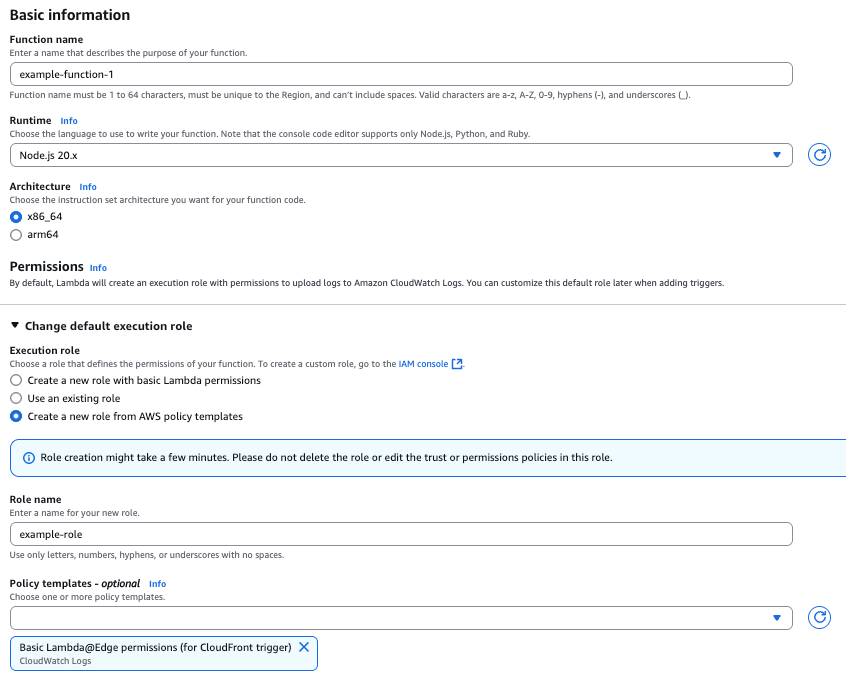
In the Basic information section, in the Function name field, enter a unique name for the Lambda function.
-
In the Runtime list, select Node.js 20.x.
-
In the Architecture section, click x86_64.
-
Click Change default execution role to expand execution role settings.
-
Under Execution role, click Create a new role from AWS policy templates.
-
In the Role name field, enter a unique name for the execution role.
-
In the Policy templates search bar, enter
CloudFrontto filter the search results, and then select Basic Lambda@Edge permissions (for CloudFront trigger).This policy template allows CloudFront to execute the Lambda function when a request matches the configured event trigger.
-
Click Create function.
Result:
A page opens for your new Lambda function.
-
-
Update the Lambda function source code:
-
Click the Code tab.
-
In the Code source section, in the Upload from list, select .zip file.
-
In the Upload a .zip file modal, click Upload, and then select the integration kit
.ziparchive in your local directory. -
Click Save.
Result:
The Lambda source code should have these files uploaded:
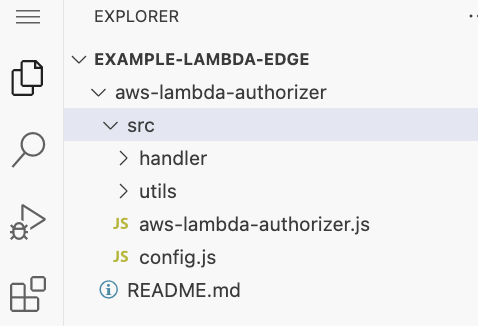
-
In the code source file explorer, expand the
srcfolder, and then open theconfig.jsfile. -
Update the following values:
-
SECRET_HEADER_VALUE: The gateway credential you saved in Setting up PingOne Authorize for Amazon Web Services integration. This value must be a string. -
SERVICE_URL: The service URL you saved in Setting up PingOne Authorize for Amazon Web Services integration. This value must be a string. -
IS_DEBUG_ENABLED: The value istrueorfalsedepending on whether debugging is needed. This value must be a Boolean, not a string. Set this value tofalsein production environments. -
MAX_RETRIES: Controls the number of connection retries that the integration kit performs when a PingOne Authorize request fails because of network errors or HTTP 5xx responses. The default is1.
Lambda@Edge doesn’t support the use of environment variables for setting these values.
-
-
Click Deploy.
-
-
Update the Lambda function handler:
-
Scroll down to the Runtime settings section and click Edit.
-
In the Handler field, replace the existing value with
aws-lambda-authorizer/src/aws-lambda-authorizer.handler.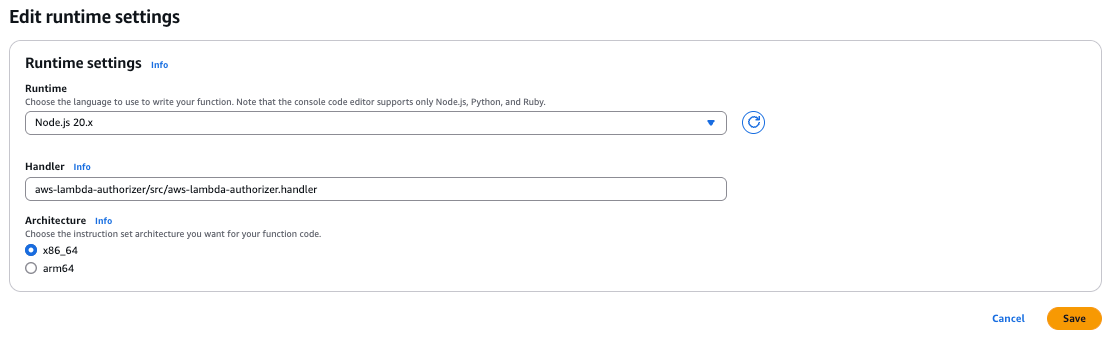
-
Click Save.
-
-
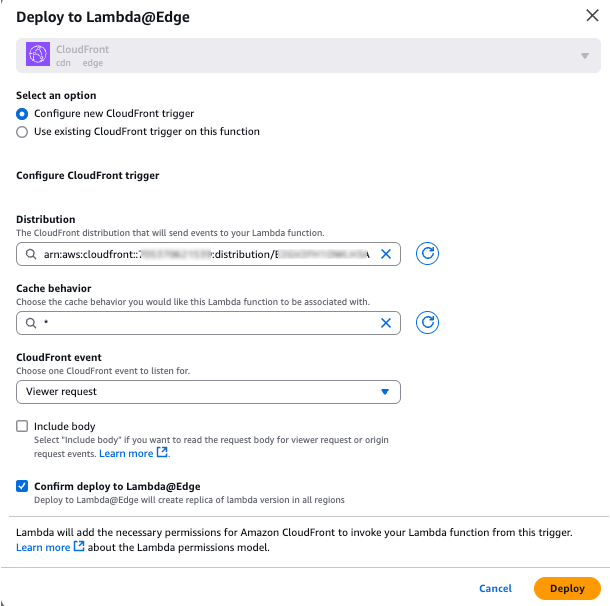
Deploy the Lambda function to Lambda@Edge:
-
In the Actions list, select Deploy to Lambda@Edge.
-
Click Configure new CloudFront trigger.
-
In the Distribution list, select your CloudFront distribution.
If you added a description to your CloudFront distribution, you can enter this description to filter the search results.
-
In the Cache behavior list, select a cache behavior.
-
In the CloudFront event list, select Viewer request.
-
Select the Confirm deploy to Lambda@Edge checkbox.
-
-
Click Deploy.
Result:
Your Lambda@Edge function will now trigger with each viewer request made to the CloudFront distribution.
Next steps
Define API services to represent your APIs so that PingOne Authorize can help CloudFront enforce access control. Learn more in Defining your API in PingOne Authorize
|
If you’re using CloudFront and Lambda@Edge to enforce access control, the API service definition must use PingOne SSO as the directory and token source. |
Troubleshooting
To track and debug issues related to your Lambda@Edge function and CloudFront distribution, you can configure Amazon CloudWatch logging. Learn more in Logging and monitoring in the CloudFront documentation.