Setting up IdP-initiated SSO
PingOne supports single sign-on (SSO) from an external SAML identity provider (IdP) to an application. If a user is already signed on with the IdP, they can access an application without having to sign on.
About this task
You’ll configure the application in PingOne, and then configure the IdP to reference the application for IdP-initiated SSO. For OpenID Connect (OIDC) applications, you must first complete the configuration steps in Configuring an OIDC application. For SAML applications, skip to Enabling IdP-initiated SSO.
You’ll need to configure the IdP to include the RelayState parameter with the target application ID when the IdP sends a SAML assertion to PingOne.
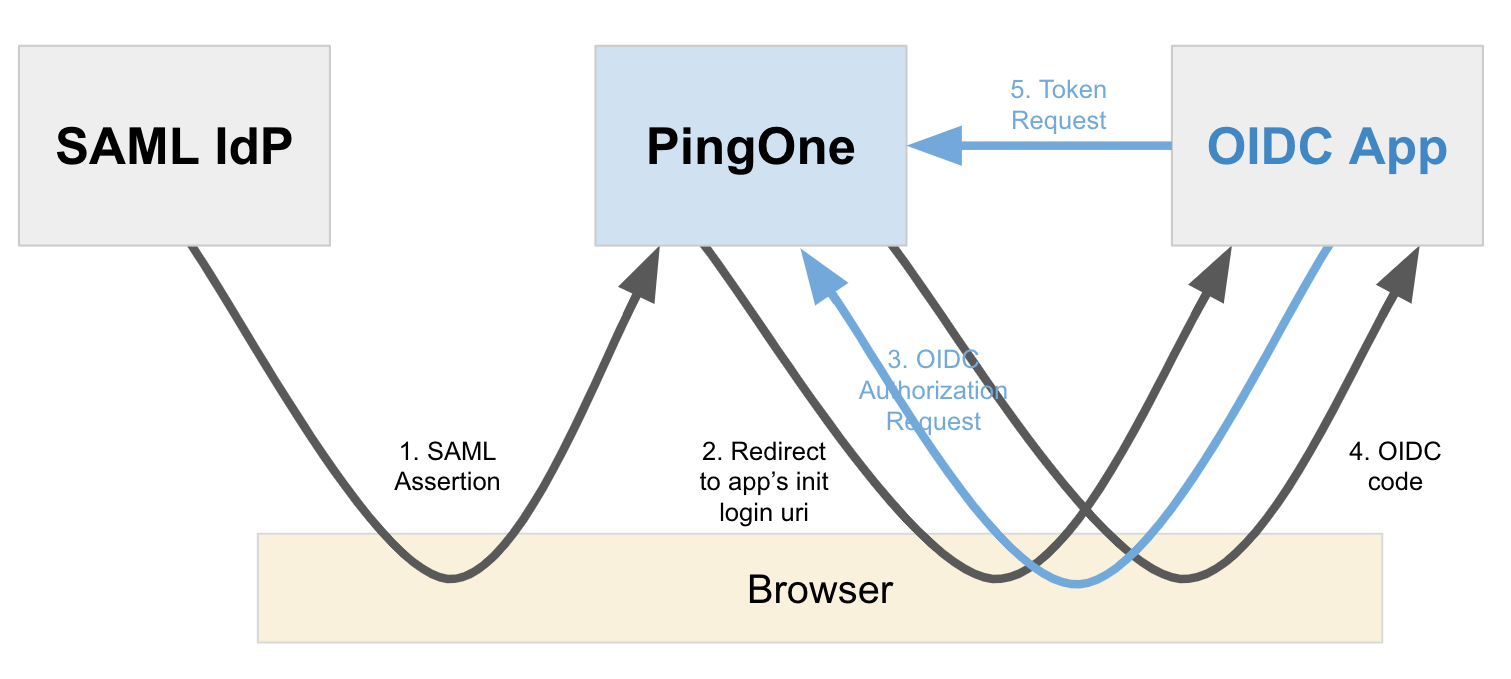
The following diagram shows the flow for an OIDC application:
Configuring an OIDC application
Add an Initiate Login URI in your OIDC application configuration. Learn more in Initiating Login from a Third Party.
Steps
-
In the PingOne admin console, go to Applications > Applications and browse or search for the OIDC application you want to edit.
-
Click the application entry to open the details panel.
-
On the Configuration tab, click the Pencil icon.
-
Enter the following:
-
Initiate Login URI: The URI to use for SSO to the application. PingOne redirects application users to this URI to initiate SSO to PingOne using OIDC. The
Initiate Login URIis required if you want the application to appear in the PingOne application portal. -
Target Link URI (optional): The URI for the application itself. PingOne redirects application users to this URI after the user is authenticated.
If you don’t specify a value for Target Link URI, you must include an
applicationUrlin theRelayStateduring IdP-initiated SSO to this application (see step 2 in Enabling IdP-initiated SSO).
-
-
Click Save.
-
Click the Profile tab.
-
Locate the Client ID and copy it to a secure location.
-
Click Save.
Enabling IdP-initiated SSO
In the external SAML IdP, enable IdP-initiated SSO. The specifics of the configuration vary depending on the IdP. Refer to the applicable IdP documentation for more information.
Before you begin
Make sure your application in PingOne has an authentication policy assigned that contains the external IdP initiating SSO. Learn more in Applying authentication policies to an application.
Steps
-
In the IdP, configure the
RelayStateparameter to contain theapplicationIdwhen the IdP sends an SAML assertion to PingOne.This is the Client ID copied from the application in PingOne.
For some applications, the
applicationIdis also known as the Client ID.Example:
applicationId=bda4e692-84c2-4f90-8835-d28da695c748
-
(Optional) Include
applicationUrlin theRelayState.Example:
applicationId=bda4e692-84c2-4f90-8835-d28da695c748&applicationUrl=https://myapp.com/overview
If the target application is an OIDC application without a
target_link_uriconfigured, include theapplicationUrlin theRelayState. TheapplicationUrlis used only whentarget_link_uriis not configured.The
RelayStateparameter should also be URL-encoded. The following are examples of the full parameter sent to PingOne:RelayState=applicationId%3Dbda4e692-84c2-4f90-8835-d28da695c748
RelayState=applicationId%3Dbda4e692-84c2-4f90-8835-d28da695c748%26applicationUrl%3Dhttps%3A%2F%2Fmyapp.com%2Foverview